
If you want to get the most from bodyweight training, you’ll definitely want some gymnastic rings.
What are the benefits of training with gymnastic rings?
They’ll give you a greater range of motion and strengthen your balance. The same exercises you do on the ground will be more challenging and more intense. Ever try a push-up on rings? It’s awesome, and it’s time to get started! This article teaches you the step-by-step process of making your own pair of affordable gymnastics rings so that you can start your training.
Buying fitness equipment from shops can prove to be pretty freakin’ expensive. You don’t need to pay big bucks to get it, though! I’ve made my own pull-up rings, and boy, was it a useful and exciting experiment. The end-product was great and well, it made me proud. It might take more time than buying it ready-made, but the effort was definitely worth it.
It might take more time than buying it ready-made, but the effort was definitely worth it.
The current guide is on how to build wooden gymnastic rings. In the past I did have a go at building one from PCV materials. You can see how it went here.
Here’s how it goes.
Choosing your rings’ measurements
You need to plan ahead on the size of your rings. Be accurate so that the end product is as close to perfect as you can make it. Knowing your rings’ dimensions ahead means anticipating the thickness of the wood you’ll need, as well as its size before being cut.
Material that you will need
This step-by-step will get your rings at minimum cost. No expensive tools are used the process, but you do need some basic material, such as:
- Any kind of wood (included salvaged from old furniture) that is:
- Triplex or multiplex wood
- Has a thickness around either 15mm or 30mm
- Board size is at least 30×30
- Wood glue
- Sanding paper
- Jigsaw
- Clamps (or heavy weights for the gluing process)
- Acryl-based lacquer
Step 1: Got wood?
If you’re using any random board that fits the requirements for this project, you’re going to need to cut it down to the usable parts. Saw them off and, if the board’s thickness is 15mm, saw it in half so that you can double back and get 28-30mm of thickness for your finished rings. If you need to do this, sand down a side of the board for the gluing process.
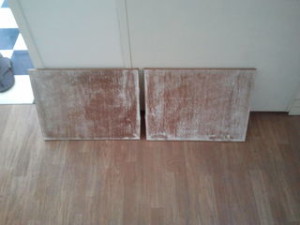
Step 1: sanded down board cut in half to get 28mm-30mm thickness
Step 2: Glue ‘em!
This step can be skipped if your board is already approx. 30mm-thick. If it isn’t, glue the sanded side of your boards together with some simple wood glue. If you have wood clamps, use them now to make sure the boards stay together until the glue has dried. You can also use some heavy weights for a similar effect. Let the glue set for approx. 24 hours.
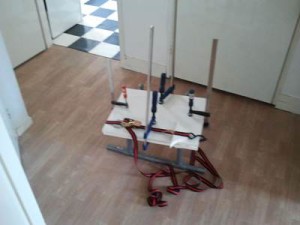
Step 2: use clamps or weights to keep the boards together until the glue sets
Step 3: Draw like an artist
Draw the inner and outer rings. You can also draw a ring in the center to help you guide the ring’s shaping in the next step. Use the jigsaw (power or manual) to first drill some holes outside of the ring’s drawing so that you can get the blade through.
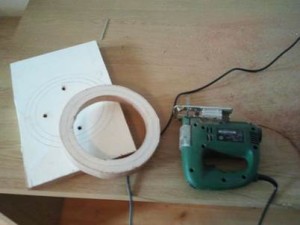
Step 3: drill holes outside of your ring’s drawings to get the jigsaw blade through
Step 4: Be patient, even artists do tedious stuff
Using wood files, start shaping your rings. Start with the rough and general shaping first, then move on to rounding it all out. You’re almost done, so don’t give up now!
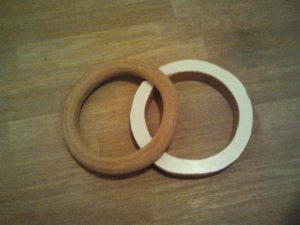
Step 4: be patient and you’ll see a beautiful finished product soon
Step 5: Make ‘em pretty and make ‘em long-lasting
If you want your rings to last for the next few years, apply a few layers of Acryl-based lacquer on them. Make sure they’re completely dry and the lacquer’s hard before starting to use them. You can choose to skip this step if you want, but I’d advise you to add some extra protection against the elements and sweaty hands.
Add some straps that hold your weight easily, and voilà! You’ve just made your own set of beautiful wooden gymnastic rings. Congrats for getting this far!
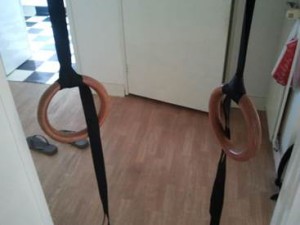
Step 5: time to start training!
Now that you have your homemade rings, check out our Guide to Using Gymnastics Rings and start with The Support to start training.
Have you made other calisthenics equipment on your own? Let us know in the comments.
Also join our Facebook Group to meet fellow athletes who just like you are on the journey to build insane strength, muscle mass, and skills with calisthenics
Source for pictures and content: Instructables


0 Comments