
Join the tribe of Movement & Calisthenics Athlete - people just like you that are working with their own body weight to get strength, lose fat build muscle, recover from injuries and live their best lives!
For those of you that were overwhelmingly inspired by my two previous article on Gymnastic Ring Grips and Exercises, here’s a third piece to help you get started. As gymnastic rings become a more popular mode of exercise, most gyms are beginning to add TRX straps and gymnastic rings to their equipment offerings. But for the frugal and antisocial, here’s a way to build your own set of gymnastic rings a home.
Rings
My preferred method of constructing gymnastic rings involves:
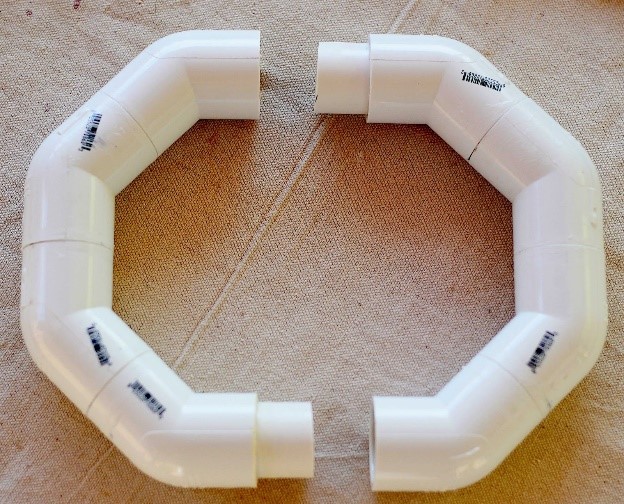
- PVC pipe, 0.5-inch. in diameter, cut into sixteen 2-inch pieces
- Sixteen 0.5-inch,45 degree Elbow Joints
- Duct tape
- PVC Cement
homemade gymnastic rings
First, connect the 2-inch. PVC pipe pieces with the 45 degree elbow joints using the PVC cement, and create two halves similar to the picture on the left.
Fill each half with sand and then combine them together using PVC cement. Then wrap duct tape around each of the 8 joint connections.
I recommend this method, particularly for beginners since the elbow joints provide clear placement for the three main hand grips, (neutral, false, and above-the-rings).
For those of you who would prefer circular rings, you’ll need:
- Two 1”X24” PVC pipe
- Duct tape
- Sand
- A gallon paint can
To start, cover one end of the PVC pipe with Duct tape and fill the pipe with sand. Once the pipe is full, cover the opposite end with duct tape and
repeat on the second PVC pipe.
Preheat your oven to 350 degrees, place one PVC pipe on a baking sheet, and cook for 10 minutes. Remove the PVC pipe, and immediately wrap it around a gallon paint can to shape it. Hold for a couple minutes and you’ll have your ring formed. Repeat for the second pipe.
Remove the duct tape from each end and drain the sand. (The sand was only used to prevent kinking when the pipe bends). To complete the rings, run a chain or rope through the hollow PVC pipe to connect with the ring straps.
Straps
Now that we have the rings, we need straps to hang them on. The length of the strap is determined by how high the mount is that you’re hanging the straps from. To play it safe, order straps that are longer than you think you’ll need. You can always shorten them with the cam buckle. Here’s an example of the type of strap that we’re looking for.
Mounting
Here’s the part where you get to be creative since mounting is based on what’s available to you. Garage rafters are the easiest set-up, just thread your straps through the rings and rafters to get going. But the most common set-up is usually inside a room or hallway of your house. For that, I recommend gymnastic ring hangers, which require a stud finder and drill. Or, if you’re feeling really hardcore, you can build your own outdoor ring set like this guy. An important rule of thumb when hanging rings is to leave a 20 inch separation between the rings when they’re hanging parallel. This will insure that you’re not over-extending your arms or core as you exercise.
For those who were insulted by my “frugal and antisocial” comment above, l was kidding. Homemade gymnastic rings are actually a great and affordable way to get in shape. The most common excuses people use to avoid exercise are time and money, and this nips both of those in the bud. Set them up in your living room and you can get jacked while watching “The Real Housewives of Orange County” and use the extra money to buy cool new workout clothes.
Feedback
As I mentioned before, I’m always looking to provide readers with the best advice possible. Your feedback in the comments below is a great way to continue the conversation.
How long did it take to construct your gymnastic ring set?
Were there any hacks you came up with to make this process even easier? Let me know in comments


This is awesome advice. Not that rings cost that much, but making them yourself brings out a little more pride in the project. Thanks for sharing this!
Ok, so it’s actually easier than I thought it is.
What the 45 degree/octagon rings DIY doesn’t mention is that the outside diameter is smaller than my balls. It’s like 5.75”. And if you’re stupid like me you don’t notice until after you spend some of your last money on it and then realize with straps you could have just bought adult sized rings online for less money.
I thank the author for taking time to write the article, I mean I didn’t do it. So thanks but some people are dumb as rocks and the diameter size would be nice to know.