Shoulder strength is a gateway to executing harder, mastery-level skills in calisthenics for shoulders
If you don’t take the time to train your shoulders specifically, you won’t be able to successfully make progress.
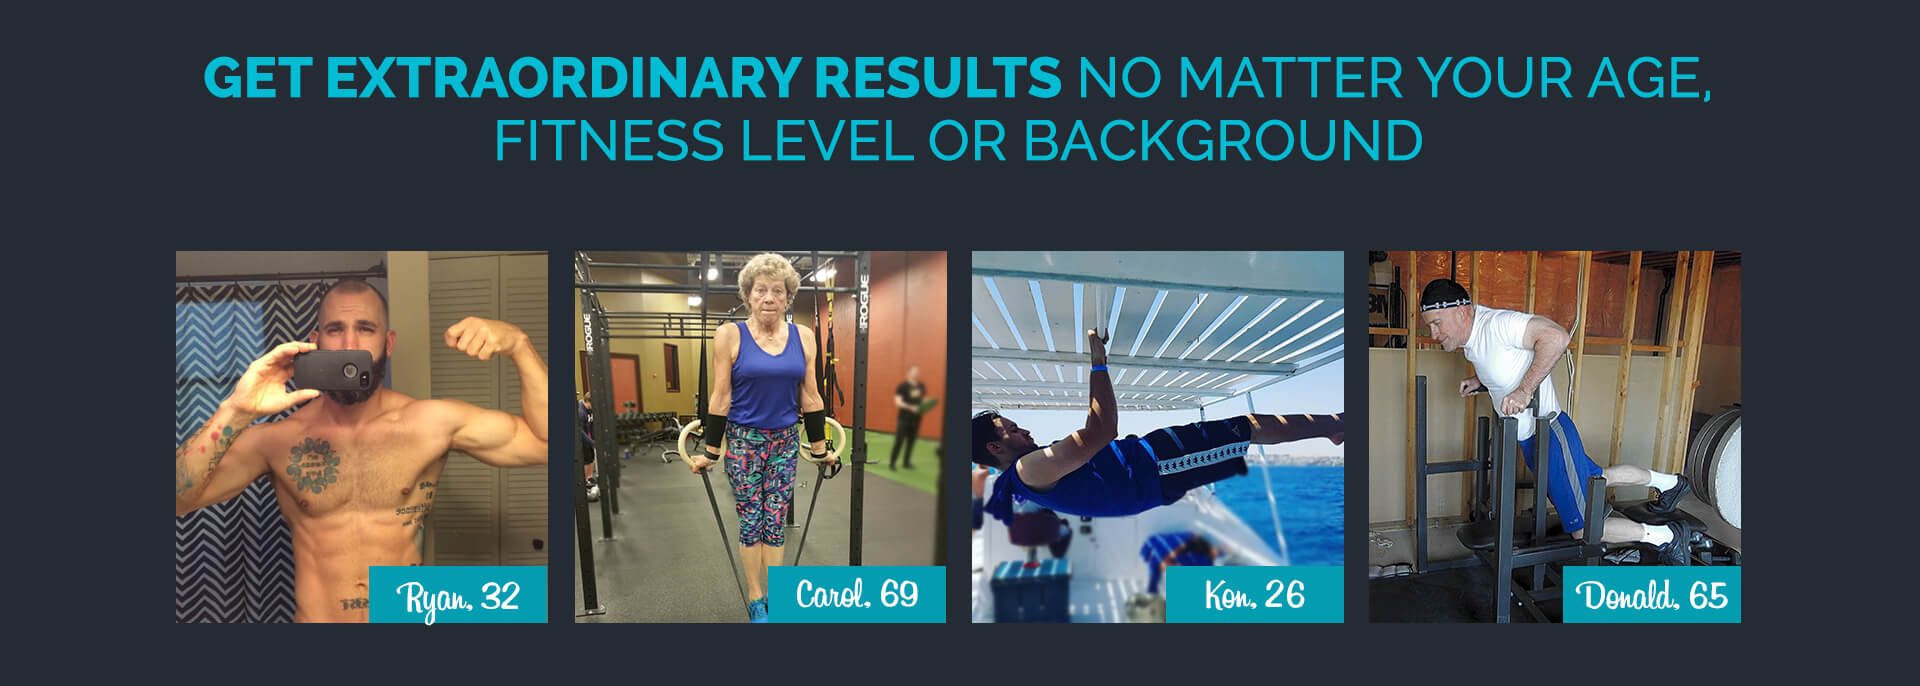
Whether you’re just getting started with bodyweight training, or are a seasoned gymnast, you’re probably looking for more (or better) ways to target your shoulders.
This is why I’ve compiled a list of exercises that focus specifically on the shoulders. They’ll help you develop strength, become more conscious of how important a body-part they are, and create more muscular definition while you’re at it.
These exercises are for ANYONE. Whether you’re a beginner or a world-class gymnast, they will benefit you. Shoulder strength is a gateway to executing harder, mastery-level skills in calisthenics.
If you don’t take the time to train your shoulders specifically, you won’t be able to successfully make progress.
Whether you’re just getting started with bodyweight training, or are a seasoned gymnast, you’re probably looking for more (or better) ways to target your shoulders.
This is why I’ve compiled a list of exercises that focus specifically on the shoulders. They’ll help you develop strength, become more conscious of how important a body-part they are, and create more muscular definition while you’re at it.
These exercises are for ANYONE. Whether you’re a beginner or a world-class gymnast, they will benefit you.
1. Warm-up shoulder calisthenics (don’t skip it!)
Warm-ups are just as important for beginners as it is for professionals. YOU NEED TO WARM-UP.
It doesn’t take much time at all, and doing it will help you avoid injury, help you reach your maximum range-of-motion and safely move on to the bulk of the exercises.
So don’t skip this section, and WARM-UP!
Joint Shoulder Calisthenics Warm-Up
2. Push-Ups
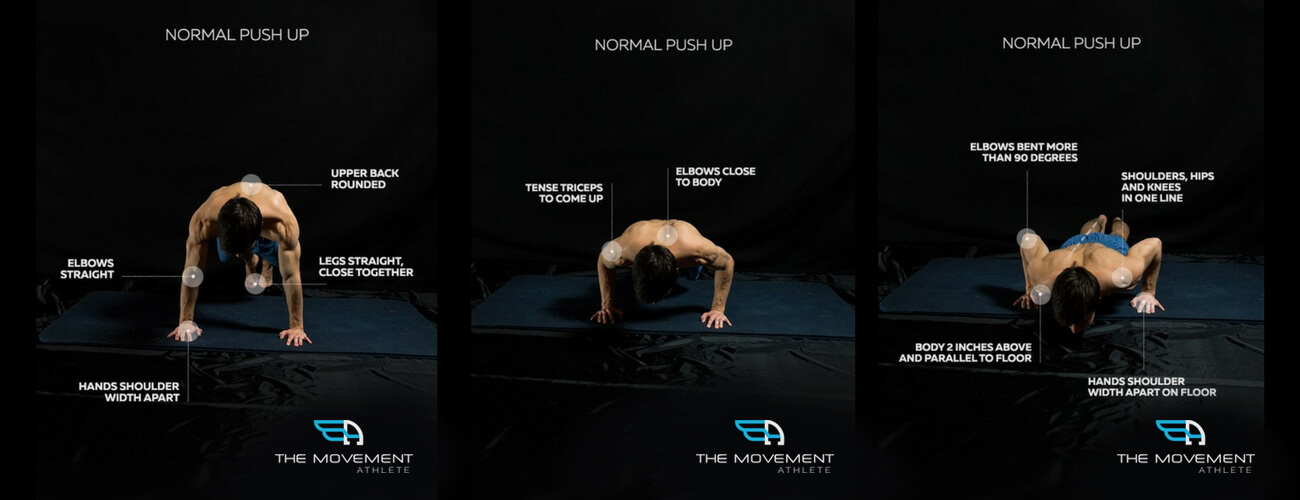
How to perform it
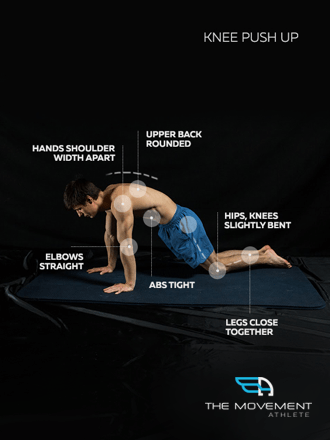
- To begin, you need to come on all fours or hands and knees position
- Make sure the hands are placed shoulder-width apart and the arms are straight.
- The upper back should be slightly rounded and the abs are tight
- The legs are bent slightly at the hips and knees with the knees and toes resting on the floor. The hips are slightly in front of the knees and not directly above it.
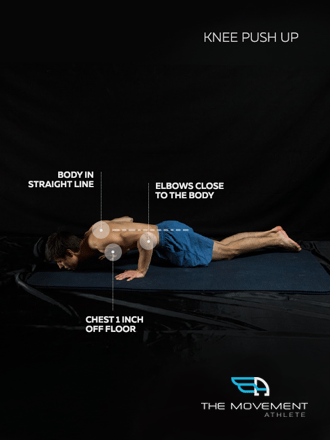
- Lower your body down by bending your elbows to more than 90 degrees till your upper body is around 1 inch above and parallel to the floor.
- The knees and toes rest on the floor throughout and the low back and abs should be tight.
- Come up by tensing the triceps and straightening the elbows.
3. Shoulder Vertical Pulses Thumbs Up
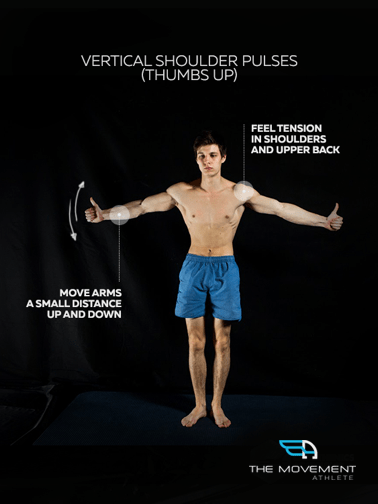
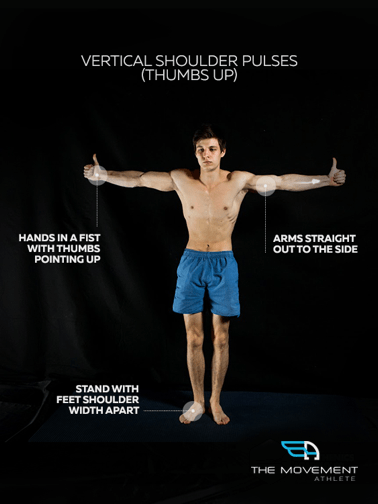
How to perform it
- Stand straight with your arms held wide open. Place your feet shoulder-width apart.
- Make a fist with the thumbs pointing up
- Now move your arms up and down through a small amplitude for a few time
Top Three Bodyweight Shoulder Exercises
For the overall top three movements, I’ve tried to include movements that can easily be altered or adapted to fit any experience level.
I’ve also included exercises that I’ve personally used with great results. These are my personal favorites:

HANDSTAND PUSH-UPS (ADVANCED)
Handstand Push-Ups are EASILY the most effective bodyweight shoulder movement there is. No other exercise comes close to simulating the same shoulder-pressing movement that builds strong shoulders.
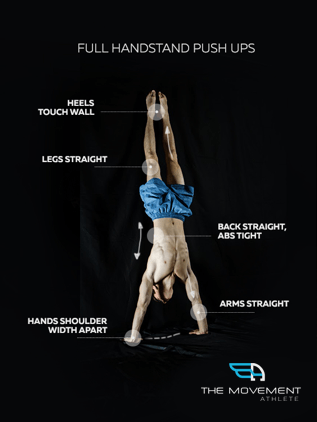
How to Perform
- To begin, you need to get in a handstand position close to a wall
- Place your palms more than shoulder-width apart and as near as possible to a wall.
- Stand on both your hands, with your legs straight up and shoulder-width apart, with the heels touching the wall behind
- Arms, back, and legs are straight and abs tight
- Lower your body towards the floor by bending the elbows till head touches the floor. Elbows move out
- Touch the floor and Push up by straightening the elbows
BE CAREFUL
- This position puts a lot of stress on the hands and the heart and may increase blood pressure.
- This routine is also strenuous for those having wrist or shoulder pain
- This routine is tremendously demanding on the body. Maintaining the body against gravity puts a lot of stress on the arms and of course the core and low back muscles. Moving the legs away from the wall involves a lot of balancing.

DECLINE PIKE PUSH UPS (INTERMEDIATE)
For those who are not yet able to get into the handstand position, or who can’t complete many (if any) Handstand Push-Ups, you can’t go wrong with Decline Pike Push-Ups.
Very similar to handstand push-ups, this exercise aims to simulate a shoulder press movement. Placing your feet up onto a bench or chair removes some of the weight from your arms. If you’re still starting out, this will make the training more approachable.
See the video below to get a better idea on how to properly execute this movement.
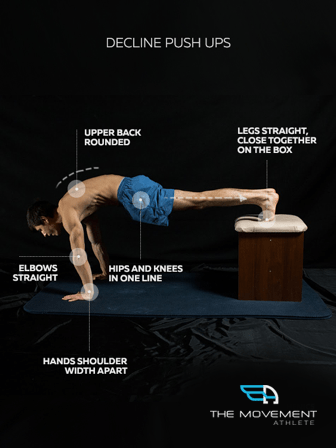
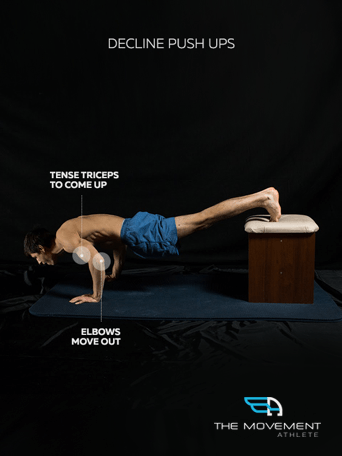
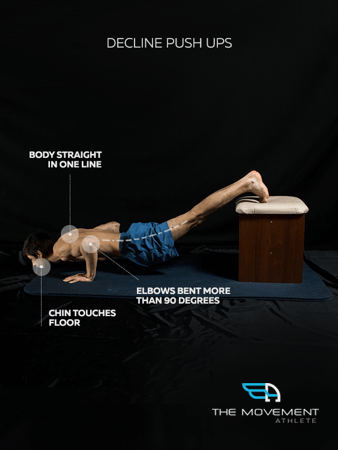
DECLINE PUSH UP (INTERMEDIATE)
Decline Push-Ups are the halfway point between regular Push-Ups (which work primarily the chest muscles) and Handstand Push-Ups (which work primarily the shoulder muscles).
Decline Push-Ups are an excellent bodyweight shoulder movement because even beginners can complete a fair amount of them.
Beginner Shoulder Exercises
Do the first exercises look too difficult for you?
Don’t worry!
Here are some awesome beginner’s exercises that will get you to a handstand and handstand push-ups in no time.
1. YTWL’S
Here is an exercise that ANYONE can do to build shoulder strength.
YTWL’s are done by lying face down on the ground or bending your upper body forward at a 90-degree angle and then repeatedly making the letters Y-T-W-L with your arms.
The most typical way to do them is to repeat each letter before moving on to the next one: 10 Ys, 10 Ts, 10 Ws, 10 Ls, then rest and repeat. Just make sure to alternate Ls to train each side of your body (see the video for details).
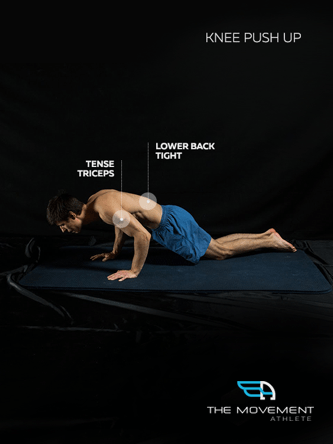
2. Modified Knee Push-Ups
Another excellent way to build yourself up to doing Push-Ups & Handstand Push-Ups is to do Modified Push-Ups.
These are essentially the same as doing a regular Push-Up, but instead of having your feet on the ground, you’re using your knees. This effectively decreases some of the weight you will be “pushing” up, making the movement slightly easier.
As with normal Push-Ups you want to be sure to keep your abs & glutes tight as a drum so that you are sure to protect your lower back against injury.
3. Push-Up Plank
Finally, an amazing exercise to strengthen the stabilizing muscles in the shoulder is the Push-Up Plank.
This is a continuous flow movement; instead of resting on your forearms like you would in a traditional plank, you will simply hold yourself in the top or extended position of the Push-Up for as long as possible.
Strengthening the stabilizer muscles in the shoulder will work you up to being able to perform normal Push-Ups and Handstand Push-Ups.
Make sure that you stop the Push-Up Plank as soon as you feel your hips/lower back start to sag. Your back will thank me later!
Advanced Shoulder Exercises
Maybe you’re bored doing Handstand Push-Ups, or maybe you’re just looking to continue to challenge yourself with bodyweight movements.
Whatever your motivation may be, the advanced exercises below are a good place to start. If you can master these, then pat yourself on the back! you’re well on your way to becoming a bodyweight beast.
I’ve also included exercises that I’ve personally used with great results. These are my personal favorites:
TRX OR RING HANDSTAND PUSH-UP
These are exactly the same as Handstand Push-Ups, but instead of using a wall for support, you place your feet carefully into TRX straps or gymnastics rings so that you are more freestanding making the Push-Up much harder.
This basically adds another degree of freedom to your torso, which adds another level of difficulty to the exercise.
Bonus Challenge: For an extremely advanced movement, try freestanding Handstand Push-Ups with no support.

SUPPORTED ONE ARM HANDSTAND
Please note, this is an extremely difficult movement that will take a lot of time and practice to master. Take extra caution to avoid injury, and don’t get discouraged if you can’t successfully do the exercise at first.
To perform a Supported One-Arm Handstand, line yourself up to a wall in the same way you would for a Handstand Push-U. On one side of you, place a bench or a chair for the “off” hand to rest while you perform the One-Arm Handstand.
Raise yourself into a two-arm handstand. Once you’re in place and are firmly positioned, simply take one hand off the ground and place it on the bench/chair for support. Hold yourself in this position for as long as possible, and then switch hands.
ONE ARM PUSH-UP
This is the ultimate beast move!
To perform a One-Arm Push-Up spread your feet as far apart as possible, giving yourself a wide base. Assume the top, or extended position of a Push-Up stance with both arms extended to prepare yourself.
When you’re ready, remove one hand from the ground and place it behind your back, near the base of the spine. Lower yourself slowly using the working hand and push yourself back up.
If you find your lower back arching too much, or if you’re unable to do many reps (if any), simply work up to the movement by doing the “modified” version where your knees are on the ground instead of your feet.
So now you know calisthenics exercises for Iron Shoulders! It’s time to go workout. So what are you waiting for? Go!
Click Here for Iron Shoulders Calisthenics Workout! »
Go Back to All Calisthenics Exercises Here!

But what if I can’t do some of these exercises?
Create an optimal training routine just for you
This is a problem a lot of us run into. We’re given routines – usually based on a standardized level – beginner, intermediate, advanced. The Movement Athlete Academy used to do that too – because it’s very hard to create a personalized training for each and every person unless we spend a significant amount of time with them.
There was just one problem with this approach (actually there are a lot of problems with it) – it hindered our athletes’ progress. We’ve written extensively on the matter in the blog post, The end of beginner/intermediate/advanced – that is hurting your training.
It simply explains why a lack of personalization is hurting your training.
Imagine if some of these exercises above were too hard for you. Your body will try to compensate for poor form, movement dysfunction and possibly risk injury if it’s too challenging.
If some of these exercises were too easy they wouldn’t challenge your muscles to grow – you’d simply be wasting your time.
This is why we created The Movement Athlete Academy: to offer a fully personalized training program reflecting exactly where your level is for optimal performance.
Take the assessment to see how do you stack up on 8 fundamental calisthenics moves
Share the results and comments in our Facebook Group
READY TO GET ON THE JOURNEY OF A LIFETIME?
See what our users are saying:
“Would you rather have the ability to boast of bench pressing 300 pounds or to do a one-arm pull-up? To me, pulling my entire body up with one arm is much more impressive. – Michael – The Movement Athlete Academy User”
“The Movement Athlete Academy is not the kind of program that demands you to be this physically fit to be able to perform. Instead, it caters to your own strengths and capabilities and keeps track of your progress.”
“Stick with it! It is hard at first, especially if you are stuck on a lower-level, high rep exercise. But persevering is worth it! Finally reaching each goal is so exciting.”