The back bridge progression is an excellent way to achieve a stronger back and increase overall fitness. This exercise can be performed by people of all ages and fitness levels, and it is a great way to improve posture and core stability.
In this article, we will discuss the different steps of the back bridge progression and how to perform them correctly. We will also provide tips for increasing your strength and flexibility so that you can progress through the exercises more easily.
We’re going to cover these following topics:👇
- 🔥 What is the back bridge
- 🔥 Benefits of training the exercise
- 🔥 Safety precautions
- 🔥 Back Bridge progressions
- 🔥 Sample workout and warm-up
- 🔥 & Frequently Asked Questions
This is one of the most dynamic bodyweight progressions. It focuses on flexibility and strength through a wide range of motion of your body. It also stimulates your core, back, and arm muscles. This exercise has too many benefits not to try out. You’ve got to try it out.
Let’s get started!
✨What Is Back Bridge
The back bridge is a very underrated exercise commonly associated with yoga, gymnastics, and kids with very high flexibility. It is, however, a great exercise for people of all ages and levels of fitness. The back bridge can help improve posture, increase flexibility and mobility in the spine and shoulders, as well as strengthen the muscles in the back. It is also a great way to activate your core muscles and improve stability. This move has actually a ton of variations that comes from many disciplines such as martial arts and acrobatics. Working on this exercise isn’t only discipline-specific but can also improve everyday life.
🎯Flexibility vs Mobility
The full back bridge exemplifies good flexibility and mobility. Yes, we have two mentioned both terms since their are not technically the same. While similar, there is a key difference:
👉 Flexibility – Passive range of motion. This is the stretch you get with assistance from external factors such as a wall, your arms, or weights. In back bridge, think of pushing against the floor to help you open up your shoulders.
👉 Mobility – Active range of motion. This is moving with control using your muscles on your own. In back bridge, this is being able to extend your spine on your own demonstrating strength.
Read more about that topic here: 📍 Flexibility vs Mobility: What is the difference?
💯 Benefits of Back Bridge
The back bridge is a great way to improve posture and increase flexibility and mobility in the spine. It can also help strengthen the muscles in the back or the posterior chain. In addition, the back bridge is a great way to activate your core muscles and improve stability. Here are some of the many benefits of back bridges:
- ☝️ Improve posture
- ☝️ Increase full-body mobility
- ☝️ Strengthens the posterior chain of your back, shoulders
- ☝️ Addresses common weaknesses such as the lower back
- ☝️ Translates to other calisthenics skills that require mobility such as better shoulder overhead extension for handstands
- ☝️ Decreases risk of injuries
- ☝️ Targets your spine, shoulders, and hips
- ☝️ Improves quality of life through real-world strength
✊Safety Precautions
Before beginning the back bridge progression, it is important to take some safety precautions. First, make sure that you have a mat or something soft to lie on. This will help protect your back and spine from injury.
Second, it is important to warm up before you start the exercises. You can do this by performing some light cardio to get the blood flowing and movements specific to the targeted muscles and joints that we’re going to cover below.
If you’re interested in the topic of warm-ups, check his article: 📍The Ultimate Guide to Calisthenics Warm-up
Third, you have to progress gradually learning the exercise and addressing weaknesses to avoid any injuries.
Lastly, if you have any underlying injuries and pains, better check with your local healthcare specalist first to get a better assessment of your current condition before attempting the back bridge training.
🤜Back Bridge Requirements
The end progression of the back bridge exercise isn’t for beginners. While its looks straight forward, it demands a high level of strength and mobility not only from the lower back but from the whole body.
We listed the requirements you need to perform for each body part that contribute to the exercise execution.
🎯Wrist:
The wrists should be able to hold your weight while in 90° passive wrist extension. While this sounds easy since the wrist position looks like you’re holding a push-up position, the full back bridge should bear more weight on your wrist with the forward lean.
Joint preparations and rotations are necessary before training for the back bridge. If your wrists are painful or tight, you can work around this by placing your hands on blocks to lessen the degree of extension.
Keep in mind that the pain we’re talking about shouldn’t be too debilitating. You don’t want to train through pain.
🎯Elbow:
Your elbows should be locked out straight and in full extension. Elbow pits rotated inwards for additional stability for your shoulders. The back bridge is basically a straight-arm full work. If you can’t hold the current progression with lockout arms, regress to an easier exercise.
🎯Neck:
The neck is an underrated muscle that you might not notice that you’re working on when training for the back bridge. Start the neck in an extended position then gradually flex as you gain more mobility.
There are three neck positions to choose from. You can have it extended looking to your hands. You can look straight to the horizon, or you can also tuck your chin for more challenge.
🎯Shoulder:
One of the most valuable gains you can get from back bridge is the opening of your shoulders. In the exercise, you need to perform a shoulder flexion by raising your arms overhead.
Scapulas are elevated. They are shrugged up pushing down to the ground. While in the elevated position you also need to retract them and internally rotate the shoulders for maximum stability. This is done by squeezing your shoulder blades together and twisting the shoulder joints inwards.
🎯Spine:
Another high-value gain is on your spine. The back bridge demands improvement in the extension mobility of your thoracic spine. The better your thoracic extension, the easier the exercise gets.
But that doesn’t mean you only have to focus on the extension component. Training your thoracic rotation and lateral flexion massively improves your spine extension for optimal progress towards the back bridge.
🎯Hip:
Along with thoracic extension comes in the hip extension. Developing good range of motion and strength in your hip extension allows you bend backward with ease.
Muscles 💪 used in Back Bridge:
👊Shoulder flexion
While shoulders obviously play the major role in moving the arms overhead. The lats and triceps also help facilitate the movement which is why stretching these two muscles also improve shoulder flexion.
👊Internal and external flexion
The anterior and posterior rotator cuff muscles move with internal and external rotation respectively. These muscles stabilizes the shoulder joints during this weight-bearing exercise.
👊Spinal extension
In order to perform end-range extensions of the back bridge properly, spinal erectors and posterior chain muscles needs to demonstrate strength and control.
👊Hip extension
The lower body, specifically the rectus femoris and iliopsoas muscles are stretched during hip extension. Strengthening and mobilizing these areas help better improve the back bridge.
👊Core stabilization
Your ab muscles should be strong and flexible enough to stabilize the while body when moving into the position. In terms of core, we’re not just talking about the abs, but the whole planes of the core including the lower back and the obliques.
💥The Back Bridge Progression
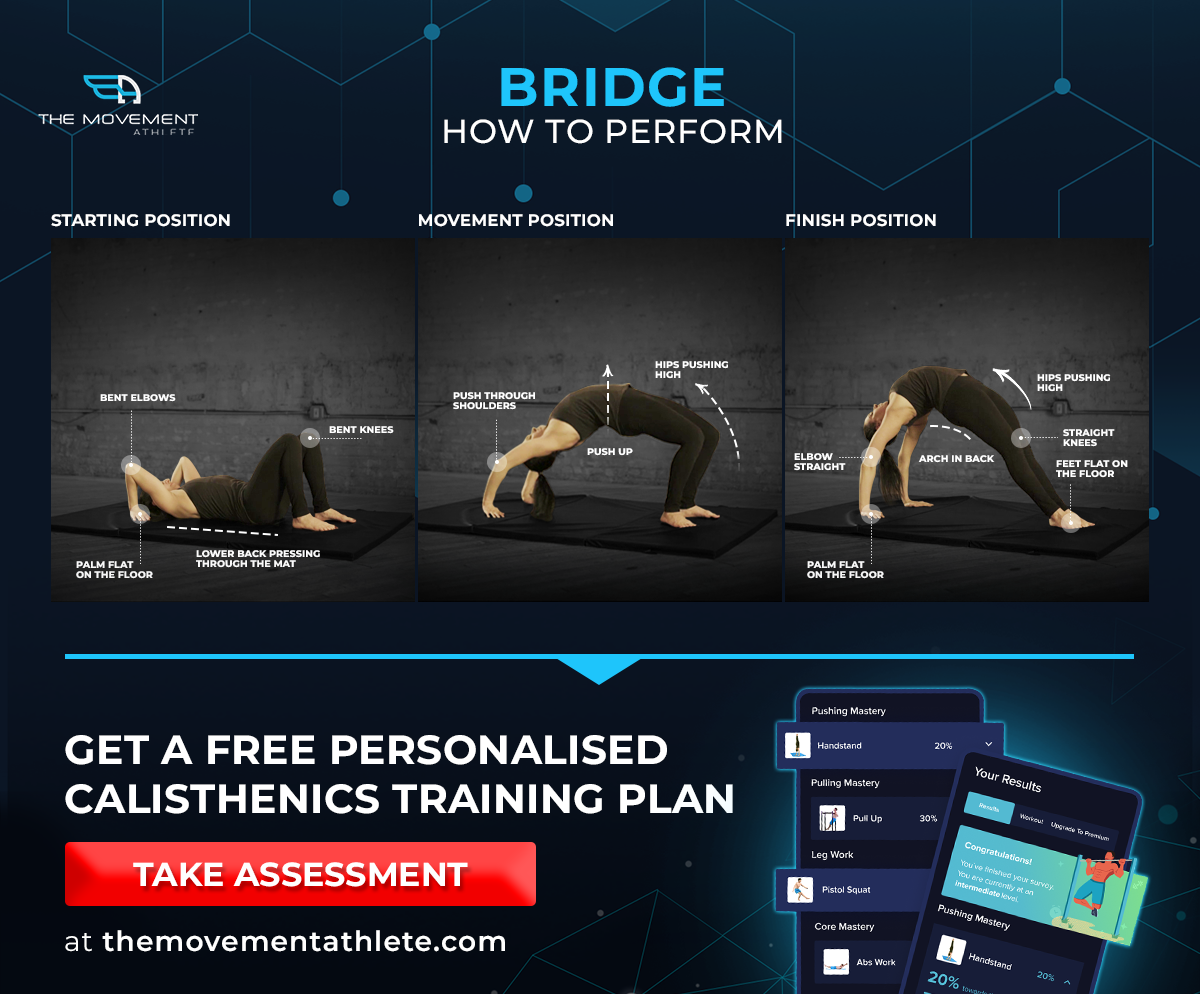
The following images for bridges give a visualization of how each step looks. We will guide you through each step on your way to displaying insane flexibility and bodily endurance.
Please note that it is important to warm up your body, including your fingers and wrists, by rotating them at the joints before each exercise. This will allow maximum flexibility and will prevent you from sustaining injury throughout this progression.

⚡️Bridges Progression Exercises List
The best approach to make progress is implementing progressive calisthenics. This means following a set of exercises that gradually leads to the specific goal; in our case, the full-back bridge.
Following progressive calisthenics is a combination of performing suitable progression to your current skill level and adjusting other parameters like reps and sets, and adding accessory exercises to fix specific weak links.
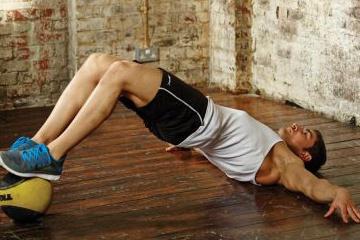
🎯Step 1: Short Bridges

Start by lying on your back with your palms on the ground by your side and knees together bent at a 45 degree angle. Focus on driving your torso off the floor using your core and leg muscles so that your body is perfectly straight at almost a 30 degree angle to the floor while balancing on your shoulders and feet. Maintain control on the way down to give muscular contraction in the full range of motion.
🎯Step 2: Straight Bridges
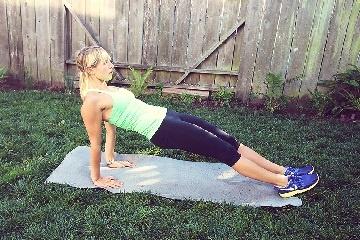
Image source: pittsburgh-personaltrainer.com/30-minute-july-4th-workout/
Start by sitting upright with your legs straight out together. Put your palms on the floor and again focus on using your core muscles to drive your body to a roughly 30 degree angle to the floor. Hold still before controlling the movement back down.
🎯Step 3: Angled Bridges
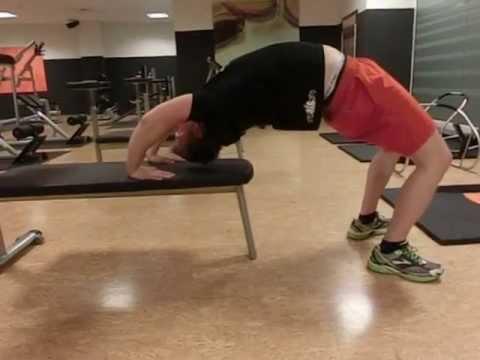
Image source: https://www.youtube.com/watch?v=RJtKQ_9ZQD0
Use a raised table or similar object for this exercise. Place your feet on the floor and stretch your back until your head and hands are balancing on the table. Each repetition involves pushing up with your arms and going onto the balls of your feet to bring your head slightly off the table and then controlling on the way down.
🎯Step 4: Head Bridges
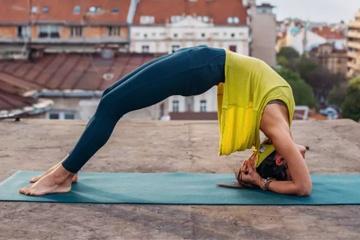
Image source: mindbodygreen.com/0-17705/5-reasons-to-do-bridges-every-day.html
This exercise is a bit more challenging than the previous one. Replicate the same starting position, but this time put your head and hands on the floor at the same level as your feet. Use your arms and extend onto the balls of your feet to lift your head off the floor and slowly control back down.
🎯Step 5: Half Bridges
This exercise requires an exercise ball. Balance on your feet and hands and place the small of your back on the exercise ball. Focus on using your core muscles and arms to drive your back off the exercise ball while raising onto the balls of your feet and control back down. This exercise is great preparation for the next phases of the progression.
🎯Step 6: Full Bridges
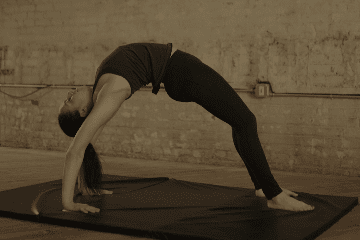
Start by lying on the ground with your feet planted and your palms placed just above your shoulders. Focus on using all the muscles in your body to drive your torso up in the air until your back is arched and your are balancing on your palms and the balls of your feet. Hold this position before controlling on the way back down.
🎯Step 7: Wall Walking Down
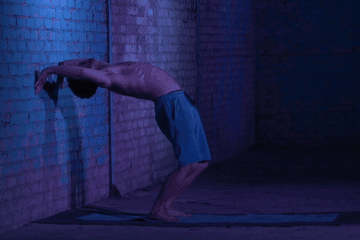
Stand upright with your back facing a wall. Estimate the distance from the wall to allow you to adopt a bridge position at the foot of it. When standing up, try to lean back and put your palms on the wall, then proceed to slowly “walk” down the wall with your hands until you are in the bridge position on the floor. Do not “walk” back up the wall just yet, as this is the next exercise. Instead, lie back on the floor and safely go back up to the upright starting position again.
🎯Step 8: Wall Walking Up
This time start he bridge position with your head just at the foot of the wall. Begin to move your hands onto the wall and slowly walk up the wall until you’re into an upright standing position. This will be more difficult than the previous exercise as your body is straining against gravity.
🎯Step 9: Closing Bridges
Start in an upright position and begin to lean back and bend your legs slowly. Do this until you can no longer stay on your feet and extend your arms onto the floor landing in the bridge position. Use all of your muscles to drive your body back up to starting position. This exercise is preparation for you to be able to perform the final step of the progression safely.
🎯Step 10: Stand-to-Stand Bridges

Stand in an upright position, and in one completely fluid move, bend back and land with your palms on the floor so that you are in the bridge position. Use all the muscles in your body to drive back up to standing position. If you’ve completed this progression, you have great physical strength and perfect body control and flexibility.
⚡️Back Bridge Workout
Perform the workout for 2 – 3 days per week
Shoulder back lift (Arms by ears) 3 sets of 6-10 reps
120 seconds rest
Wall Shoulder Stretch 3 sets of 30 seconds
90 seconds rest
Weighted hip thrusts 3 sets of 8-12 reps
90 seconds rest
Back bridge progression 4 sets of 20 – 45 seconds
3 minute rest
Specific warm-up
Wrist rotations 20 reps
Shoulder rotations 20 reps
Cat camel 5 reps
Cobra stretch 5 reps
🧐Frequently Asked Questions:
🔎Can I train back bridge together with strength workout?
Mobility work can also be demanding if you put direct focus on it. It can also be intense. If so, then combining back bridge training with strength exercises in a single workout could be too much.
HOWEVER, if you have a lighter strength load, then doing your back bridge before your strength training can be implemented.
We recommend training for strength and back bridge on separate workout sessions to get better results. This minimizes results and allows for maximum recovery. Training frequency and structure matters.
🔎How often should I train for mobility?
Depending on the intensity, you can work on mobility every day. But if your main goal is the back bridge, then working on 2 – 3 days per week on specific work.
If you need more help on training frequency, read here: Can I train calisthenics everyday?
🔎Can I train back bridge after a back injury?
This is highly situational and depends on a case-to-case basis. If you have any previous injuries, always be sure to consult with your healthcare specialist in person to get an accurate assesment and diagnosis of your situation.
Once you get the go signal, you are good to go. Train smartly.
🔎What if you’re experiencing any pains?
Aches and pains are commonly a sign that there’s a dysfunction in your body. There could be possible weaknesses that’s affecting your movement so your body tells you that you need to fix that certain area.
If you’re feeling pains, then you can consult a specialist. You don’t necessarily have to get a complete rest. but movement can help you fix the issue. Again, move carefully. Any pain that’s too much should be consulted.
Read here for more information: How to Treat Injuries with Calisthenics
🔎What are the knee and feet positions?
Generally, you would want your feet and knees pointing forward. If your knees or feet are pointing at an angle, there’s no problem. Each body is different and could prefer a specific position. You don’t have to force your limbs into certain positions if it’s not going to negatively impact the movement or your put unnecessarily loading unto your body.
🔎How do I address weak links?
Because of the complexity in such a seemingly simple move, one weakness in a specific body part can potentially hinder progress in your quest for the full back bridge. So, you need to specifically address weak links to maximize your progress.
This means, aside from performing the back bridge that suits your skill, you need to add accessory exercises that can fix your issue. The back bridge is a compound move that can be technically demanding. But that’s just part of the fun!
📌Takeaway
The back bridge progression is a great way to improve your overall fitness and strength. It is important to consult with a healthcare specialist before starting any new workout routine, especially if you have any previous injuries. Be sure to warm up properly before beginning the exercises and focus on your form to get the most out of the workout.
If you are feeling any pain, stop the exercise and consult with a specialist. With proper form and technique, you can achieve a strong back and overall increased fitness.
Did you find this article helpful? Leave a comment below and let us know what you think! And be sure to check out our other articles on calisthenics and workout tips.
Train smart!💪