Welcome to our One Arm Push-Up Progression Guide!
Before we dive into the exciting world of mastering the one arm push-up, I want to share a crucial insight gleaned from years of coaching experience.
In our work with countless individuals, one common mistake we’ve noticed is rushing into advanced exercises like the one arm push-up without considering individual readiness. While the allure of challenging movements is understandable, attempting exercises beyond your current abilities can lead to frustration and even injury.
This approach often results in two common scenarios:
- Struggling with advanced movements, risking injury, or experiencing minimal progress.
- Following generic progression plans that fail to address individual strengths, weaknesses, and limitations.
As you embark on your calisthenics journey and set your sights on mastering the one arm push-up, it’s essential to recognize that progress will vary for each person. Some progressions may feel too challenging, while others may not provide enough stimulus for growth.
To navigate this effectively:
- Prioritize safety to avoid setbacks and injury.
- Optimize your training approach to ensure meaningful progress.
In the past, we categorized exercises into beginner, intermediate, or advanced levels. However, we’ve learned that this approach often overlooks individual needs and progress rates.
That’s why we’ve developed The Movement Athlete Academy – a personalized, progressive, and adaptive training program tailored to your unique abilities and goals. By combining advanced technology with personalized coaching, we ensure that your journey to mastering the one arm push-up is both safe and effective.
If you’re intrigued by this personalized approach and eager to conquer the one arm push-up, I encourage you to take our FREE assessment. It will show you excatly where are you at on your journey towards a one arm pushup and give you a personalsied training plan to get started right away.
Say goodbye to guesswork and the risk of injury – trust me, it’s a game-changer.
Let’s dive into a One Arm Push Up.
Push-ups are one of the most popular exercises in the world. They have been around since ancient times and, for a good reason: they work! Push-ups target many different muscles groups at once and can be customized to suit your needs.
In this blog post, we will discuss how to build one-arm push-up strength for your advanced calisthenics workout especially if you want to learn more advanced calisthenics skills!
Mastering the push-up fundamental
Before attempting the single-arm variation, it’s vital to first master the basic standard full push-ups with good form. This will allow for more complete and joint-friendly, efficient progress.
The full one-arm push-up is one of the ways to progress in calisthenics.; it’s a progression. It requires a great deal of upper body and core strength.. Holding your own body weight on only one arm is already a challenge. Controlling the full range of motion of the one-arm push-up isn’t going to happen overnight.
This is why setting the journey needs the mastery of the two-handed version. As cliche as it might sounds, “you need to first walk before you can run”.
The basic push-up is performed from the floor, on your hands and toes, with a straight bodyline and engaged core. Breathe in as you lower down to do an inverted row movement that works every muscle in the body!
The basic push-up sets a proper foundation for the one-arm push-up journey. If you’re not comfortable yet with the normal push-up, go get a headstart by polishing your technique and strength with The Movement Athlete.
General Rules for each exercise
All of the exercises in our list will follow general rules in terms of technique and form. They are all push-ups anyway.
Elbow position
The correct elbow position will help engage the correct muscles while saving your elbow joints from the risks of any injuries that may come with improper form.
- When you do a push-up variation, your elbows should be at about 45 degrees relative to the floor and point outwards from one another in order for them to assist with stabilizing by pulling on their biceps as well the muscles of the chest that stabilize during this exercise.
- It is important not to flare them out even when using a wider hand placement
Shoulder blades placement
Having correct shoulder placement sets a stable base for your upper body to work efficiently and safely throughout the push-up movement.
- Shoulder depression – Imagine pushing your shoulders down and away from your ears to avoid unnecessary loading on the shoulders and inefficient pec and tricep activation
- Shoulder blade retraction – This is for the bottom position to get a fuller range of motion and activate the chest muscles even further in a deeper push-up position. The top position should be in a neutral spine or slight scapular protraction.
Core engagement
Maintain a tight core with any movement pattern. A lousy unengaged core will result in compensations such as the arching of the lower back or the inability to hold the proper starting position. Not only the push-up motion will be inefficient, but it can also turn into lower back injuries over time. Core stability provides optimal upper-body mechanics for better workout performance.
Proper cues
Make sure to think of the cues when performing any movement.
- The pushing arm must be in full tension
- When lowering, don’t simply rely on gravity, but counteract gravity with the arm push
- Posterior pelvic tilt or slight forward tilt in your hips to keep your core tight
- During the motion of the push-ups, imagine squeezing the floor with your hands inwards to activate your pectoralis muscle group.
Mind-muscle connection
The mind-muscle connection is a technique used to greatly improve muscle engagement and movement awareness. To do this, actively think of the major groups used when performing a push-up; hence, the pecs, and the triceps.
Whole-body tension
Efficient movement through any exercise can only be achieved with full-body tension. This way, there will not be any energy leaks that might hinder you from executing the move with maximum effort.
About this Progression
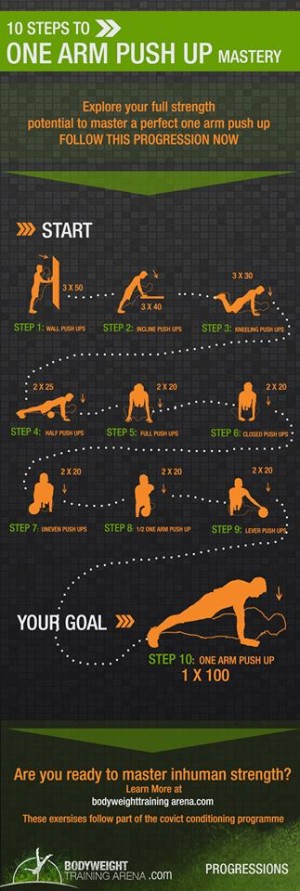
The one-arm push-up is a dynamic movement working the whole of your upper body but mostly your arms and chest. It is a constant contraction bringing great endurance and lean muscle composition. Due to the difficulty of some of the steps in this one-arm push-up journey, the early exercises consist of many repetitions of relatively easy exercises until you have build up the necessary muscular strength and endurance up to the ultimate step. You will gradually work towards more difficult variations as you grow stronger.
When completing these exercises be sure to keep in mind the general rules above and specific coaching pointers for each exercise.
Remember: Form is everything
Proper form ensures maximum progress in each given repetition and is the best way to avoid injury.
Level
Beginner
Goal
To master a perfect one arm push up
One Arm Pushup Progression Exercises List

Step 1: Wide push-ups
This exercise elevates your normal push-up to target more of your pectoral muscle group. The first step out of your fundamental push-ups.
How to perform:
- Begin in a normal push-up position, feet together.
- Move your hands slightly wider than shoulder-width apart.
- Lower down to the bottom-most position.
- Push back into the starting point.
- Repeat for reps.
Coaching pointers:
- Keep your elbows tucked inward or at least parallel to your body. Avoid flaring it out.
- Go wide as possibly go with the stance

Step 2: Deep push-ups
For this variation, you would need a platform to elevate your arms. A small pair of blocks or parallettes will do nicely. Deep push-ups will increase the range of motion which will further improve your pushing strength.
How to perform:
- Position hands on a low elevated surface.
- Move into the push-up position with legs together and hands shoulder-width apart.
- Lower down into the bottom-most position until your torso almost touches the ground.
- Push back up to the starting point.
- Repeat for reps.
Coaching pointers:
- You can also elevate your feet to the level of your arms so you can go even way deeper.

Step 3: Decline Push-ups
Let’s turn it around this time and keep the feet elevated. The modification will put you at a more mechanical disadvantage as you need to move to a bigger degree of motion. Your shoulders will work more in this exercise.
How to perform:
- Place the hands for the push-up form.
- Elevate your feet on a platform such as a bench.
- Fix your posture to assume a solid push-up starting point.
- Lower down until your face nearly touches the ground.
- Push back up to the original starting point.
- Repeat for reps.
Coaching pointers:
- Keep your body tight and straight as you go through the motion
- Put your weight on your shoulders and hands
- Keep your feet touching the platform very lightly

Step 4: Diamond Push-ups
This push-up variation got its cool name because of the diamond shape you form with your hands. It’s basically a close-grip push-up that puts much emphasis on your tricep muscles.
How to perform:
- Place your hands on the floor.
- Make your index fingers meet and your thumbs meet forming a diamond shape with your hands.
- Proceed to extend your whole body for the push-up starting point.
- Lower down to the maximum range of motion.
- Push back up to the starting point.
- Repeat for reps.
Coaching pointers:
- Keep your elbows tucked near your body
- Focus on the arm dominant tricep activation when performing the exercise

Step 5: Low push-up hold
Isometric holds build strength in the specific point of contraction. For this variation, we shift our focus to developing more strength endurance at the bottom of a low push-up.
How to perform:
- Go into a normal push-up starting point.
- Lower down to the bottom.
- Hold for a specified amount of time.
Coaching pointers:
- Breath while performing the exercise
- Engage the targeted muscle group

Step 6: Wide arm low push-up hold
It’s a similar take on the previous exercise but with a wider stance for more pec activation.
How to perform:
- Go into a wide push-up starting point.
- Lower down to the bottom.
- Hold for a specified amount of time.
Coaching pointers:
- Breath while performing the exercise
- Engage the targeted muscle group

Step 7: One-leg diamond push-up
Lifting one leg up removes additional support which makes you rely more on your pushing strength.
How to perform:
- Place your hands on the floor.
- Make your index fingers meet and your thumbs meet forming a diamond shape with your hands.
- Proceed to extend your whole body for the push-up starting point then lift one leg up.
- Lower down to the maximum range of motion.
- Push back up to the starting point.
- Repeat for reps.
Coaching pointers:
- switch legs every rep to get a balanced weight distribution
- Keep your elbows tucked near your body
- Focus on the arm dominant tricep activation when performing the exercise


Step 8: Tiger push-up
Also known as diver bombers or Hindu push-ups, this is a great exercise to include in your bodyweight strength training. It develops mobility and general strength needed for the one-handed push-up.
How to perform:
- Begin in a downward dog hold; start in a normal push-up hold then push your hips upward and back to stack your weight on your deltoids.
- Lower down by diving forward.
- At the bottom, shift back up your upper torso while pushing down with your arms.
- Reverse the motion to perform a single rep.
- Repeat for reps.
Coaching pointers:
- Keep elbows tucked
- Move along with mobility capability
- Expect bicep engagement and more deltoid stimulation
- Better hamstring mobility and pancake flexibility will allow good form
- Move your hands closer to your feet for better starting stance

Step 9: Leaning forward push-up
Here’s an excellent exercise for building strength which also transfers to planche training.
How to perform:
- Start in normal push-up hold.
- Lean forward while maintaining proper push-up posture.
- Lower down until the bottom hold.
- Push back up to leaning push-up hold.
- Repeat for reps.
Coaching pointers:
- Maintain a forward lean when lowering and rising back up
- Scale the exercise by the amount of forward learn.
- The more you lean forward, the harder the exercise


Step 10: Typewriter push-up
This exercise is the beginning of the assisted one-arm push-ups variations. Typewriters train the lower phase of the assisted variation. Since this is a unilateral exercise, you can eliminate muscle imbalances.
How to perform:
- Begin in a push-up hold with a wider stance.
- Lower down to the bottom on one arm while keeping the other arm for support.
- Shift your whole weight to the other arm.
- Repeat the process for reps.
Coaching pointers:
- Aim for a straight supporting arm when you finish the whole motion
- One arm should have most loading when done with one rep
- Maintain good bodyline


Step 11: One-arm assisted push-up
We incorporate a more dynamic approach to the typewriter push-ups by adding a vertical motion. This exercise is also known as the “archer” push-up.
How to perform:
- Begin in a push-up hold with a wider arm stance.
- Lower down to the bottom on one arm while keeping the other arm for support.
- Push back up to the top position.
- Lower down to the other side.
- Repeat for reps.
Coaching pointers:
- Aim for a straight supporting arm when you finish the whole motion
- One arm should have most loading when done with one rep
- Maintain good bodyline


Step 12: Circular push-ups
This variation is similar to the archer push-up but moves in one continuous flow from one side to the other to the starting position again. Think of it as a combination of archer and typewriter push-ups.
How to perform:
- Begin in a push-up hold with a wider arm stance.
- Lower down to one side.
- Continue to shift to the other side.
- Push back up to the starting position.
- Repeat the motion in the opposite direction.
- Repeat for reps.
Coaching pointers:
- Aim for a straight supporting arm when you finish the whole motion
- One arm should have most loading when done with one rep
- Maintain good bodyline

Step 13: Pseudo incline one-arm push-up
Like the normal push-up progression, we’ll incorporate a change of angle to make the exercise easier. The difference with this exercise compared to the real one-arm push-up is the foot’s position. A wider stance allows easier balance and stability.
How to perform:
- Position your body in a one-arm push-up position while one hand is on a platform.
- Widen your stance more than shoulder-width apart.
- Lower down using only one arm for the push-up.
- Push back to the starting position.
- Repeat for reps.
Coaching pointers:
- Train both arms equally.
- Keep the whole body in a good line
- Do not bend sidewards
- Hips squared
- Elbow tucked

Step 14: Pseudo half one-arm push-up
We next move to the floor but limiting our range of motion as we build more strength for the full range of motion of this exercise variation.
How to perform:
- Position your body in a one-arm push-up position.
- Widen your stance more than shoulder-width apart.
- Lower down using only one arm but stopping when the elbow is in 90 degrees.
- Push back to the starting position.
- Repeat for reps.
Coaching pointers:
- Train both arms equally.
- Keep the whole body in a good line
- Do not bend sidewards
- Hips squared
- Elbow tucked

Step 15: Pseudo one-arm push-up
We are almost close to the full one-arm push-up. The wide stance keeps stability and the balance easier compared to the real one-arm push-up.
How to perform:
- Position your body in a one-arm push-up position.
- Widen your stance more than shoulder-width apart.
- Lower down using only one arm until chest in near the floor.
- Push back to the starting position.
- Repeat for reps.
Coaching pointers:
- Train both arms equally.
- Keep the whole body in a good line
- Do not bend sidewards
- Hips squared
- Elbow tucked

Step 16: Incline one-arm push-up
Again, we will be utilizing the inclination angle to make the one-arm push-up possible as you develop more strength.
How to perform:
- Position your body in a one-arm push-up position while one hand is on a platform with legs together.
- Lower down using only one arm for the push-up.
- Push back to the starting position.
- Repeat for reps.
Coaching pointers:
- Train both arms equally.
- Keep the whole body in a good line
- Do not bend sidewards
- Hips squared
- Elbow tucked

Step 17: Half one-arm push-up
Halfing the range of motion again to make the one-arm push-up possible. Focus on form and developing strength for the full deal.
How to perform:
- Position your body in a one-arm push-up position while one hand is on a platform with legs together.
- Lower down using only one arm for the push-up but stop when the elbow is bent at 90 degrees.
- Push back to the starting position.
- Repeat for reps.
Coaching pointers:
- Train both arms equally.
- Keep the whole body in a good line
- Do not bend sidewards
- Hips squared
- Elbow tucked

Step 18: One-arm push-up
Finally the push-up we’ve been aiming to achieve. At this point, it’s about getting stronger to achieve more reps.
How to perform:
- Position your body in a one-arm push-up position while one hand is on a platform with legs together.
- Lower down using only one arm for the push-up until the chest is near the floor.
- Push back to the starting position.
- Repeat for reps.
Coaching pointers: Train both arms equally.
- Keep the whole body in a good line
- Do not bend sidewards
- Hips squared
- Elbow tucked
Other potential ways to work up to a one-arm push-up are detailed here:
To wrap up!
It seems that the one-arm push-up journey is long and hard but with good guidance and a lot of practice, you will be able to achieve this goal.
Remember that the path to greatness is always tough.
If it is still too hard for you, it means that you just need to regress to easier variations or focus on your fundamentals first!
And to get stronger faster, getting a balanced training routine is optimal. Don’t forget to incorporate your pulling exercises, accessory pushing exercises, core work, and (and certainly equally important) leg training!
Where are you in your one-arm push-up journey? Let us know in the comment section down below!
