
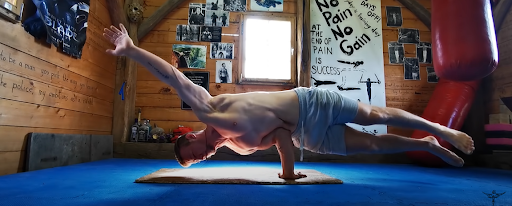
One of the underrated calisthenics hand-balancing skills is the elbow lever. It’s a display of mobility, strength, body control, and awesomeness that’s totally MORE achievable for everyone who wants to want to work towards it. It looks cool as the planche and the handstand, but easier to master than both of those exercises! If you want to learn how to do an elbow lever, then read on!
In this article, we’ll be covering:
- ✊ The benefits of the elbow lever
- ✊ Muscles used during the hold
- ✊ Prerequisite or minimum base of foundations
- ✊ Progressions list & coaching pointers
- ✊ Common mistakes
- ✊ And frequently asked questions
This progression is not aimed at a novice trainer. It is another one of the gymnastics-based progressions from bodyweight training and takes much strength, stability and balance. Have the illusion of floating in mid-air!
If you’re working on your planche progression and getting frustrated with the results, then you should definitely try out elbow levers which are similar to this type of exercise. It has similar body alignment, essential to executing the perfect form of the exercise.
Mastering your calisthenics fundamentals will massively boost your progress towards the elbow lever as well.
🏆Benefits
The elbow lever is primarily a skill that is its own endpoint. Meaning that the elbow lever isn’t part of any other progression nor used for other goals such as muscle development. However, training for the elbow lever does have some benefits.
- ✅ Builds body awareness – Getting into position and holding the elbow lever requires concentration. There’s also an element of balance and proper cues of the movement are needed to hold it efficiently. Training the elbow lever trains you to become more particular about your body position.
- ✅ Teaches hand-balancing mechanics – Elbow lever is a hand-balancing technique. Since its performed with bent arms, the center of gravity is lower compared to a handstand making this exercise a lot easier to balance. However, it’s also good for understanding how to balance your hands in a safer and “less scary” situation.
- ✅ Improves wrist strength and mobility – Learning towards the skill makes builds additional wrist strength and mobility as most of the weight is placed on these joints.
- ✅ Train core strength – Your core should be strong enough to stabilize you into position. Having a weak core will hinder you from even getting into the starting position, let alone help you balance.
- ✅ Can be a combo for other skills – Once you have mastered other calisthenics skills, you can connect the elbow lever with the skills you have learned. For example, from a handstand, drop into an elbow lever, then press up into another handstand. This will keep your workout fun, interesting, and creative!
- ✅ Looks very cool for a relatively easy skill! – Let’s be honest. Not everybody can perform an elbow lever. Plus, people who don’t know about the skill will probably think this skill is so challenging and impossible to achieve. It’s really something you can bust out easily anywhere for fun.
🎯Targeted muscles
This exercise puts emphasis on your general pushing muscles such as your chest, triceps, and shoulders. It also has a heavy emphasis on your core particularly on your abs to stabilize you into position.
Your hamstring, glutes, and lower back muscles also play a part to maintain a good posture for your lower body.
👊Prerequisites
There are two general prerequisites for this move mainly: Upper body & core strength, and joint mobility which we will break down further.
✔️ Strength
You need a decent amount of upper body pushing strength to hold the position since you will be pushing your body off the ground. A good and safe bet so you can proceed to learn this skill safely is if you have at least 10 push-ups and 10 dips in your calisthenics arsenal.
For core strength, aim to have at least 30 seconds of hollow body hold in an extended position with arms and legs fully extended.
✔️ Mobility
An obvious requirement is wrist mobility because there will be a good amount of pressure placed on your wrist while it is extended. Good general back and shoulder mobility will also be beneficial so you can easily place your elbow in unto your midsection with ease.
☝️Coaching Pointers
To hold the elbow lever, regardless of the progression used, keep in mind the following tips:
- 🎯 Posterior pelvic tilt – tilt your hips backward to avoid arching your lower back and consistently engaging your core.
- 🎯 Place your elbows comfortably – Finding the right position for you to place your elbows should depend on you. Generally, it’s around your belly button but it would depend on your mobility and body proportions. You can move your elbows much closer to your belly button. Each of us is different so there’s no specific answer for this. What matters most is that you can hold it comfortably.
- 🎯 Spread your fingers & grasp the floor – Spread your fingers to get a wider surface area covered. This will provide a solid base. Then grip the floor by pulling your fingertips towards your palm as if holding a basketball. Don’t just let your finger lay flat on the floor.
- 🎯 Full-body tension – Although there are body stabilizers and movers, keep the whole body engaged for a more stable hold.
- 🎯 Breathe – No matter how challenging the exercise is, don’t forget to breathe.
- 🎯 Scapula protraction and depression – Push your shoulders away from your ears and down. This allows for a stable shoulder position.
- 🎯 Lean forward – The harder the progression you are performing, the more you need to lean forward to balance out the longer body lever.
- 🎯 Forearm vertical to the ground – Have your forearm roughly perpendicular to the ground. This keeps a stable base.
- 🎯 Palms facing sidewards – Actually, you can use and hand position, but this makes it a bit easier when first learning. The sideward position helps you control your balance while not putting too much compression loading on your wrists.
💥Elbow Lever Progression Exercises List💥
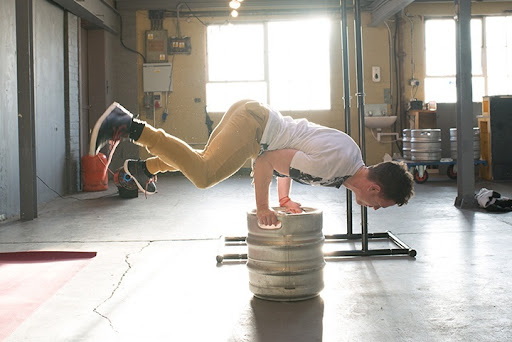
🔥Step 1: Bent Knee 2 Arm Elbow Lever
Despite being step 1, you will need a good bit of strength and balance to achieve this exercise. Balance in the planche position (hands on the ground, body suspended straight and parallel to the ground), but turn your hands downwards with your fingers pointing sideward. This will allow you to balance with your fingers. When falling forward, push from your thumb. When falling backward, push through your pinky area. Place the elbow just around your middle abs for balance. The bent-leg position shortens the lever. You can also perform it on parallettes or a bench so you can let your legs go past the elevated surface to decrease the amount of forward lean required to hold the position.
Source: Simon Ata of Simonster Strength
🔥Step 2: 2 Arm Straddle Lever
This part of the lever progression requires you to extend your legs straight and sidewards. The wider the straddle, the shorter the lever, and the easier the exercise.
Do this from the position of step 1 but allow your legs to separate to assist with the balancing process, making it easier to balance on your arms.
🔥Step 3: 2 Arm Full Elbow Lever
The next step is to fully place your together to achieve the longest lever you can perform with your elbow lever. As you get into position, you need to lean your upper torso a bit more forward to counterbalance the extended lever position.
🔥Step 4: 1 Arm Straddle Lever
This part of the elbow lever progression is a replication of step 2 but with 1 arm. You will have to display excellent strength and balance to hold this position, and we salute you if you are able to reach this next step. It’s also a great idea if you could do it with either hand! No dominant, or non-dominant hand. Just dominate the exercise!
To perform, you can begin with the non-working hand stretched out to the side to assist in balance. Once you slowly achieve your balance on your working arm, you can remove one finger at a time until you work your way into just one arm.
Source: Dominik Sky
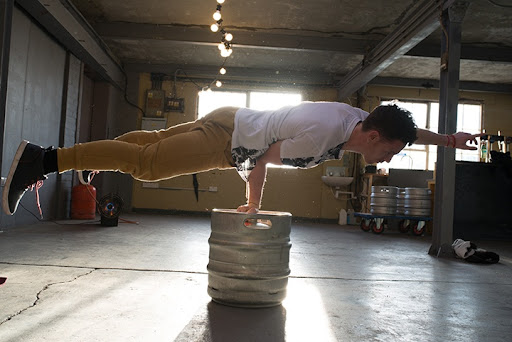
🔥Step 5: 1 Arm Straight Lever
This is the final step to fully mastering the elbow lever. Like step 3, the full straight lever has the legs together to achieve the maximum length.
Working on this exercise is similar the step 4. Don’t just jump into the elbow lever. Gradually move towards the skill so you can gain control and strengthen and learn the necessary corrections.
If you want to learn another exercise similar (but a lot harder!) to this one, try planche progressions. You’ve trained a good form and body line with the elbow lever.
You will have to apply it on planche as well as the general strength built with the elbow lever.
When working towards planche, expect a heavy increase in difficulty because you’re no longer resting your body on your abs, but instead, your shoulder is fully loaded in the planche.
🤔Frequently Asked Questions:
🔎How long before you can learn the skill?
Although looking impressive when holding an elbow lever, this skill is quite easy to learn granted that you already have the necessary foundational strength.
If you have already mastered your normal push-ups, dips, and have covered your full hollow body hold, even the single-arm elbow lever will be a breeze!
It can take you a month or less to master the skill if you have the basics down. The main concern will be balance and getting comfortable in the position.
For beginners, the two-arm elbow lever is more plausible at first. Specific wrist conditioning will be the primary issue as it can heavily strain your wrists if you’re not yet comfortable. It will probably take a minimum of 3 months since your focus will still be on the fundamentals.
🔎Is learning planche necessary?
You don’t need to learn how to planche to master the elbow lever. But if you’re already training for planche, you will have a much easier time transitioning into the elbow lever training.
While both skills look similar, there’s a drastic difference between the two in terms of difficulty and mechanics.
Planche is a straight-arm skill that has a high specific demand. There’s no elbow or additional support you can use. You need to “levitate” purely using your upper body.
To give you a picture, planche training usually takes 6 months for the extremely talented and already advanced athletes. For us mere mortals, mastering the full planche can take years!
With the elbow lever, you just have to place your weight on the naturally stronger bent arm.
🔎Do you need insane core strength?
Here’s what both planche and elbow lever have in common. Both exercises do not require exceptional core strength.
Yes, core strength is still a requirement, but if you have a good hollow body hold, it will be sufficient enough to maintain the elbow lever in terms of your core.
🔎How to learn the balance?
Proper elbow placement to find your center of gravity is key. If you find the correct elbow placement (which is usually around the belly button area, then balancing is already going to be easy. Just be sure you already have the strength for it. You will just have to balance if you’re going to fall forward or back with the two-arm elbow lever.
For the single-arm variation, it’s going to be a bit more challenging since you need to balance from different planes. Practicing with one arm extended for assistance will help as you try to maintain balance in the beginning. Slowly move to finger assistance until you can hold the single-arm elbow lever.
🔎Getting wrist pains?
Wrist pains are inevitable if you don’t do the necessary wrist conditioning and prehabilitation. Elbow levers put heavy tolls on your wrist so prepare your wrist even before attempting the move.
Regular push-ups do improve wrist strength, however, you can benefit from adding specific wrist movements. Don’t just stretch them passively. Use strengthening movements in a given range of motion in all directions.
If there’s sharp pain when trying out the elbow lever, work on your wrists first and hold off your elbow lever training for the moment.
Protect your wrists here: 📍How to Bulletproof your wrists!
📌Takeaway
Now that you’re equipped with the necessary know-how and progressions of the elbow lever, you can get started on mastering the skill and impressing people in your party!
Kidding aside, the elbow lever is definitely a good skill to learn especially if you want to focus on calisthenics skill work.
If you haven’t mastered normal floor push-ups yet, it’s best to first master the fundamentals so you don’t get frustrated or injure yourself while working on the elbow lever.
Whether you’re working on your fundamentals, learning advanced skills, or building muscle, a personalized approach offers the best bang for your buck. Cookiecutter and one-size-fits-all workouts are proven to be obsolete and can do more harm than good in the long run.
Start your PERSONALISED and ADAPTIVE approach to calisthenics by first knowing your strengths and weaknesses.
TEST YOURSELF AND KNOW WHAT YOU NEED TO WORK ON NEXT NOW!
0 Comments