Join the tribe of Movement & Calisthenics Athlete - people just like you that are working with their own body weight to get strength, lose fat build muscle, recover from injuries and live their best lives!
Wrist mobility is absolutely crucial to any calisthenics workout and needs to be implemented to effectively build and maintain upper, and even lower, body strength. If you don’t strengthen your wrists, you’ll never be able to get as far as you want with calisthenics. There are many wrist wraps and straps available on the market, but it is important to build up your wrist mobility and strength on its own without the need for third party products.
I started calisthenics in 2010 and pushed myself hard with handstands, bridges and frost attempts at planche. It wasn’t long before my wrists were hurting, the pain and lack of mobility was stopping me from performing the exercises! If you’ve ever tried a bridge you’ll know our bodies weren’t made to be in that position, not mentioning holding the whole weight of our bodies on our wrists.
All the other guys in the gym, some not even as big as me, seemed to be doing these exercises no problem and I couldn’t figure it out so I pushed myself harder. Soon it felt like I’d broken my wrists; they were on fire every time I performed. I spoke to a trainer and he told me about wrist mobility and why it’s so important. Almost all exercises we do in calisthenics involve our wrists, so it seemed so obvious that I needed to pay attention to my wrists as well!
Since then I’ve got good at training and protecting my joints, and my wrists are much stronger now and I’ve been able to push myself further and further with my calisthenics. Just like when I started, the new starters that I teach always complain about wrist pain, because they’ve never focused on wrist mobility before!
I’ve written this guide because I want to teach you here what I teach them, why you should focus on your wrist mobility and how to do it. It’s not only the possibility of pain or injury you’re risking; poor wrist mobility will mean you’ll never be able to perform the calisthenic moves that you want to. That’s why YOU MUST READ THIS GUIDE.
Why Should You Be Focusing On Wrist Mobility?
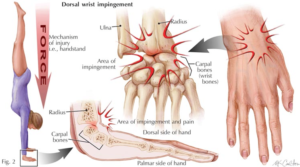
Many exercises in your calisthenics routine will involve using your wrists, whether this be handstands, bridges, blanches or front levers. Without good wrist mobility, chances are you won’t even be able to perform these moves, but if you do this new level of intensity, combined with lack of wrist mobility and the pressure on the joints from exercises like using a keyboard can leave you with a wrist pain or injury.
Even worse, it can stop you from ever performing calisthenics as the health of the wrist directly affects grip strength! I know I found it tough when I was out of training, trust me you DON’T want to get into that position, it’ll only make you miserable. These are just some of the exercises you’ll need strong wrists for:
- Push ups (Regular, incline, diamond, decline and MORE!)
- Chest dips
- Handstands
- Planches
- Chin ups & Pull ups
Your wrists are crucial to your calisthenics routine, and this list just scratches the surface of how often you’ll use them. Gymnasts differ from other athletes or gym-goers in that they spend a hell of a lot of time on their hands. Those at the highest levels of competition might even spend as long as 40 hours a WEEK on their wrists (OUCH!). Gymnasts are repeatedly exposed to compressive, torsional and tensile stresses with the wrists constantly in the extremes of extension and flexion. It’s hardly surprising that wrist pain is one of the most common issues gymnasts have to deal with is it?! Get this right and you’ll be unstoppable!
I know you’d much rather focus on building bigger biceps or stronger shoulders, and it may feel like you’re wasting your time with wrist exercises, but as we use our wrists a lot more than we think daily, having strong and flexible wrist mobility is a must. Injured wrists will lower the reps you do and damage your technique. Without this you can’t push on further and be the best at calisthenics that you want to be.
Remember, there’s two areas you want to focus on with your wrists; mobility and stability. Mobility allows for a greater position of the hand for grasp while stability will allow you to engage in heavier tasks like lifting or pulling.
All seem a little too much?
Don’t worry, at first it stressed me out having to focus on the tiny ligaments and joints in my wrists when all I wanted was to be out there performing one-handed handstands like the pros. But bringing a new focus to your wrists and dedicating time to strengthening these joints will allow you to push the rest of your workout further, as well as increasing your overall performance and health both inside and outside the gym.
Now I feel like one of those pros myself!
Not Worried About Your Wrists? Soon You Might Be!
Poor wrist mobility HURTS. Trust me, I’ve been there. It was hurting me to drive, to pick up coffee and even keeping me up at night. You might be able to guess that it put me out of training for a while. More seriously, it can lead to conditions like:
- arthritis
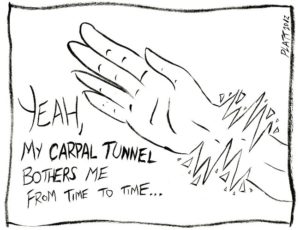
- carpal tunnel syndrome
- tendonitis
- bone bruising
- ligamentous damage
- growth plate irritation
- scar fractures
None of these injuries sound too fun do they?! It’s VITAL that you focus on your wrists early on before you get serious about your calisthenics.
Source: Platitudes
Wrist and ankle pain are two of the most common places for pain and acute injury, with approximately 350 million people worldwide suffering from arthritis. It is easy to find yourself suffering from some form of acute wrist pain at some point in your life, especially with the increased use of mobile, tablet and laptop usage.
Gymnasts differ from most other athletes in that their wrists essentially act as weight-bearing joints due to the extra level of extension that we get. Quite simply, we weren’t MADE to do some of the exercises we do. Although that might seem a little crazy, that doesn’t mean we can’t still do them! It just takes an extra level of understanding with your routine. But it means we look a lot cooler than other athletes right?
Before you think, “I’ll be fine, it won’t happen to me!”, let me tell you, IT WILL.
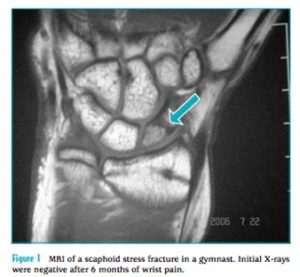
I thought exactly the same thing, and it was only after I was out with injury that I was told at least 75% of male gymnasts have chronic wrist pain of greater than 4 months in duration. While this was only 33% for female, it’s still not worth taking the risk! Failing to take steps to prevent this kind of injury could leave you out of calisthenics & gymnastics permanently, and none of us want that! This guide looks at why wrist injury is common in gymnasts.
Source: Why Wrist Pain is common in Gymnasts
4 Easy Ways To Test Your Wrist & Finger Mobility
These are 4 easy tests you can do to test your wrist and finger mobility. It’s so important that you do this BEFORE you train, so you know your limits. If your wrists hurt slightly from these, then you will feel it BIG TIME when you move on to calisthenics. Don’t be disheartened though, I had to start from the beginning as well; just see these tests as areas you need to improve, and I can help you work on that further below.
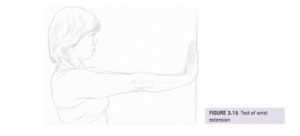
Wrist Extension
This is an easy exercise for testing your wrist extension. Stand facing a wall with your shoulders flexed to 90 degrees and with your arms outstretched. Make sure your hands are in front of your shoulders, your wrists in a neutral position and your palms facing downwards.
With your elbows straight, attempt to place your hands flat on the wall in front of you. If you have a normal Range of Motion (ROM), you should be able to place your palms flat on the wall. If you feel pain, don’t worry! It’s normal to feel this at the beginning, which is why it’s important to build up wrist flexibility.
Wrist Flexion
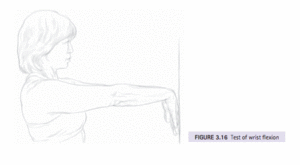
Stand facing a wall with your arms outstretched , with your hands in front on your shoulders and the palms facing downwards. Keeping your elbows straight, try and place the back of your hands flat against the wall. You should be able to get most of your palm on the wall, with the wrist coming within about an inch of the wall.
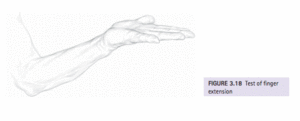
Finger Extension
Either standing or sitting, have your elbow flexed with the forearm supinated and the palm facing up. Open your hand as wide as possible and it should open to reveal a flat or slightly hyper-extended position. Make sure you test both hands!
Finger Flexion
Stand with your arms outstretched in front of you at 90 degrees and your palms facing downwards. Try and make a tight fist, and then flex your wrists at 30-40 degrees, testing both hands. Again, feeling pressure or even pain is completely normal if this is your first time testing this, but just acts as a warning before you do anything more intense with your wrists!
Again, feeling pressure or even pain is completely normal if this is your first time testing this, but just acts as a warning before you do anything more intense with your wrists!
All images sourced from this Assessing Flexibility document.
How Do The Wrists Work?
The Wrist’s Structure
The wrists, while small, are complex joints with bones, ligaments, tissues, muscles and nerves that aren’t specifically designed for taking the full weight of our bodies or large amounts of pressure for an extended period of time. But, as with any muscle, they can be trained.
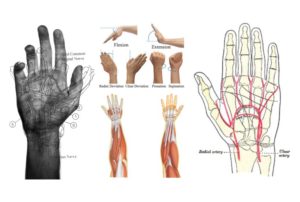
The wrists are highly flexible joints, being able to move both forwards and backwards (extension and flexion), as well as from side to side (radial and ulnar). This is in direct contrast to the knee joint, which only has the flexion and extension abilities.
The range of motion (ROM) for normal extension and flexion is approximately 120 degrees (85-160 degrees) and the ROM in radial and ulnar deviation is approximately 65 degrees (15-25 degrees for radial and 30-45 degrees for ulnar).
For most daily activities, a functional level of ROM is:
- 40 degrees wrist extension and flexion
- 15 degrees in radial and ulnar deviation
For good calisthenics you need good flexibility and motion in your wrists. As with any muscle, you need to train it and increase its potential. I work on mine daily and have built up the flexibility over a number of years, meaning I’m not limited in my calisthenics routines.
Technique
As with all areas of our body, maintaining correct technique with the wrists ensures they will stay healthy and strong. This means using the right grip, aligning your body correctly and having a good bar path. If you’re not sure if your technique is quite right, ask your trainer before you risk doing yourself some real damage and putting yourself out of training!
Calisthenics And Wrist Mobility
Here I look at some of the different calisthenics exercises you might be performing and how wrist mobility is important for those. These are just some of the many exercises available, get in touch if you want to discuss it further!
Handstand
Performing a free-standing handstand looks awesome, but it puts a lot of strain on the wrist. Your wrist will be at a 90 degree angle to your arm, and if you felt the pain when testing out your wrist mobility by placing your palm flat on a wall as shown above, holding your full bodyweight on your wrists will hurt even more!
If you can’t extend your wrist to at least 90 degrees on its own, then a handstand will cause you a lot of injury. Before you start, work on the primary wrist motions, build strength in these areas to build yourself up to the handstand.
Being able to perform a free-standing handstand takes time, patience, a lot of discipline and of course strong wrist mobility and stability. This is one of the harder exercises to master but when you have you’ll feel like you can do anything! Not to mention it looks super cool.
Bridges
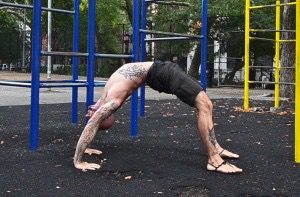
Ever look at someone performing a bridge exercise and wonder how the hell they got into that position?! Well, as difficult as it looks, it’s possible, but you need good wrist mobility. Your wrist is going to be at an even greater angle to your arm than it is in a handstand, so if you struggle with a handstand you may find a bridge tough as well!
Bridges are an incredible exercise to work yourself up to, not only is it great for a weak or injured lower back, it will also help to make it a strong, flexible and injury-proof. Many skip over this exercise but as it works on every single muscle in your back it is something you should definitely factor into your routine. Once I started working on my bridges I found that it gave the front of my body a great stretch as well as resulting in extra endurance.
Source: Al Kavadlo
Front Lever
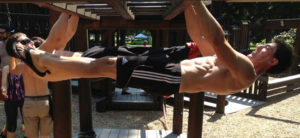
The front lever is another exercise that will not only help develop your strength immensely, but it also looks awesome, and really shows others just how hard you’ve worked to achieve your results in not only your wrists, but also your should shoulders, back and core. It will take you time to build up to a full front lever and there are many steps to progress up to this, such as starting with your pulling prep and strength, and working yourself up through pulling up with knees to a front tuck, then to leg extension and finally to a full front lever.
Your wrists will be under a lot of strain when performing an exercise like this as you’ll not only be pulling up your own body weight but will be extending and flexing your wrists as you move into a full lever position. Holding yourself in this position you’ll feel the tension on your wrists, so it’s vital to build yourself up to this rather than diving straight in.
Push Ups
An obvious exercise, but a great one to build up the strength of your upper body that also uses your wrists. While many use this exercise to increase the muscles in their chest and arms, don’t forget about the pressure that you are putting on your wrists while doing a push up.
Source: A Shot of Adrenaline
To keep your wrists pain-free, keep your hands shoulder width apart and close to your chest, facing forward (not angled!) and all parts of your hand should make contact with the ground. Check this guide here for a full list of how to protect your wrists during a press up.
Preventing Wrist Injury
It’s better to be proactive with these things rather than reactive; you want to be focusing on building up your wrist mobility early on to avoid the pain and the time out of training. Trust me, once you get put out of training you’ll be kicking yourself you didn’t do more to prevent it before! Here’s my best preventative strategies:
Mindset
Mindset is absolute crucial to any workout and for preventing injury and achieving success. This is something my clients regularly overlook, but you can’t have a strong body without a strong mind. If you don’t believe you can do it and don’t stay positive, chances are you won’t do it!
You need to see building up your wrist mobility as honing your skills and progressing towards becoming the most awesome gymnast you can be. Stay positive and stay patient, but stay committed!
Remember, strong mind = strong body.
Warm-up
You must ALWAYS warm-up no matter what exercises or routines you are planning to work on. The lack of a proper warm-up is one of the most common mistakes I see all many gymnasts suffer from. The pros still warm-up, no matter how long they’ve been doing it for.
There isn’t really a wrong way to warm up so don’t stress about trying to find the ‘perfect’ warm-up routine, just make sure you loosen the muscles and the joints, get the blood flowing and get the heart beating.
Mobility, Flexibility & Strength
At the end of a workout you’re tired so it’s ok to just go home and relax right? Wrong!
Make sure you stretch after every routine to keep your wrists flexible and limber; much like a warm-up you need to make sure you warm-down. Skipping out on stretching is another common but easily avoidable mistake that causes people stiff muscles and longer-term injury.
Remember, strong wrists SCOFF AT INJURIES. Try using a therapy ball to improve your wrist strength and mobility, you can see a great tutorial video for this here: https://www.youtube.com/watch?v=WknBLKSpG0w.
I look below at 5 AWESOME exercises to help build your wrist strength and mobility without a therapy ball. Without proper movement quality, you can’t train how you want to and below you’ll see how to keep your wrists mobile and working right.
5 Effective Exercises For Building Wrist Mobility
Below are a list of effective exercises I use for increasing my wrist mobility, some that I do at home or on the way to work, and others that I’ve incorporated into my calisthenics routines. Try and use a number of the exercises for a more balanced and well-rounded routine:
Wrist Rotations
This is the most basic of the wrist mobility exercises, but it is something that you can easily work into your everyday routine. Simply intertwine your fingers and rotate your wrists around in every direction possible. Any position that feels slightly tender or restricted; simply hold this position for a little longer. Repeat as often as you feel comfortable with throughout the day. This exercise will help to increase your natural wrist movement range, allowing you to push further with your calisthenics exercises.
This is one of the most effective routines as you can perform it ANYWHERE, and it focuses on every possible range of movement with your wrists.
Planche Push-Ups
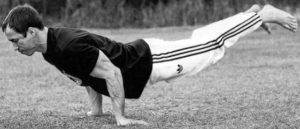
This is a more intense exercise, but a great one to do to increase your wrist mobility and strength. Get yourself into the plank position with you elbows fully extended at the top of the push up, while turning your hands inwards so that your fingers are pointing towards your feet. Move your body forward so that there is an angle from your shoulders to your wrists, and try holding this for as long as you can, although 30 seconds is a good marker to aim for. This is a great exercise, and as you progress through calisthenics you can complete the exercise with your legs raised up off the floor. Trust me, it looks super cool!
It also has the added benefit of working your arms, core and even your legs. Perfect right?
Wrist Walks
Place your palms on a wall as high up as you can reach, and then ‘walk’ your hands down the wall. Go as far down as possible, while keeping your palms on the wall, and once you can’t reach any further turn your hands around, with your fingers pointing to the floor, and walk the palms up the other way. Repeat this for as many times as you feel comfortable.
A good exercise, but it only focuses on the extension and flexion movements rather than the radial and ulnar – although most calisthenics exercises use extension and flexion.
Prayers
While standing, place your hands in front of you as though you are praying. While keeping contact between your two hands, lower them as far down as you can – the longer you can keep your hands together the better you’ll be stretching your wrists. Once you get down as far as you can go, reverse your hands so your fingers are pointing downs, and complete the exercise in reverse.
(Maybe at the same time you can pray to be the best gymnast there’s ever been?! It doesn’t hurt to aim big!)
Static Holds
This is another simple exercise that you can complete from wherever you are, so there’s absolutely no excuses not to be improving your wrist mobility and strength! A client once told me she didn’t have the time to work on wrist mobility, but this is just an excuse, not a reason! With this exercise, all you need to do is pull your wrists back into the extension and flexion positions and hold each for 20-30 seconds. You should feel the pressure on your wrists, and this will ease over time as they become more flexible. A basic but easy exercise to help with your calisthenics by increasing your maximum movement range.
Still Want More?
Check out this awesome page, 5 exercises to improve hand mobility, for more exercises and also check out this forum thread from Reddit for a huge section on grip training: Grip Training.
So what’s my key takeaway from these exercises? NO EXCUSES.
I’ve given you a range of exercises here – some you can incorporate into your routine and some you can do anywhere, so you have ABSOLUTELY NO EXCUSES not to be working on your wrist mobility.
Wrist Injuries
If you’ve got an injury on your wrists DON’T be stubborn and continue pushing them harder with your routine. You’ll be using them everyday so you don’t want to do any serious damage to yourself and us gymnasts aren’t completely invincible (yet)! Make sure you see a healthcare professional first before you take any further steps, and seek their advice on what you can and can’t do. This article is no substitute for appropriate medical care and they may prescribe you certain exercises you must do.
If you’ve already injured your wrist, adopt some of the less pressurised exercises listed above to gradually bring strength back. You want to perform a range of exercises but in as much pain free repetition as possible. Once it’s healed be sure to adopt these exercises into your routine.
Try the Wrist Rotations to start as these don’t apply too much pressure and you can effectively test every area of your wrist. If you feel you can handle more then go for one of the more strenuous exercises, but DON’T attempt anything like a planche push-up that requires holding your whole body weight on your wrists, you’ll only cause yourself more damage!
I know you’ll be eager to keep up with your exercise, I definitely was when I injured myself! Luckily, the best advice is to not stop moving the wrist completely, simply continuing working on the areas that are pain free.
Once you’re ready, begin training for the movement that caused the injury and make sure you show that movement who’s the boss! (It’s YOU, obviously). Soon you’ll get to the point where you’ll be able to do that movement in your sleep and wonder how it ever caused you an injury in the first place!
The Do’s and Don’ts if You’ve Injured Your Wrists
- DO seek proper medical advice first
- DO continue to work on your wrist mobility in the pain-free areas
- DO continue to exercise the injured area, but only with exercises you can manage
- DON’T stop wrist exercises completely
- DON’T push yourself further or ignore the pain or warning signs of injury
- DON’T attempt the highly pressured exercises like a planche push up
- DON’T GIVE UP! Once you’re ready, being to tackle the exercise that caused you injury
Injuries are only a minor setback – seem them as a learning curve.
Here’s a great guide on recovering from wrist injury.
Other Factors To Consider For Wrist Mobility
There’s More!
As if all this wasn’t enough to take in already, remember when using our arms not only do we use our wrists, but we also make use of both our shoulders and elbows, so it is important to also work on scapular and shoulder mobility as well as wrist mobility. I’ll cover these other areas in more depth in another post, but consider exercises like Standing Unilateral Chest Openers for shoulders and Scapular Wall Slides for scapular mobility.
Other Areas Of Your Life
While it’s important to factor in some of these wrist mobility exercises, be sure to look at other areas of your life where you could make adjustments or improvements to strengthen your wrists. For example:
- Check that your keyboard and wrist position are both suitable for when you are typing, particularly if you have a job that involves working at a computer.
- If you do a lot of driving, ensure you hold the wheel in a way that doesn’t hurt your wrists.
- Do you have a heavy manual labour job? Think about your wrists and not pushing yourself further than you have to or being extra careful with heavy lifting.
Remember, your age will have an effect on your wrists as well. As you get older the strength in your wrists will naturally decrease. This doesn’t mean you can’t continue with calisthenics, just make sure you accommodate for this and know your limits!
Improving your wrist mobility will improve many areas of your life – from good hand-writing to heavy lifting. Some websites even recommended getting kids to practice good wrist extension from an early age so this is something you should incorporate into your life not just for your calisthenics routine but for your life as a whole. If that isn’t motivation enough then I don’t know what is!
Resources
To give you even MORE resources to kick-start your wrist mobility routines, here’s a couple of videos with extra drills and exercises:
- Wrist Mobility Exercises and Stretches: Tutorial: https://www.youtube.com/watch?v=cWtvCGCYbYc
- Wrist Mobility Drills: https://www.youtube.com/watch?v=7k8KLQ_-jAI
Also, check out this document from The Monkey Gym on Wrist Mobility Exercises.
Wait, You Want Even More?!
I thought so!
Here’s a video on 5 wrist mobilisation exercises taken from Japanese martial arts, some we’ve already talked about here and some we haven’t: https://www.youtube.com/watch?v=ii0J3Ye9NnA.
Be sure to do a mixture of exercises in your routine to keep it interesting and ensure you’re working every part of your wrists!
Conclusion
So, I hope this has given you some insight into just how important your wrists are for your calisthenics routines. If you don’t factor it into your routine, trust me you’re going to feel the PAIN! There are exercises that you can easily do at home, on the way to work or even in bed so there’s absolutely no excuses here!
Building up your wrist mobility, flexibility, stability and strength may seem basic, but it one of the MOST important factors in helping you to push yourself further and further with many calisthenic and gymnastic exercises.
Remember, NO EXCUSES!
I’d love to hear from you:
- Do you have anymore questions about wrist mobility?
- Have you got a wrist mobility routine you’d love to share?
- Do you need help with working wrist mobility into your workout?
Thanks for reading, I’m looking forward to helping you guys have the most mobile wrists possible!


