The dumbbell or barbell row has always been the go-to option for horizontal pull exercise.
However, bodyweight exercises can also offer TOP-TIER horizontal pull exercises that you can do at home!
Do you want to get a strong and sexy back? Horizontal pull exercises are a great way to do that! In this article, we will discuss seven horizontal pull exercises that you can do at home with no equipment needed. These exercises are calisthenics, which means they use your own body weight as resistance.
We’ll be covering these topics:⏬
- ⚡️What are horizontal pull exercises
- ⚡️Why do you need to do them
- ⚡️The best calisthenics 7 horizontal pull exercises
- ⚡️& Frequently Asked Questions
Let’s get started!
🤔What are horizontal pull exercises?
Based on the name alone, horizontal pull exercises are any movement that involves pulling your body horizontally (or diagonally, which we’ll get into later) to the ground. This is contrary to vertical pulling exercises, such as pull-ups & chin-ups where your body is vertical.🤛
Horizontal pull exercises work primarily the muscles in your posterior chain, including your:
- ✊Latissimus dorsi, also known as the lats
- ✊Trapezius, also known as the traps
- ✊Rear deltoids
- ✊Rombhoids
- ✊Rotator cuff muscles
They also engage your biceps and forearms. Although they are not included in the posterior chain, these muscles help facilitate the pulling movement. Stronger horizontal pulling muscles will result in a WIDER, STRONGER, and DEFINED back.
👊Why do you need to train horizontal pulls?
Are your shoulders and back hurting from seemingly endless hours of sitting in front of a computer for work?🤕
Have you been excessively slouching while scrolling for extended periods of time on Tiktok or other social media?🤕
If so, then you probably need to start doing the best calisthenics horizontal pull exercises at home! This is because horizontal pulling movements strengthen and mobilised the weakened muscles that compensate for the lack of activity.
These exercises aren’t only for alleviating pain but also build a strong, powerful, and sexy back!😱
🏆Benefits of horizontal pull exercises
Here are other benefits of why you should include horizontal pulls into your workout:
- 💯 Builds a bigger and stronger back – Supplement your back training with your horizontal pulling exercises. Vertical pulls should be your primary compound exercise for your back because of the natural higher loading capacity of the movement. Adding horizontal pulls with low to moderate load allows higher training volume, which can be optimal for building muscle.
- 💯 Improves shoulder health and size – The manageable intensity allows you to full control and trains your scapula strength. If you’re having a hard time performing scapula pulls from a bar OR you just want to improve your overall pull-up strength, this is a great option without requiring too much overhead shoulder mobility.
- 💯 Address hard-to-target, common weak points – Since you can use variations plus the naturally lower loading of horizontal pulls, it can be used to address specific points on your shoulders, particularly the rotator cuffs and rear deltoids.
- 💯 Entry pulling exercise for beginners – Inverted pull is a pull-up core exercise. You can’t do pull-ups without passing through proper horizontal pull work.
- 💯 Transition to harder pulling exercises – Training your horizontal pulls allows you to get stronger for specific horizontal pull work such as crow favourite, front lever.
- 💯 Improves posture – Because you’re mainly hitting your rhomboid and traps, you also get to improve your spine elongation for a strong and proud posture.
- 💯 Fixes & prevents muscle imbalances – We’re usually stronger with our pushing movements because we use them more often in real life. Balance out your pushing strength to minimise movement dysfunction.
🙌What equipment do you need for horizontal exercises
While we can get away with using our furniture when training with these exercises, we still want to get access to these affordable and easy-to-install pieces of equipment.
- 👊 Gymnastics rings
- 👊 Low bar
- 👊 TRX system
You don’t need all of them. Even just one will do. We recommend getting a pair of gymnastics rings since you can easily put them anywhere and get a solid back (and full body) workout.
Read more: 📍Ultimate Guide to Calisthenics Equipment & Cheap Ways to Replace Them
🔥🔥 7 Vertical Pull Exercises At Home
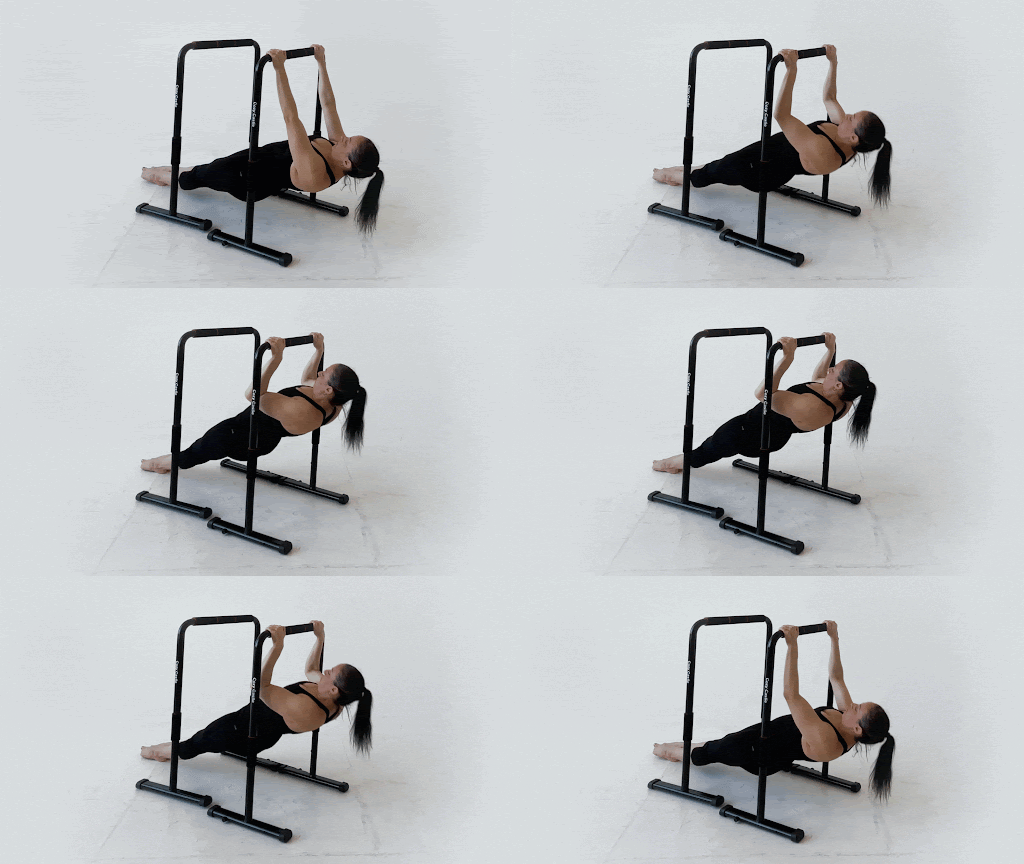
✨Inverted rows/ Pulls
Inverted rows are the perfect pulling exercise to begin your back development when you’re just starting out.
If you can do a single pull-up yet, then you have to begin with inverted rows. This exercise is basically a leg-assisted pull-up with your body in a more horizontal plane. The assistance + center of mass drastically lessens the load, which is why it’s perfect for beginners.
While inverted rows are a beginner requirement for pull-ups, they can also be scaled to cater to more advanced athletes. There are plenty of progressions you can use to keep the exercise challenging.
To do this movement, all you need is something to hang from. This could be a TRX system, gymnastics rings, or even a low bar. If you don’t have any of these things, simply use a sturdy table or countertop. We highly recommend the gymnastics rings since they can be adjusted to suit your skill level.
☝️How to perform:
- Begin in low dead hang with legs extended and arms straight.
- Depress and retract your scapula.
- Pull your body upward until you have driven your elbows behind your body.
- Brief pause at the top.
- Slowly lower with control.
- Repeat for reps.
🎯Coaching pointers:
- Upper torso straight
- Hands shoulder-width apart or slightly wider
- Fully retract & depress your scapula
- Keep your elbows close to the body
- Core engaged
- Posterior pelvic tilt
- Hips extended
- Controlled movement
- Pronated or neutral grip
✊Ways to change difficulty:
- More vertical angle = easier
- Lower angle = harder
- Bent knees = easier
- Straight legs = harder
- Feet elevated = harder
- Add weights using dip belts to your midsection for added difficulty
- Unilateral variation
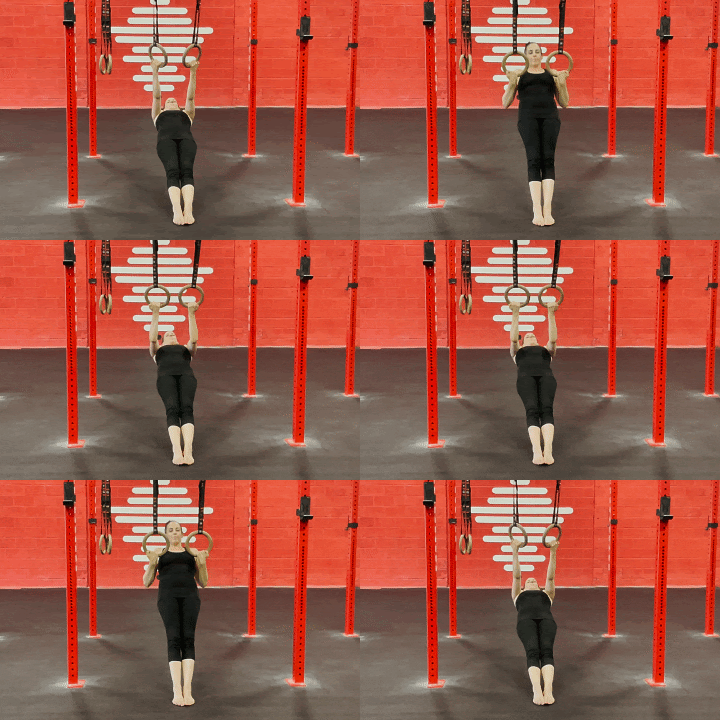
✨Face pulls
If you’re looking into building strong posterior deltoids, then this is the exercise for you. The rear delts are commonly a neglected area since they are not easy to target if you don’t have the knowledge to do so.
Face pulls, while emphasizing your rear deltoids, also targets your upper back muscles, particularly your middle trapezius and rhomboid. It also strengthens the rotator cuffs in a full range of motion, so you can also get healthier shoulder joints that are capable of movement. It’s one of the best exercises for your shoulders!
Face pulls can either be performed on rings or a TRX system. You can perform them on a stable bar. However, the fixed nature can irritate your elbows and shoulders which defeats one of the purposes of the exercise.
☝️How to perform:
- Begin in a low dead hang with straight arms and legs extended on the floor.
- Pull your elbows sidewards until aligned to the level of your shoulders.
- Pause at the peak briefly while making sure your scapula are fully retracted and depressed.
- Lower down with control.
- Repeat for reps.
🎯Coaching pointers:
- Upper torso straight
- Fully retract & depress your scapula
- Core engaged
- Posterior pelvic tilt
- Hips extended
- Controlled movement
✊Ways to change difficulty:
- More vertical angle = easier
- Lower angle = harder
- Bent knees = easier
- Straight legs = harder
✨Bodyweight bicep curls
Building bigger biceps is also possible with horizontal pull exercises. You don’t need dumbbells or barbells to perform this exercise. Rings offer the best tool for bodyweight bicep curl since it’s more friendly to the joints because of free movement and the adjustable ring height offers a convenient change in intensity.
Expect pump biceps thanks to the supinated grip, which shifts the focus to the biceps when performing the movement. The concept is similar to chin-ups vs pull-ups. Supination of the forearms activates the bicep function.
☝️How to perform:
- Start from a low dead hang with a supinated grip.
- Pull your body upward with hands going towards your face.
- Pause at peak contraction.
- Lower down with control.
- Repeat for reps.
🎯Coaching pointers:
- Upper torso straight
- Fully retract & depress your scapula
- Core engaged
- Posterior pelvic tilt
- Hips extended
- Controlled movement
✊Ways to change difficulty:
- More vertical angle = easier
- Lower angle = harder
- Bent knees = easier
- Straight legs = harder
- Unilateral variation
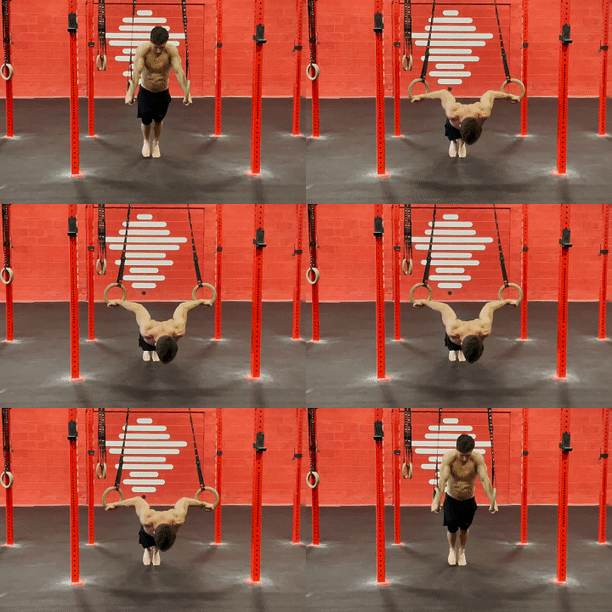
✨Pelican curls
We still have one more exercise with a bicep dominant function, and this is the pelican curls. This exercise is more for intermediate to advanced athletes who are looking to add more bicep strength and mass.
The pelican curl trains the elbow flexion, forearm supination, and shoulder flexion. Take note that this move requires good shoulder mobility to begin with; that’s why many are not too happy starting with the exercise. But still, if you develop the necessary mobility, it’s a great option to have to build bigger biceps.
Learn the Best Bicep Workout Here!
Like the rest of the mentioned exercises, the pelican curls are ideally performed on rings or at least a TRX system. You can do it on a bar but not ideal.
☝️How to perform:
- Begin by performing a low push-up position on the rings.
- Slowly lower your body towards the floor past the rings until your arms are nearly extended.
- Pull back up into starting position.
- Repeat for reps.
🎯Coaching pointers:
- False grip hold
- Elbows close to the body
- Externally rotate the arms
✊Ways to change difficulty:
- More vertical angle = easier
- Lower angle = harder
✨Front lever raises
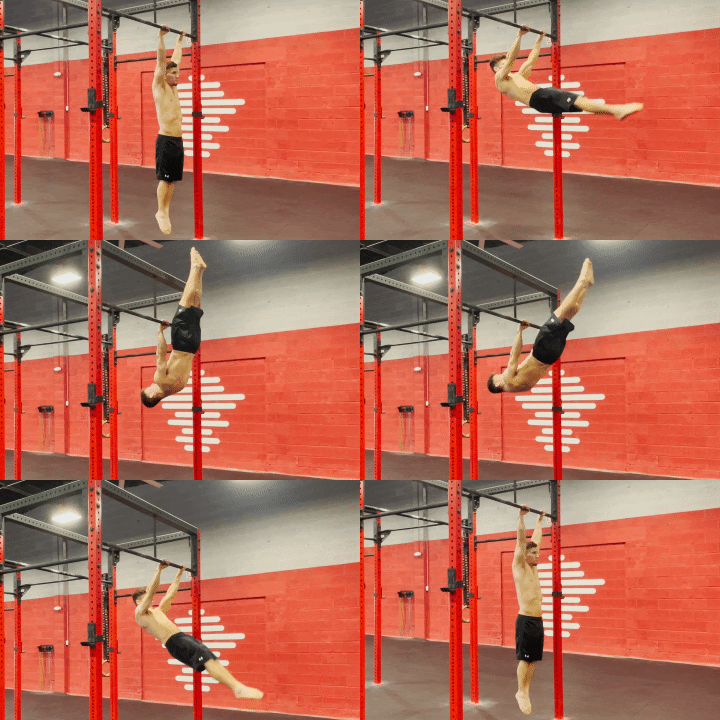
An underrated lat-builder exercise is the front lever raises. This move combines the mechanics of the front lever but moves through the full range of motion, starting an active hang and moving to a vertical hang while keeping the front lever position. The motion performed is similar to a lat pullover, but down with only bodyweight. Expect the heaviest load at the start of the exercise.
Front lever raises seem crazy, but you can definitely lower the difficulty of the exercise to suit your skill level so you can at least perform 6 full reps with good form. Simply adopt a shorter lever and progress gradually. Below is a brief guide on the body position from easiest to hardest:
Tuck > advanced tuck > frog > piked straddle > straddle > one-legged > half-lay > full extension front lever
Compared to the other exercises above, front lever raises are better done on a bar for better force production because of the stability of the bar.
☝️How to perform:
- Begin from a dead hang with a pronated grip.
- Engage in an active hang.
- Pull from your lats and lift your body into a vertical extension while maintaining body lever posture.
- Lower down with control as slowly as possible.
- Repeat for reps.
🎯Coaching pointers:
- Maintain straight arms throughout the range of motion
- Depressed and retracted scapula
- Slow negative
- Keep the chosen body posture throughout the phase
✊Ways to change difficulty:
- Slow negative
- Change body position
✨Front lever pulls
Front lever pull is the next level inverted rows. If you think about it, it’s basically an inverted row with your legs floating in mid-air and your body’s already fully horizontal. The challenge in front lever pulls is maintaining the correct body posture and maintaining it parallel to the ground.
Similar to the exercise above, choose the body lever position that you perform with good form. Ideally, you would also have mastered at least the front lever hold of that position. Of course, this exercise is relatively advanced but is an effective lat builder at home!
☝️How to perform:
- Get into the front lever position as your starting position.
- Pull your body towards the bar while maintaining the front lever body. Your hands will be roughly around your midsection.
- Lower down to the front lever hold with straight arms.
- Repeat for reps.
🎯Coaching pointers:
- Straight arms at the front lever position
- Depressed and retracted scapula
- Extended hips
- Straight bodyline
- Full body tension
- Arms near the mid-section when pulling
- Maintain the front lever position even when pulling
✊Ways to change difficulty:
- Slow negative
- Change body position
✨Front lever hold
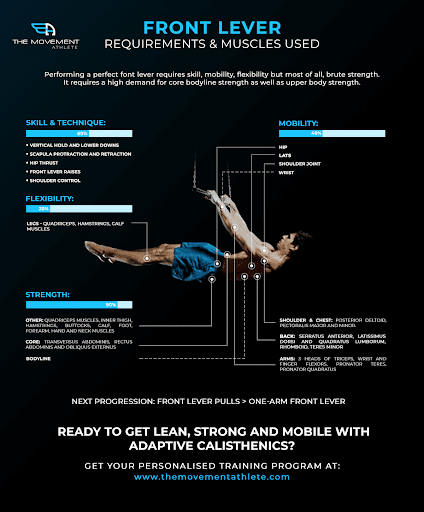
Of course, the front lever progression is definitely a part of the best exercises to build a strong and solid back. Even though it’s an isometric exercise, it can still build back muscles because of the intensity it can provide as long as you match it with the right training volume.
Before you go jump into your front lever journey, be sure to study the exercise carefully so you can prepare for the work that’s needed to be done. The better prepared you are, the better you can progress with the exercise.
We’ve set up the most comprehensive reading material on front levers so check them out!
Read here: The Ultimate Guide to Front Lever
☝️How to perform:
- From a dead hang on a bar, pull into an active hang.
- Pull your body full into the front lever position.
- Hold for a specified period of time.
🎯Coaching pointers:
- Full body tension
- Legs together and point your toes for added tension
- Arms locked out straight
- Body fully horizontal and parallel to the ground
- Hollow body core position
- Head in a neutral position
- Shoulders and scapula depressed and retracted
- If you can’t hold the front lever position, regress to an easier progression
- Film yourself to watch your form
✊Ways to change difficulty:
- Longer holds
- Use band assistance
- Change body position
🧐Frequently Asked Questions
🔎Are horizontal pulling exercises necessary or can I stick to vertical pulling alone?
Very excellent question!
In reality, you get away with building a solid, strong, and healthy back with vertical exercises alone. However, getting there with vertical exercises can be challenging because of the intensity it offers and the limitations of targeting certain muscle groups efficiently such as the posterior deltoids.l
Adding horizontal pull exercises into your workout is a smart way to develop a strong and functional back while minimizing the risk of overtraining and injuries from a single vertical pulling approach. Dr. Justin Rusin, a strength coaching specialist and author of The Functional Hypertrophy Training Program, highly recommends putting emphasis on HORIZONTAL pulling because of its effective back development results without straining the shoulders too much.
Of course, if you’re a beginner, then the horizontal pull is absolutely vital since it’s the best way to target your back while pull-ups are still out of reach.
📌Takeaway
Don’t neglect your horizontal pull exercises! They’re an essential part of back development, and horizontal pulling variations offer a lot of benefits that other exercises don’t.
As always, be sure to master the basics and perfect your form before moving on to the more advanced horizontal pull exercises. Stay safe, stay strong, and keep horizontal pulling!
If you want to learn more on how to integrate the two pulling mechanics (horizontal and vertical pulling) into a single workout routine, check out our full calisthenics pull workout below.
🤯Not sure where to begin your training?
There are a ton of exercises apart from these listed above. And if you’re a beginner, not all of these exercises should be in your routine yet. It can be easy to get overwhelmed.
Don’t worry. We’ve got you covered.👊
Begin your journey with a short assessment to know what you should be working on and to get a PERSONALIZED training approach that will boost your progress, not only for your back but for your whole body.

0 Comments