🤔I get it—pull-ups are hard. You’ve probably stared at the pull-up bar, wondering how people make it look so effortless while you’re struggling to even hang there for more than a second.
But here’s the truth: pull-ups are tough for everyone when they’re starting. And guess what? You don’t need superhuman strength to do your first pull-up. With the right approach and some help from resistance bands, you can absolutely crush it.
This article will walk you through a method that works well for people who’ve struggled to believe they’d ever get their chin over the bar. Let’s dig in!
✨ Why Pull-Ups Are So Important and Why They’re So Tough
You might already know that pull-ups are among the best exercises for building upper body strength. Pull-ups hit your back, shoulders, arms, and even your core. There’s a reason people talk about mastering the pull-up as a fitness milestone—it’s the ultimate test of strength, control, and endurance.
But here’s why pull-ups are also intimidating: they require you to lift your entire body weight using mostly your upper body. If you haven’t trained those muscles before, it feels like trying to climb a mountain. The good news? You don’t have to do it alone. With resistance bands, you can make this mountain a whole lot easier to climb.
💥 How Resistance Bands Boost Your Pull-Up Strength
Resistance bands are like your ideal training partner—always there to offer just the right amount of help but never do the work for you. They provide enough support to allow you to perform pull-ups while building strength and progressing at your own pace.
Here’s how resistance bands work for pull-ups:
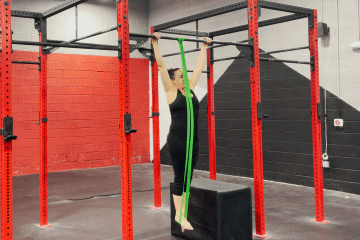
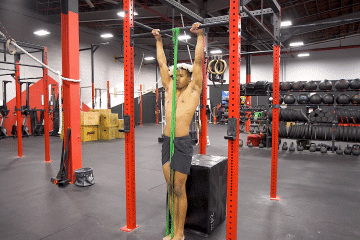
- Step 1: Loop the Band Around the Bar
Start by looping the resistance band securely over the pull-up bar. This will create the tension you need for support. - Step 2: Place Your Foot or Knee in the Band
Depending on your comfort level, place either your foot or knee into the stretched part of the band. The band will support a portion of your body weight, giving you a boost to complete the pull-up. - Step 3: Perform the Pull-Up
Use the band’s assistance to help you go through the full range of motion for the pull-up. Make sure to engage the proper muscles—your lats, shoulders, and core—as you pull yourself up to the bar. - Step 4: Progress to Lighter Bands
The beauty of resistance bands is that as you get stronger, you can gradually decrease the assistance. Simply switch to a lighter band that provides less support, challenging your muscles even more until you can perform pull-ups without any help.
⚡️Key Benefits of Using Resistance Bands for Pull-Ups:
-
🏆 Controlled Progression
Resistance bands allow you to progressively reduce the level of assistance, so you’re constantly working toward the ultimate goal: unassisted pull-ups. This gradual reduction ensures you’re still challenging yourself as you build strength.
-
🏆 Improved Form and Muscle Engagement
By using bands, you can focus on mastering proper pull-up form—shoulders back, core tight, and smooth movements—without being overwhelmed by the weight of your own body. This helps avoid bad habits or jerky motions.
-
🏆 Confidence Builder
The assistance of the band helps build confidence, especially for beginners. It lets you experience the entire pull-up movement, making it less intimidating as you work toward the unassisted version.
💯 Practical Tips for Building Strength with Resistance Bands:
-
✅ Consistency is Key
Make pull-ups with resistance bands a regular part of your routine. Consistency helps you build the necessary strength and ensures steady progress.
-
✅ Use Proper Technique
Always focus on proper form. Keep your body aligned—engage your core, avoid swinging, and pull with your back muscles, not just your arms.
-
✅ Track Your Progress
Monitor your performance. When a particular band starts feeling too easy, it’s time to switch to a lighter one. Tracking small wins like this keeps you motivated and on the right path.
-
✅ Incorporate Supporting Exercises
To accelerate your progress, add exercises like inverted rows, lat pulldowns, and push-ups to your routine. These will help strengthen the muscles you need for pull-ups.
👊How to Set Up Resistance Bands for Pull-Ups
First things first—get yourself a set of resistance bands. They come in different resistance levels, and you’ll want to start with a thicker band that provides more assistance. As you get stronger, you can move to thinner bands.
- Loop the band over the bar: Find a sturdy pull-up bar, loop one end of the band over, and pull it through itself to secure it.
- Step into the band: You can place your foot or knee into the looped end of the band. If you’re using your foot, keep the other foot crossed behind it for balance.
- Perform the pull-up: Grab the bar with both hands, engage your core, and pull yourself up until your chin is above the bar. Lower yourself slowly to really feel your muscles working.
You’ll notice that the band gives you enough support to get over the bar, but you’re still doing the work. This is key because it lets you build the strength and coordination needed to go unassisted eventually.
🔥 Crushing It with Resistance Band Pull-Up Variations
Once you’re comfortable with the standard band-assisted pull-up, it’s time to mix things up. Why? Because different variations target different muscles and help you build balanced strength.
- 🤜 Close-Grip Pull-Ups: These target your biceps and lower lats more. They’re great if you want to focus on arm strength.
- 🤜 Wide-Grip Pull-Ups: These focus on your upper back and shoulders, helping to broaden your back.
- 🤜 Negative Pull-Ups: This is where you jump or use a band to get to the top, then slowly lower yourself down. Focusing on the lowering phase (the eccentric movement) builds serious strength fast.
- 🤜 Chin-Ups with Bands: Palms facing you instead of away—this variation gives your biceps even more work and helps you transition to unassisted pull-ups faster.
Try incorporating these variations into your routine to keep things interesting and challenge different upper body parts.
🙌 Progressing from Assisted to Unassisted Pull-Ups
Now, this is where the real magic happens. Over time, you’ll start noticing that the band you’ve been using feels too easy. This is exactly what you want! It means you’re getting stronger. When that happens, switch to a lighter band, one that provides less assistance.
Keep in mind: this isn’t a race. Progressing with resistance bands requires patience and consistency. But if you stick with it, you’ll eventually be able to attempt pull-ups with no band at all. You’ll be surprised at how quickly you go from needing a thick band to using none.
You can incorporate other exercises, like rows, lat pulldowns, and even push-ups, to support your progress. These will help strengthen the muscles that make pull-ups easier.
🚫 Avoiding Common Mistakes to Maximize Your Pull-Up Progress
While resistance bands are an incredible tool for improving your pull-ups, a few common pitfalls could hinder your progress if you’re not careful.
- Relying Too Much on the Band
One of the most frequent mistakes is letting the band do all the work. While it’s there to support you, staying actively engaged throughout the movement is crucial. Focus on activating the right muscles—your lats, shoulders, and core—so you’re not just going through the motions.
A proper pull-up should involve intentionally pulling, not just passively riding the band. Always keep your form in check: shoulders back and down, core engaged, and avoid jerky or swinging motions. Think of the band as a support, not a crutch.
- Not Progressing to Lighter Bands Soon Enough
Another mistake is sticking with the same resistance band for too long. While it might feel comfortable, progress comes from challenging yourself. Gradually switch to lighter bands that offer less assistance as your strength increases.
Staying with the same band will eventually slow down your growth and may even create a plateau. The goal is to push yourself toward unassisted pull-ups continually to avoid fitness plateau. Monitor your progress regularly, and don’t hesitate to transition to less assistance once you’re ready. It’s better to struggle through a few reps with less help than to stay comfortable with the same level of support.
- Using the Wrong Resistance Band
Choosing the right band is essential to ensure steady progress. A band that’s too heavy might give you more assistance than necessary, preventing you from developing the strength needed to perform the pull-up independently.
On the other hand, a band that’s too light might not provide enough support, leading to poor form or incomplete pull-ups. Experiment with different band tensions and find the one that challenges you but still allows you to complete your reps with good technique.
- Ignoring Full Range of Motion
Many people need to work through the full range of motion. This means not fully extending at the bottom of the pull-up or failing to get your chin over the bar at the top. Resistance bands should help you achieve a full range of motion, ensuring you engage all the pull-up muscles.
Failing to do so can limit your strength development and make it harder to perform unassisted pull-ups in the future. Focus on controlled movements and proper form from start to finish.
- Speeding Through Reps
Another common mistake is rushing through repetitions. It’s easy to get carried away with momentum, especially when using bands, but this takes away muscle engagement.
By speeding through your reps, you’re not allowing your muscles to fully activate and contract, which reduces the effectiveness of the exercise. Slow, controlled movements are essential. Take your time with each pull-up—lower down slowly, pause at the bottom, and pull yourself back up with intention.
- Not Engaging the Core Properly
Pull-ups are not just a back and arm exercise; they require strong core engagement to stabilize your body throughout the movement. One mistake is allowing your legs to swing or your lower back to arch, which puts unnecessary strain on your spine.
Tightening your core and keeping your body straight will improve your overall control and strength, making the pull-up more efficient and reducing the risk of injury.
🧐 Frequently Asked Questions
🔎 What resistance band should I use for pull-ups as a beginner?
As a beginner, it’s best to start with a band that offers more assistance, typically a thicker band with higher resistance. The extra support will help you complete full pull-up movements with proper form while building strength. As you progress, you can switch to lighter bands with less assistance to gradually challenge yourself more.
🔎 How do resistance bands help improve pull-up strength?
Resistance bands provide assistance by reducing the amount of body weight you need to pull up. This allows you to practice the full range of motion and build the necessary muscles in your back, arms, and shoulders. Over time, as your strength improves, you can decrease the band’s resistance until you’re able to perform pull-ups without assistance.
🔎 Can using resistance bands make pull-ups easier over time?
Yes, resistance bands gradually help you build strength and improve your form. By using lighter bands as you get stronger, you’ll eventually be able to perform pull-ups without any assistance. They’re a great tool for progressing toward unassisted pull-ups while maintaining the correct technique.
🌟 Takeaway
If you’ve been staring at that pull-up bar, wondering if you’ll ever be able to conquer it, here’s your answer: Yes, you can! Resistance bands are your gateway to mastering pull-ups, helping you build strength at a pace that suits you.
But if you want to take your progress to the next level, The Movement Athlete can guide you every step of the way. The app provides personalized training plans tailored to your current strengths and goals, ensuring that you’re progressing safely and efficiently toward unassisted pull-ups.
Take the free assessment today and receive a custom plan designed to help you master pull-ups and other bodyweight exercises. You’re on your way to becoming a pull-up hero, one rep at a time!