L-Sit, V-Sit and Hamstring Mobility
Join the tribe of Movement & Calisthenics Athlete - people just like you that are working with their own body weight to get strength, lose fat build muscle, recover from injuries and live their best lives!
Week 1: L-Sit, V-Sit, and Hamstring Mobility
The first step to becoming a master of straight arm strength is to develop the L-sit. The L-sit is a basic skill which, when trained with grace and expertise, has a tremendous amount of carrying over to the more difficult lever skills. By following the progressions to a full L-sit and beyond, you will notice increased strength in your core musculature, shoulders and wrists, and greatly improved hamstring flexibility. During your L-sit training you will also have the perfect opportunity to practice tuning into your own body and developing body awareness.
There are many benefits to training the L-sit. Sure it’s great for those of you who want to see chiseled, rock-hard abs in the mirror everyday, but there are more subtle benefits to developing the L-sit that are much less obvious and not without their perks. L-sit stimulate the smaller muscles in the shoulders, elbows, and wrists that are used for stabilization and control.
The more consistent of a practice you have, the more these muscles will develop which will have a massive carry over to the balance and control required to master skills like the handstand and planche. On an entirely different level of anatomical observation, you may notice that a regular L-sit practice can produce long-term benefits for lower back and hip health. When holding an L-sit, your body recruits many of the muscle fibers in the back and hips which in turn receive increased blood flow and grow stronger.
Now it’s almost time to break down the progressions used to achieve the L-sit in all its glory, but first I’d like to talk about some basic prerequisites to achieve before beginning this set of progressions. The L-sit, being a movement executed in the support position, requires that you have some basic pressing strength.
The prerequisites that meet that criteria are as follows: 10 pushups, 15 chair dips, 20-second reverse plank hold and 5 hanging knee raises.
These prerequisites are all recommendations based on my own experience, therefore they are optional. I believe that each one of us moves and progresses through movements in a different way and should be allowed to explore the movements and find what works. That being said, I do not encourage anybody to attempt the more difficult moves in this progression without first getting a feel for the prerequisites and the basic exercises that come first.
L-Sit Progression Guidelines
1. Never compromise form! Beginners should start with short holds of about 5 seconds. Do not force it. Listen to your body. If your form breaks you should stop the exercise.
2. We are aiming for a solid 30-second hold on each exercise before progressing. This means for 30 seconds your form should be spot on and your breathing should be relaxed and consistent.
3. After reaching the goal of a 30-second L-sit, the next progressions will be trained for a goal of 10 seconds each and there will be more dynamic exercises coming into play.
4. At first these exercises should be trained no more than 2 days per week. The tendons at work in straight arm exercises take significantly more time to recover than our muscles do and therefore should be given more rest. At a more advanced level, it is ok to increase your training frequency to 3 or even 4 days per week.
Seven Lever Progressions

FRONT SUPPORT
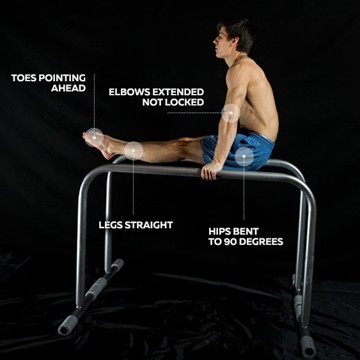
The Front Support Hold. Number one on the scale of progressions. Rotate your elbows so that the pits are pointing straight forward and press the bars or floor towards your feet. There should be no signs of shrugging in the shoulders and your upper back should be slightly rounded just like in the hollow body position or “dish.” Squeeze your glutes and point your toes to maintain a straight body line. Once this becomes easy for you, you can add some swinging while maintaining your form to build shoulder strength dynamically and improve endurance.

TUCK L-SIT
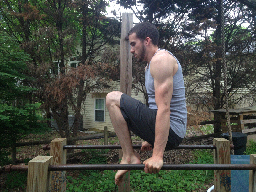
Now you are ready to move into your first true L-sit progression, the Tuck L-sit. Remember the points on form from the last progression? They remain very consistent throughout this compilation of exercises. Bend your knees to a 90-degree angle and then, by using your core and hip flexors, lift your knees up to hip height. Keep the knees together and point your toes at the ground. If your elbow pits are no longer pointing forward, you are most likely shifting your hips forward which causes the elbows to flare out. Keep the hips back and really focus on engaging your core to keep a tight position.
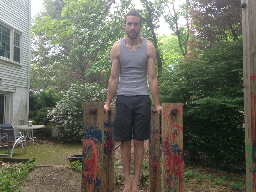
This exercise can be performed dynamically as well. Moving from a Front Support to a Tuck L-sit is called a Support Knee Raise. Performing knee raises for repetitions is a great way to build up strength and endurance.While working up to a 30 second Tuck L-sit, I highly recommend that you train this exercise dynamically as well, with a goal of 15-20 repetitions.

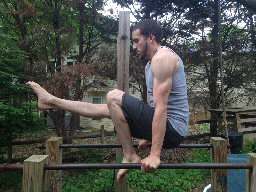
SINGLE LEG L-SIT
The Single Leg L-Sit is a fun and simple progression to help evolve your Tuck L-Sit into the mighty full L-Sit. Simply lift your knees into the tucked position and slowly extend one leg at a time while constantly keeping the knees at approximately hip height and pointing your toes. At first, you may not be able to hold a solid 90-degree angle in the hips with a straight leg.
That is OK! Work the knee extensions regularly and your hip flexors and hamstrings will begin to adjust to the exercise, getting respectively stronger and more flexible. If you are plateauing at this stage due to lack of hamstring flexibility, please refer to the section at the end of this article entitled Hamstring Flexibility and Core/Hip Flexor Conditioning.

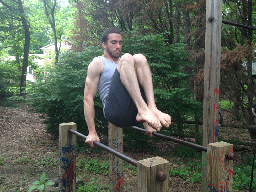
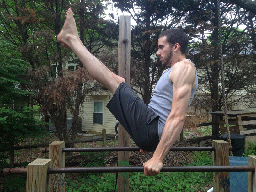
L-SIT
It is time! The Big Kahuna awaits. You are now ready to tackle the infamous L-Sit! Begin in a tuck position and extend both knees simultaneously. Keep your toes pointed and your hips back. If you started working on your hamstring flexibility in the last progression, you have a nice head start on this exercise. Again, it is ok if you cannot maintain a 90-degree hip angle quite yet. Keep practicing and stretching and with time the mobility necessary for the L-Sit will be yours.
Practice the L-Sit dynamically by performing Support Leg Lifts. With locked knees and pointed toes engage your core and hip flexors and lift your legs until you have reached a 90-degree hip angle. Work up to 15-20 repetitions for this exercise.

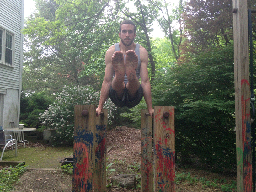
TUCK V-SIT
Now that you are a master of the L-Sit, let’s make it a bit more challenging. The V-Sit is the next goal after achieving a 30-second L-Sit. To start with this difficult move, perform it in a tuck position. Throughout the L-Sit progressions, I have carefully instructed you to keep your elbow pits forward and your hips back to maintain the proper position. However, when performing the V-Sit, the dynamic is a bit different. You must use your core strength to shift your hips forwards so they are in front of your forearms. This will cause your elbows to flare out just a little bit and will engage your posterior deltoids more than you have experienced up to this point. It should look something like this:

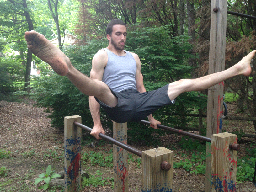
WIDE LEGS V-SIT
This next step is going to require more flexibility than any other progression so far. It is the wide legs V-Sit. It can also be called a Straddle V-Sit. By performing a V-Sit or any other lever skill in a straddle position you increase the amount of leverage you have over that of a full lever hold making it an easier variation. Move into an L-Sit, spread your legs as wide as you can while keeping the knees locked and toes pointed, then shift your hips forward like you did in the Tuck V-Sit.

V-SIT
The final progression in this week’s lever series is the full V-Sit. Mastering this skill takes lots of patience and hard work. One of the greatest determining factors in how tight your V shape looks is your active hamstring flexibility and hip flexor strength. You must be able to compress your hips and core more than the average calisthenics athlete, bringing your knees as close to your face as possible.
It is ok to start working V-Sit holds even if you cannot compress the shape as much as a gymnast. I am still working on my V-Sit and have a lot of flexibility work to do, and so do you! Get started with these progressions as soon as you can and be patient. Mastering any given lever skill takes time and determination. Good luck on your journey to achieving the awesome V-Sit! Here is a look at mine to give you an idea of how a V-Sit hold should look in the early stages:
Hamstring Flexibility and Hip Flexor/Core Conditioning
Here are some basic exercises that will help improve your L-Sit and V-Sit as well as your overall strength and flexibility.
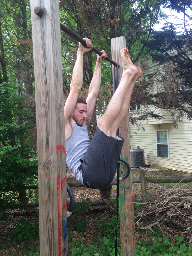
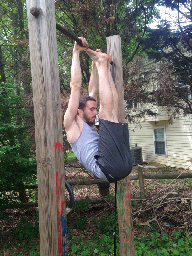
Hanging Compression Drill
This drill is fantastic for working both active and static hamstring flexibility. Hang from a bar with straight arms and relaxed shoulders. Lift both feet up to the bar with straight knees and pointed toes as usual. From here you can slide your feet under the bar and hold a static stretch by bringing your head to your knees. You can also release the feet from bar and actively hold them as close to your head as you can. This will build the active flexibility necessary for the V-Sit. Here are some pictures to demonstrate what I mean:
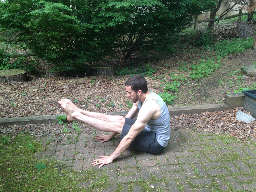
Next we will talk about seated drills for improving active hamstring flexibility. Sit down as if you were doing a static hamstring stretch by touching your toes. Place your hands on the outside of your knees and press into the ground lifting your straight legs off the ground and into your chest. Hold this position for time or move into and out of it dynamically. Both are important and each should be practiced regularly. In order to scale this movement, shift your hands closer or further from your hips. Hands close to the hips makes the exercise easier and vice versa.
So concludes the first article in the weekly lever series. Next week we will talk about handstands. Topics will include finding your balance and building strength through deliberate scaling and progression, improving flexibility and form, and of course, some fun variations to make training more interesting! Thanks for reading.
READY TO GET ON THE JOURNEY OF A LIFETIME?
See what our users are saying:
“Would you rather have the ability to boast of bench pressing 300 pounds or to do a one-arm pull-up? To me, pulling my entire body up with one arm is much more impressive. – Michael – The Movement Athlete User”
“The Movement Athlete is not the kind of program that demands you to be this physically fit to be able to perform. Instead, it caters to your own strengths and capabilities and keeps track of your progress.”
“Stick with it! It is hard at first, especially if you are stuck on a lower-level, high rep exercise. But persevering is worth it! Finally reaching each goal is so exciting.”