Ever wondered if your push-up form could be holding you back from reaching your fitness goals?
Push-ups are a fantastic and versatile exercise, working multiple muscle groups to boost strength and endurance. Yet, mastering the perfect push-up can be tricky, and many folks unknowingly make mistakes that impede progress and may even risk injuries.
Whether you’re a fitness enthusiast or a beginner, understanding and rectifying these common errors can significantly enhance your workout experience. These mistakes often go unnoticed, but their impact on your overall fitness journey can be substantial. They range from issues related to body alignment to improper breathing techniques.
In this article, we’ll not only highlight common push-up mistakes but also provide valuable insights and practical tips to help you navigate through the nuances of a flawless push-up routine.
Let’s dive into the details and refine your technique for a more effective and injury-free workout.
✨ How to Perform a Push-Up?
Performing a push-up is a great way to strengthen your upper body, including your chest, shoulders, and triceps.
To perform a push-up, start by lying face down on the floor or a mat. Place your hands shoulder-width apart, fingers pointing forward, and slightly wider than your shoulders. Extend your legs straight behind you, forming a straight line from your head to your heels. Engage your core muscles to maintain this straight body alignment.
Inhale as you lower your body towards the floor by bending your elbows, keeping your body straight without arching your back or letting your hips sag. Lower your chest until it is just above or lightly touches the ground.
Exhale as you push through your palms, straightening your arms. Avoid locking your elbows at the top of the movement and keep your body in a straight line throughout.
Repeat the process for the desired number of repetitions. If you find a full push-up challenging, modify it by performing the exercise on your knees instead of your toes.
Remember to inhale as you lower your body and exhale as you push back up. Pay attention to your form, ensuring you don’t arch your back, let your hips sag, or lock your elbows.
Gradually increase the number of repetitions as you build strength, and if you have any health concerns, consult with a fitness professional or healthcare provider before starting a new exercise routine.
Get more insights on perfecting your push-ups with our articles:
- 📍 How to Do Perfect Push-up: The Ultimate Guide for Maximum Gains and Explosive Strength
- 📍 How to do Push-ups: The Ultimate Guide
Check out also this YouTube video on 🎥Perfecting Push-ups
🎯 4 Push-Up Mistakes and How to Correct Them
Push-ups are a staple in any effective workout routine, targeting various muscle groups for increased strength and endurance. However, even the seemingly straightforward push-up can be prone to mistakes that may hinder your progress.
Here are the four common push-up mistakes and how to correct them:
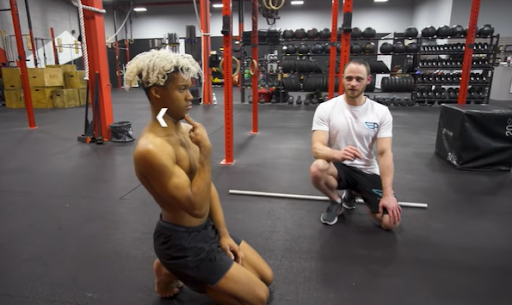
👎 Mistake #1: Not Finishing the Lock Out
If you’ve found yourself rushing through push-ups, you might be making a common mistake – not finishing the lock out properly. Do you notice yourself ducking your head, elbows flaring out, and perhaps losing engagement in your core? Breaking down this first mistake will help you understand why completing the lockout is crucial for a more effective workout.
“Not finishing the lock out,” means failing to lock your arms out to the straight position. This often happens when you’re in a hurry, trying to complete as many push-ups as possible. The focus shifts to quantity rather than quality, and in the process, the arms are never fully extended to the straight position.
This incomplete range of motion not only affects the effectiveness of the push-up but also has broader implications for your overall upper body strength and flexibility.
Completing the lock out is not just about the push-up itself; it’s about preparing your elbows for more advanced exercises like handstands or handstand pushups, where a fully straight, locked-out position is crucial.
By skipping the full range of motion, you’re missing out on fully engaging your triceps, limiting the benefits of the exercise.
Correction:
To address this issue, it is recommended to slow down the push-up, emphasizing the top position where the elbows are locked and straight.
Additionally, regressing to knee push-ups can help you focus on achieving the correct technique, ensuring you prepare your elbows and triceps for the full range of motion.
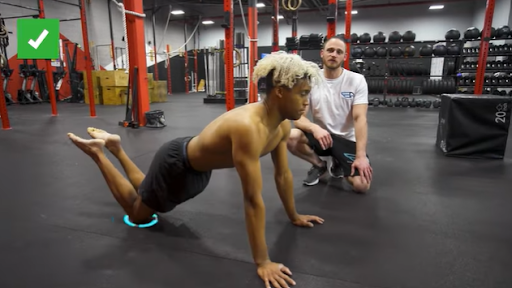
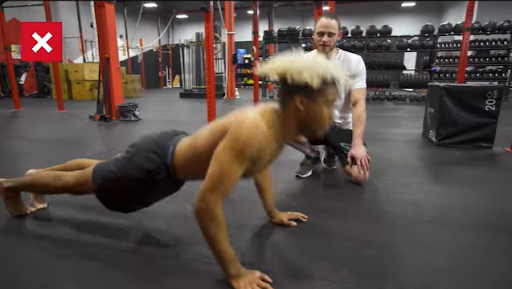
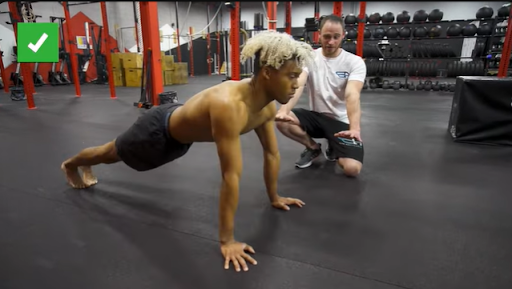
👎 Mistake #2: Ducking the Head
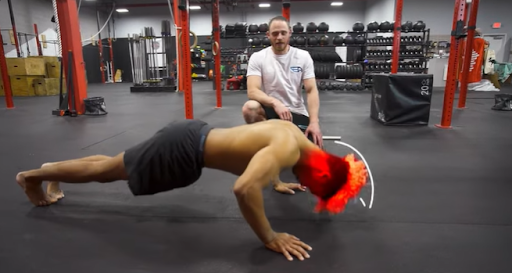
The second mistake involves ducking the head, usually a result of fatigue or negligence towards the neck position. When you observe this mistake, the push-up itself may appear normal, but you can notice the head being tucked in or craned forward.
It creates an illusion that the push-up doesn’t need to go as far because the head touches the floor sooner. Unfortunately, this practice unusually strains the neck, potentially leading to extra stress on the nerves and even headaches.
Correction:
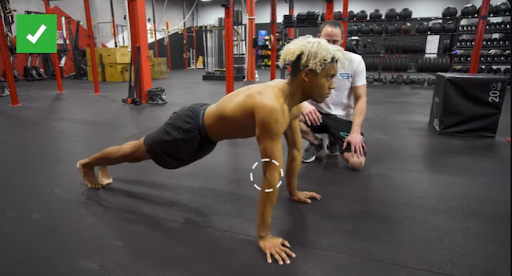
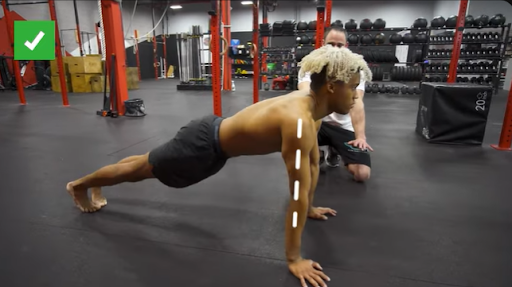
To address this issue, it’s crucial to think about neutralizing the head position and engaging the neck flexors correctly. One effective technique is the chin tuck movement.
Using your first two fingers, gently push back on your chin to bring the head into a neutral position. To practice this, start in the plank position, actively correcting the neck alignment.
Another helpful method involves using a feedback mechanism, such as a stick. By aligning the stick properly with your head, you can ensure the correct position.
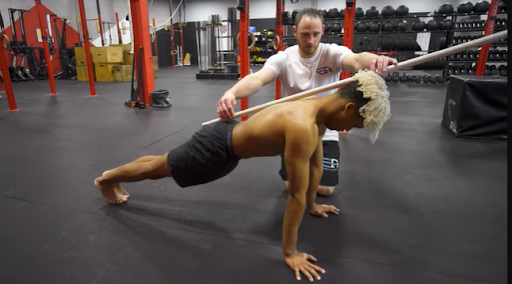
If you were to make the mistake of ducking your head, you wouldn’t contact the stick. However, when your head is in line with the stick, you’re using the correct muscles and effectively addressing the problem.
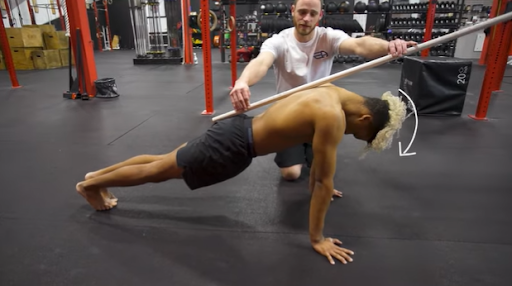
This correction involves maintaining proper head alignment throughout the entire range of motion. Using the stick as a guide ensures that your head is in the correct position, providing feedback for a more precise and effective push-up.

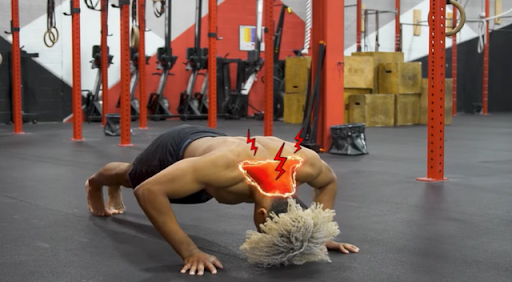
👎 Mistake #3: Elbows Flaring Out
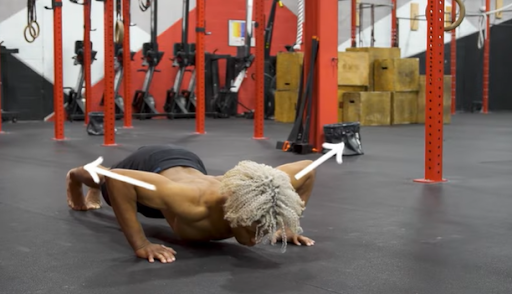
The third common mistake in push-ups involves allowing the elbows to flare out to the sides, and it’s crucial to understand why this can be problematic.
This mistake often arises due to the path of least resistance, as it may initially feel easier to perform push-ups in this manner. However, it’s important to recognize that this technique can potentially irritate the shoulders. Instead of the elbows following the preferred 30 to 45-degree plane relative to the body, they extend directly to the sides, misaligning with the shoulders.
Correction:
One effective strategy is to focus on the sensation of screwing your hands into the floor. This action induces external rotation in the shoulders, promoting a more favorable alignment for the elbows. By consciously guiding the elbows to track more behind than to the side, you can mitigate the risk of shoulder irritation.
A helpful technique is to be aware of the distance between your arms during the push-up. If your elbows are too close, you’ll likely feel excessive pressure on your lats and triceps, indicating an incorrect position. Finding a balance, where your hands are slightly screwed in, and you feel engagement in your pecs and triceps, signifies the correct alignment.
This correction not only reduces the risk of shoulder irritation but also optimizes muscle engagement, ensuring a more effective push-up.
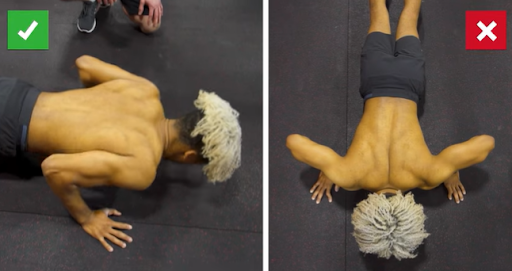
👎 Mistake #4: Loose Core
The fourth push-up mistake involves having a loose core. This manifests in two distinct forms — the arched loose core and the piked hips — each introducing its set of challenges.
1. Archeld Loose Core
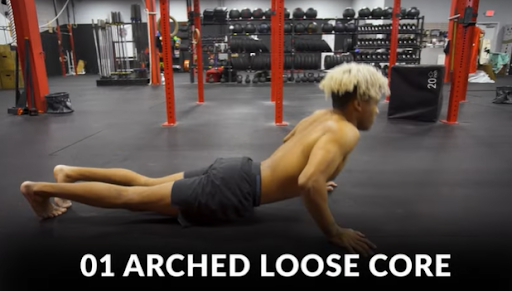
Arched loose core, compromises the proper alignment of the body and hinders the effectiveness of push-ups. This occurs when the lower back assumes an arched position, creating a noticeable misalignment between the belly button and the lower back.
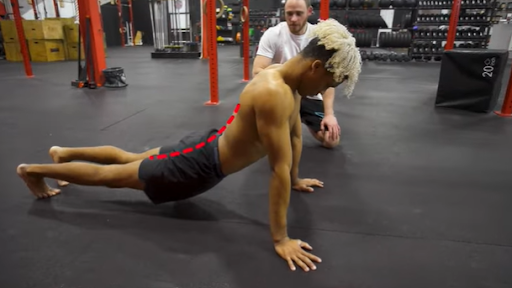
This misalignment compromises the structural integrity of the push-up, detracting from its effectiveness.
2. Too Piked in Hip

Moving on to another aspect, the issue of piked hips presents a distinct challenge during push-ups. This occurs when there is an overcompensation or fatigue in the shoulders, leading to the hips piking upward.
The result is a misalignment where the shoulders consistently lag behind the hands, disrupting the desired flat body shape.
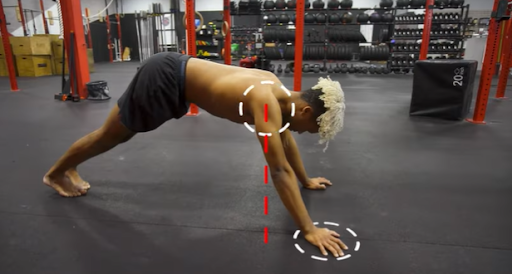
These deviations often result from a lack of understanding of how to maintain a neutral spine and a straight body shape. Fatigue exacerbates the issue, as individuals might unconsciously sacrifice form for expediency, opting for the path of least resistance.
Correction:
To address this problem, it’s crucial to regress to an easier version of the push-up, focusing on elongating the body.
To correct the issue of a loose core during push-ups, it is imperative to prioritize core stability through a methodical approach. Begin by assessing your plank position, ensuring a straight arm alignment, and utilizing external feedback, such as a mirror or a friend, to validate the correctness of your form.

Extend this practice to the elbows, engaging core muscles and executing a pelvic tilt to straighten the body. Understanding the extremes of the saggy arch and over-hollow positions is pivotal; deliberately exaggerate these positions to find the middle ground, emphasizing the necessity of recognizing and feeling these extremes.
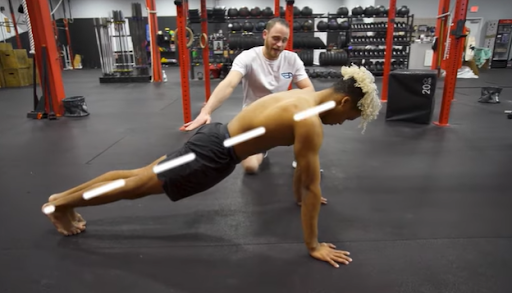
As you transition these principles to push-ups, concentrate on maintaining a straight body shape, engaging the core, and avoiding both the saggy and over-hollow positions. This correction not only enhances push-up effectiveness but also ensures optimal engagement of the chest and shoulders, preventing the breakdown of form and promoting overall strength and stability.
For advanced guidance, explore The Movement Athlete app’s body fundamental section, which provides comprehensive instructions for achieving a neutral body line in different planes.
Here’s a full video on 🎥Push-Up Mistakes You Should Avoid
🔥Tips for Improving Push-Up Form
Improving your push-up form is essential for maximizing the effectiveness of the exercise and preventing injuries. Here are some tips to help you refine your push-up technique:
1. ✅ Body Alignment
Maintain a straight line from your head to your heels. Avoid sagging your hips or arching your back. Engage your core muscles to keep your body stable throughout the movement.
2. ✅ Hand Placement
Position your hands slightly wider than shoulder-width apart. Keep your fingers pointing forward or slightly turned outward. This helps engage the chest muscles and prevents unnecessary strain on the wrists.
3. ✅ Elbow Position
Bend your elbows at a 90-degree angle, forming an “L” shape with your arms. Avoid letting your elbows flare out too wide; keep them close to your body.
4. ✅ Head and Neck Position
Keep your head in a neutral position, looking at a spot on the floor about a foot in front of you. Avoid looking up or letting your head hang down. Align your neck with your spine to prevent strain.
5. ✅ Full Range of Motion
Lower your body until your chest is a few inches from the ground. Ensure that you’re going through the full range of motion by extending your arms completely at the top of the movement.
6. ✅ Breathing
Inhale as you lower your body towards the ground. Exhale as you push back up to the starting position.
7. ✅ Engage the Muscles
Squeeze your glutes and thigh muscles to create a strong, stable base. Focus on contracting your chest muscles as you push up.
8. ✅ Controlled Movement
Avoid rushing through the exercise. Perform push-ups in a slow and controlled manner to engage your muscles effectively. Focus on the quality of each repetition rather than the quantity.
9. ✅ Modifications
If you’re a beginner or working on building strength, start with modified push-ups on your knees. Gradually progress to full push-ups as you become stronger. You can also use an elevated surface (such as a bench or step) to reduce the intensity while maintaining good form.
10. ✅ Consistency and Progression
Practice regularly to improve your strength and form. Gradually increase the difficulty by adding more repetitions or progressing to advanced push-up variations.
Helpful article:
📍How Beginners Do Push-ups: Mastering the Basics
🧐Frequently Asked Questions
🔎 Can arching my back during push-ups lead to injury?
Yes, arching your back excessively can strain your lower back and lead to injuries. Keep your body in a straight line from head to heels during push-ups. Engage your core muscles to maintain proper alignment and protect your lower back.
🔎 Why do I feel shoulder pain during push-ups?
Shoulder pain may result from improper form or excessive shoulder rotation. Keep your shoulders away from your ears, and position your hands slightly wider than shoulder-width. Focus on engaging your chest and triceps rather than placing excessive stress on your shoulders.
🔎 Is it normal to feel elbow pain while doing push-ups?
Elbow pain can occur if your elbows flare out too much during push-ups. Tuck your elbows slightly, forming a 45-degree angle with your body. This reduces stress on the elbows and focuses the effort on your chest and triceps.
🔎 How can I avoid neck strain during push-ups?
Neck strain is often a result of looking too far up or down during push-ups. Maintain a neutral neck position by keeping your gaze fixed on a point on the floor about a foot in front of you. This helps align your spine and prevents unnecessary strain on your neck.
🔎 Why do my push-ups feel too easy or too hard?
Push-ups may feel too easy if your form is incorrect, and you’re not engaging the right muscles. Conversely, they may feel too hard if your body position is improper. Ensure a straight body line, engage your core, and adjust your hand placement to find a challenging but manageable level of difficulty.
🔎 Can I do push-ups every day, or is rest necessary?
While push-ups are a great exercise, doing them every day without proper rest can lead to overtraining and an increased risk of injury. Allow at least one day of rest between push-up sessions to give your muscles time to recover and strengthen.
🔥Conclusion
Mastering push-ups requires attention to detail and a conscious effort to avoid common mistakes. By addressing issues such as incomplete lockout, ducking head, flaring elbows, and a loose core, you can optimize your push-up form, leading to more effective workouts and reduced risk of injuries. Incorporating the suggested corrections and utilizing feedback mechanisms will contribute to a safer and more rewarding calisthenics experience.
If you’re interested in mastering push-ups and gaining a comprehensive understanding of calisthenics basics, explore THE PERSONALIZED and ADAPTIVE program available through The Movement Athlete.
TAKE AN ASSESSMENT now and get a personalized training plan including recommendations and workouts you can use immediately.

