If you’re looking to add some strength and definition to your core, look no further than the leg raise progression. This simple exercise can be done with either hanging leg raises or support leg raises, depending on your level of fitness. In this article, we’ll discuss the benefits of each variation and how to perform them correctly.👊
Here’s a summary of this read:
- 🔎 What is the Leg raise
- 🔎 Benefits of Leg raise
- 🔎 Hanging vs supported
- 🔎 Leg raise progressions
- 🔎 Leg raise sample workout
Let’s get started!
✨What is the Leg raise?
The leg raise is a great exercise for your core, but it can also be a terrific way to build up your six-pack abs. The exercises are simple, and you can even do them at home!
Leg raises are one of the most underrated exercises in fitness, but are one of 📍THE BEST AB EXERCISES. They’re not generic and less popular than your regular sit-ups and crunches, but leg raises are a great way to work your core, and hip flexors and strengthen your grip without the risk of destroying your spine.
Leg raise progressions are often overlooked as well, so we put together this definitive guide for all levels of fitness; from beginner to advanced.
🤔Why do Leg raises?
🏆Stronger hip flexors
Are you feeling weak and tight in your weak flexors? While stretching might be able to help to some degree, strengthening this area using leg raises will provide a better result. Tightness is a manifestation of weakness which is why leg raises is perfect to address the issue.
🏆Better 6-pack
Crunches and sit-ups have their place, but it’s mostly for beginners. You don’t want and need to do hundreds of those.
Leg raises offer a progressive exercise that’s always going to be challenging wherever you are in your fitness journey. The exercise targets your whole rectus abdominis in its full functions which are perfect for building bigger ab muscles.
Read more: 📍How to Build 6-pack Abs
🏆Transferable core strength
The hollow body position at the bottom allows for maximum strength of the body line. Strength gains are transferable to many calisthenics movements that can lead to 📍More advanced calisthenics workouts.
🏆Easy to progress
The hanging leg raise is by no means an easy exercise, but it’s easy to adjust the intensity to initiate📍 progressive overload. Leg raise has many variations so you can get started implementing this to your routine at any level.
🏆Scapula stabilization
Whether you choose hanging or the supported hold variation, you need to execute the movement with a depressed scapula. This trains the muscle which transfers to stronger pull-ups, dips, and other movement patterns.
🏆Stronger grip
When you move to the hanging leg progression, you need to grip the bar for extended periods of time to be able to bust out the reps in your workout. You might not notice it, but your grip gets stronger over time which is perfect for your pull-up workouts.
🏆General core strength development
As mentioned earlier, performing the hanging leg raises helps to develop a stronger core, and hips (and to an extent, the arms and legs). You also achieve the other health benefits of having a strong core such as better posture, a healthier spine, better balance, and so much more.
🏆Good back health
Traditional ab training usually involves situps and crunches. Research shows that these popular floor ab trainers could wreck your back as well as develop the wrong muscle group.
Leg raises, without putting unnecessary pressure on your lower back, target, focus, and develop primarily our ab muscles.
🧐Hanging Leg Raises vs Support Hold Leg Raises
The two exercises are very much related/similar. As you’ll notice, both exercises require you to raise your legs and engage your lower abs and hip flexor muscles. The movement pattern for the lower body is similar.
The main difference is the grip and the scapula action. For the hanging progression, you need to pull back your shoulders for depression. For the support hold progression, the scapula is depressed by pushing down with your shoulders.
Supported hold/dip leg raise is a viable option if you’re grip strength is limiting you when performing reps or if you are more interested in the pushing component with the given difference in the scapula position.
Perform the exercise that suits your goals.
For more scapula help, read here: 📍What is the Scapula?
⭐️Pull-up or chin-up grip
Your grip on the bar could slightly affect your workout especially when you begin the lifting motion.
A chin-up grip minimizes the swing backward so you can maintain a vertical body alignment when you’re raising your hips. But this grip is a bit more taxing on the shoulders and arms due to the forced external rotation.
A pull-up grip is a bit more comfortable on the shoulders and arms but is prone to leaning backward which takes away the demands on your abs and hip flexors and puts more load on your lats.
Choose a grip that lets you follow a strict form.
⭐️Lying raises
Beginners can start the journey in the lying position. Once mastered this exercise, you can move toward the hanging variation. The floor variations allow you to have a more advantageous position to execute the movement. In addition, fewer demands are placed on the upper body. Perfect for beginners.
General rules for form🤸
Performing any of the leg raise progression and variation, whether it be lying, dip, or hanging leg raises, requires a proper form. It’s the only way to get the most out of the exercise.
Take note of these tips below and focus on making it a point of avoiding the mistakes, and committing
- ✅Move slowly and with control. Avoid the use of momentum
- ✅Scapula depressed
- ✅Complete the full range of motion for specific progression
- ✅Avoid leaning backward with your upper body
- ✅Choosing a variation appropriate for your skill level
- ✅Keep posterior pelvic tilt at the bottom position
- ✅BREATHE! Inhale upwards then exhale downwards
- ✅Point your toes (unless you use your feet to hold a dumbbell for weighted variations)
- ✅Keep your feet forward of the hip to maintain proper hip position
- ✅For lying progression, keep your lower back pressed on the floor before lifting your legs.
- ✅Roll your hips forward.
💥Common Leg raise mistakes
- ❌Fast reps – Using momentum and fast reps is not an efficient way to progress in this purpose. Aim for a slow and controlled tempo.
- ❌Arching the lower back – This position places the activation on your hips more rather than your core. Tilt your hips backward to engage your core and to avoid arching of the lower back.
- ❌Limited range of motion (not reaching 90 degrees at the hip) – Full range of motion allows for maximum muscular stretch which stimulates our targeted areas optimally.
- ❌Leaning backward – Backward lean on the upper body shifts the loading to your upper back which we don’t. This type of movement can be beneficial for front lever work or working your upper back, but not for primary core engagement.
- ❌Not using the suitable progression – Progression is the key. If you’re not able to perfect the form of an exercise, It’s most likely that you’re doing a too challenging progression. Swallow your pride and regress.
✨About this Progression
This is a core muscle exercise progression that will build great strength, endurance, and sweet muscular definition in your abdominal muscles. Leg raises hit your core muscles, so you gain a better athletic shape, more agile movement, and perfect form. As you might know, core control is vital for every calisthenics move and skill work.
This is a lot better than doing your basic crunches that are too easy and can hurt havoc on your back. Time to level and do the best exercises for your abs.
Basic principles still apply to all of the exercise progressions. Breathe normally while performing controlled movements. Visualize the movements being executed by the abdominal muscles and you will be able to enjoy a 6-pack soon!💪
🎯Leg Raises Progression Exercise List
✔️Step 1: Lying Knee Raises
Start by lying on the floor with your legs at a 90-degree bend and feet on the floor. Hands by your side. Lift your knees towards your chest. Pause at the topmost position for a second before lowering slowly again to the ground.
✔️Step 2: Knee Raises on Elbows
Start by lying on the floor with your legs at a 90-degree bend and feet on the floor. Hands by your side. Push your elbows down to the ground to raise your upper back off the floor performing like a mini-crunch with your upper torso. Lift your knees towards your chest. Pause at the topmost position for a second before lowering slowly again to the ground.
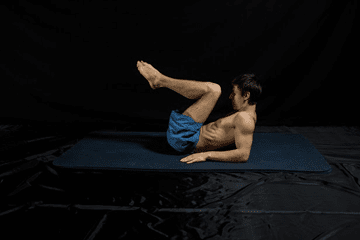
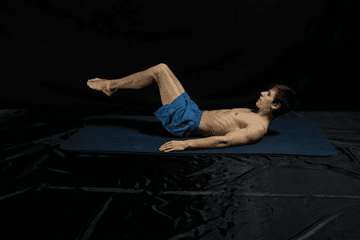
✔️Step 3: Leg Raises with Bent Knees
Lie on the floor again but with your legs just slightly bent about 6 inches from the floor. Lift your legs from this position until your thighs are perpendicular to your body. Lower back down to the starting position. By now you should feel your core straining to keep your legs supported off the ground.
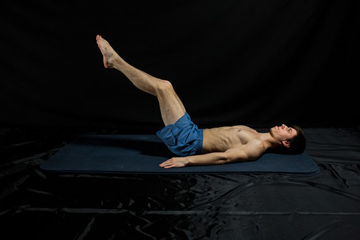
✔️Step 4: Straight Leg Raises
Lie completely flat on the floor. Begin by raising your legs. Hold your legs straight until they are perpendicular to your body. Lower with control on the way back down. The contraction of your abs occurs when you engage your lower abs to lift up your legs and when you lower your legs. Keep your upper body rigid by pushing down with your hands.

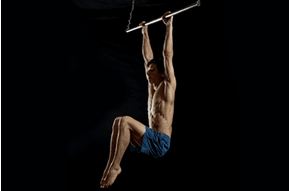
✔️Step 5: Hanging Knee Raises
Now that you’ve built good foundational core strength, we’ll move to the first of the hanging leg raise. Hang from a pull-up bar with a hollow body. Tuck your knees to your chest until your hips are past 90 degrees, then slowly lower them back down. Don’t let momentum sway you around.
✔️Step 6: Hanging Frog Raises
Hang with your legs bent at 90 degrees and open. Lift your knees to your chest while keeping the “frog-like” position. The open leg position puts more strain on the thighs. Move your hips forward then lower your legs back to the ground then repeat for reps.
✔️Step 7: Partial Hanging Leg Raises
Raising the intensity further is done by extending our legs. Start by holding your legs straight and slightly raised from the basic hanging position. Raise them slightly until they are completely straight and parallel to the ground before returning to the original partially raised position.
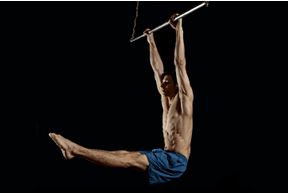
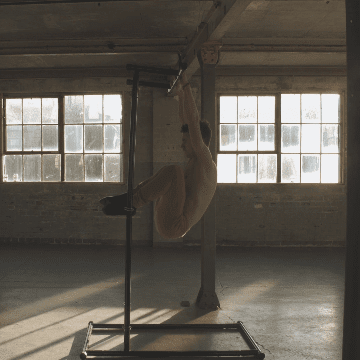
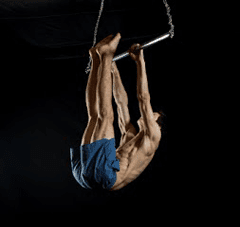
✔️Step 8: Hanging Straight Leg Raises
The ultimate goal of this progression. Start in the straight leg hanging position and raise your legs using your (now very strong) core muscles until they touch the bar. If you have worked through this progression, we are proud of you. If you think you have hit the skill ceiling, you can still make it more challenging by adding weights to your feet but make sure you can still perform with proper form.
😍How to add your workout?
Now that we’ve included the important tips and progressions, it’s time to move to how you can implement the exercise in your routine.
Here it is:👇
- ♥️Choose the right progression for you
- ♥️3 sets of 8 to 20 rep range
- ♥️1 to 2 minute rest period
- ♥️Do this at the end of your workouts
- ♥️2 to 3 times per week
📌To sum it up
Leg raise is an amazing movement pattern you need to include in your workout. It’s simple, easy to progress, and very effective in building your abs and overall health.🩺
The move has a high skill ceiling and very low entry point so every level of fitness can enjoy the fantastic benefits of leg raises.🦵
If you’re unsure where and how to fit the exercise into your routine, taking our assessment can massively help so you can know where to start your journey and you can also get a personalized workout that is more effective and more fun! 💯