Join the tribe of Movement & Calisthenics Athlete – People just like you that are working with their own body weight to get strength, lose fat build muscle, recover from injuries and live their best lives!
When it comes to getting a strong, defined core, nothing beats calisthenics exercises. These exercises use your own body weight as resistance, making them ideal for strengthening and sculpting your abs. This article will discuss 5 of the best calisthenics exercises for your abs. So if you’re looking to build strength and muscle in this area, read on!
Quick Myth Busters
Ab exercises alone won’t show your 6-pack
No matter how well you do your ab exercises, your 6-pack won’t be visible not until you get rid of the layer of fat that’s covering it. All of us have a 6-pack. Each comes in different shapes and sizes, but the main crucial difference why not everyone has the chiseled enough is because most aren’t meeting the necessary work to trim the stubborn fat. The exercises below are excellent to make your ab muscles pop off even more.
So in addition to these strengthening and hypertrophy exercises, make sure you’re eating a healthy diet and getting enough cardio in order to see results.
For better results in terms of building your ab muscles, check out this article: 6 Key Principles of Building Muscle with Calisthenics
A 6-pack doesn’t mean strong abs
Having a six-pack seems like the epitome of healthy, but it doesn’t always translate to having a solid core. It just means that you are lean with minimal body fat. A strong core? Not necessarily. But if you train with the exercises below, then your six-pack is probably strong as hell!
This article will help you build a 6-pack the right way: Why Most 6-pack Challenges Suck!
Doing 10000x sit-ups and crunches won’t work
Sit-ups and crunches work your abs, but they have their limitations. Both exercises are not progressive enough, and you can easily master them after a short time frame. This means that if you want to get the most out of your workout, you have to do A LOT more reps to make it work. Unfortunately, your back will first ache before you even build muscle with those exercises.
There are far better options that we will discuss below that have a wider range of progressions to cater to beginners to advanced.
You can’t train your abs everyday
Many people crave the elusive washboard abs, so people tend to overwork their abs. This can work if the intensity of your other exercises is low, but you have to remember that your abdominal muscles are also active during other exercises. The abs work as stabilizers for most of the calisthenics exercises.
For example, in an EMG (electromyographic analysis), pull-ups exhibited a high rectus abdominis activation. This also holds true for other exercises such as squats, and push-ups. That’s why some athletes can argue that they can build a 6-pack abs without doing other ab exercises and relying fully on the calisthenics fundamentals.
In addition, putting too much emphasis on one area will result in overtraining or muscular imbalances and this can lead to an injury.
Train your abs like how you would train the rest of the body. Give rest days for your abs to let it grow. There are also other parts of your core that demand equal respect and attention.
Here are also the other common myths surrounding calisthenics: STOP THE LIES! 5 Common Calisthenics Myths DEBUNKED!
5 Best calisthenics ab exercises
Hollow body hold
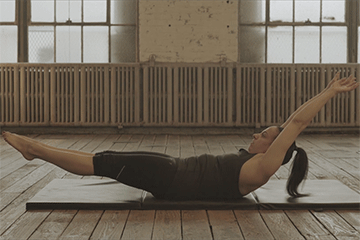
The hollow body is a gymnasts’ staple in core development and for a good reason. It forces your entire midsection to work as one unit to maintain a stable hollow position.
It also has a good transfer to other calisthenics exercises because of the similar body position you need to hold. Especially for handstands in which the hollow body holds simulates this position. It’s basically a handstand but your back is on the ground. This makes it perfect for developing strength and muscle in your abs.
Don’t let its looks fool you. It’s definitely not easy to hold and most people attempting this for the first time fail to hold it for even a second with good form. Luckily, as mentioned earlier, this exercise can be scaled to suit your skill level.
How to perform:
- Begin by lying on the floor belly up.
- Raise your arms overhead.
- Engage your cover and initiate a posterior pelvic tilt.
- Lift your arms, upper back, and legsoff the floor so that your mid back to your glutes are the only parts in contact.
- Hold for a specified amount of time.
- Repeat for reps.
Coaching pointers:
- To activate your core, make sure that there’s no gap in between your lower back and the floor. A hand shouldn’t be able to squeeze in. You can do this by tilting your hips backward to do the posterior pelvic tilt (PPT).
- Breathe normally during the hold. Don’t hold your breath.
- Full body tension even on your legs and arms. Pointing your toes and hands can help.
- Straight arms and legs to get an even better transfer to handstands.
- Head in an awkward double chin position or tucked to chest to alleviate unnecessary tension on the neck
Easier:
- Bent arms and legs hollow hold
- Tuck hollow hold with arms raised forward
- Hollow body hold with arms on the side
Harder:
- Hollow body rocks
- Weighted hollow body hold
- V-snaps – A dynamic ab flexion exercise with hollow holds at the bottom
Plank
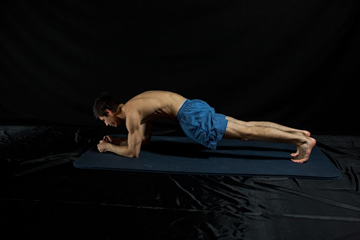
If you’re looking into building a solid core and you’re just a beginner, then the plank is a must-have in your routine. It’s the perfect exercise to develop strength and stability in your abs, glutes, and lower back. It also develops the correct technique and positioning for your shoulders and scapula for push-ups when performed correctly.
Like the hollow hold, it’s also one of the few exercises that has a good carryover to other exercises such as handstands, push-ups, planche, and squats.
A published research in the Journal of Strength and Conditioning Research in 2013 shows that planks are much superior in developing the abs (and the full core in fact) compared to isolation exercises such as crunches.
Just one thing to keep in mind, especially for more advanced athletes: once you can hold it for 60-seconds or more, it will be less efficient in building muscle. If you’ve reached this limit, it’s time to move on to a harder plank progression for an added challenge.
How to perform:
- Begin in a quadruped position.
- Lower down into your elbows.
- Extend your legs backwards one at a time.
- Hold the position for a sustained time.
- Repeat for reps.
Coaching Pointers:
- Be sure to push your shoulders away from your ear and down away from the ground to stabilize your shoulders safely
- Chest and back in a neutral position
- Posterior pelvic tilt
- Elbows stacked over your shoulders
- Straight bodyline withou aching from the lower back or hunching at the upper back
- Hips not too high or too low
- Full body tension by squeezing every muscle
- Breathe normally as possible
- Head in neutral position
Easier:
- Knee plank
- Two arms plank on an elevated surface
Harder:
- Higher surface plank
- Plank pulses
- One arm plank
- Plank on an unstable surface
- Plank with hands far away from the body
Dragon flag
This iconic ab exercise is popularised by the legendary immortal dragon, Bruce Lee and for a good reason. Dragon flag is an advanced exercise that not only works your abs, but also your shoulders, triceps, and lats. It’s one of the best exercises to build strength and muscle in your abs for more intermediate to advanced athletes.
This exercise is commonly used as part of a progression of the front lever hold. The body position of the dragon flag is very similar to the front lever’s progression and has direct transferability to the skill.
You might be surprised that you can easily hold a front lever if you already have mastered the dragon flag. You can also use so many variations in the exercise to address specific sticking points in the full dragon flag hold. You can do the exercise as an isometric hold, dynamic isotonic movement, or a mix of both.
Here’s a better look on how to master the dragon flag exercise.
Be sure to have a good solid foundation of at least planks, hollow holds, and upper body fundamentals before trying out the exercise.
How to perform:
- Lie down just below your support base.
- Hold on to the support base with your body straight.
- Lift your body vertically until perpendicular to the ground with your upper back and back of the head only touching the floor.
- Lower down while keeping your body in a straight line until your body is close to the floor.
- Hold the bottom position for a few seconds.
- Rise back up to the vertical position.
- Repeat for reps.
Coaching pointers:
- Posterior pelvic tilt
- Pull with upper body so keep it stable
- Keep your troso straight and aligned
- No piking at the hips
- Full body tension – pointing your toes helps for leg tension
- Have a soft padding for your upper body to keep it comfortable
- Finding a comfortable solid base is also good. A straight bar is ideal to have a good comfortable hold unto the base.
- Avoid flaring your elbows out
Easier:
- Easier progression body position: tuck > advanced tuck > frog > straddle > full
- Eccentrics only
- Limit range of motion
Harder:
- Lower close to the ground
- Full dragon flag isometric hold at the bottom position
- Combining a hold at the bottom then isotonic movements in between
- Weighted dragon flags (weights placed at the ankles)
Hanging leg raises
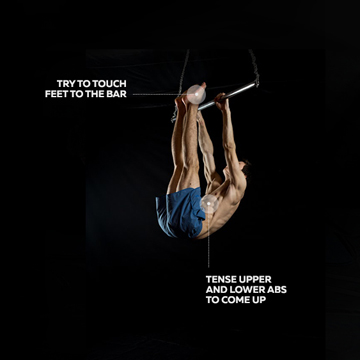
This exercise is incredible for developing your abs while working other aspects as well such as your hanging grip and lower body mobility.
There are two ways to perform this movement. You can either hang from a bar or support yourself on a dip station. Choose the method that works best for your goals. If you’re just training for your ab strength, then hanging is the better option since you can dead turn so you can focus more on your ab flexion. Support on dips is better if you would want to get that scapula depression as well for skills like Manna and the L-sit.
The only downside with this exercise is that if you lack lower body mobility, you’re prone to performing the incorrect technique. Leaning backwards tends to activate the lats and removes some of the activation from the core.
To minimize this, use a supinated grip (chin-up grip) or use weighted leg raises with bent knees. The second option minimize the mobility requirement but provides a great scalable exercise.
Here’s the complete leg raise progression from complete beginners to advanced.
How to perform:
- Begin hanging from a pull-up bar with a comfortable grip for you.
- Tilt your backward.
- Raise your legs to your highest point (ideally until your feet touch the bar).
- Lower down with control.
- Repeat for reps.
Coaching pointers:
- Controlled movements. Don’t use momentum.
- Hinge at the hips.
- Don’t lean backwards to compensate for the lack of mobility.
- Point your toes for added leg tension.
- Use your abs to facilitate the movement.
- Expect cramping on your quads if you lack mobility and flexibility.
Easier:
- Leg raises on the floor
- Knee raises
- Limit range of motion up the 90-degree hip flexion
Harder:
- Weighted leg raises
- Full range of motion
- Slower tempo
Ab wheel
Ab wheel rollout is not just a gimmick exercise. It’s one of the best exercises for targeting your rectus abdominis and building that six-pack. It’s a very simple exercise to perform, but it can be quite challenging, especially if you’re new to movement pattern and just starting out.
The ab wheel is an anti-extension exercise meaning it trains your abs to stabilize itself and prevent from overextending the spine by bracing the core. It’s effective for building a solid core strength with gains transfering to other movement patterns.
The only downside to the wheel rollouts is the requirement for shoulder mobility. It can be limiting at the beginning if you lack the necessary requirement, but calisthenics always has a solution. Here are some options to play with to avoid the shoulder overhead mobility limitation:
- Use a barbell that can roll smoothly across the surface instead of an ab wheel
- Do ab wheel rollouts on gymnastics rings that allow free movement that’s more comfortable with your shoulders. Although the instability factor will add difficulty, the adjustable ring height also allows for an easy adjustment of difficulty.
Ab wheel rollouts look easy so people tend to jump straight to the standing variation. DO NOT DO THIS. This is a recipe for injury.
Take a smarter approach by beginning with the easiest exercise (which is already very difficult), then work your way towards the top.
Here’s the Ab wheel progression for your reference.
How to perform:
- Prepare ab wheel in a pike position.
- Lower down with control until arms overhead.
- Return back to position by crunching the abs.
- Repeat for reps.
Coaching pointers:
- Posterior pelvic tilt with no arch in the back
- Hips extended
- Keep your body straight when performing the movement
- Full range of motion
- Full body tension
- Choose the ab wheel setup that’s most comfortable so you can max your efforts in the exercise
Easier:
- Limit the range of motion by doing rollouts in front of a wall
- Ab wheel rollouts on knees
- Using resistance bands placed on hips
Harder:
- Full standing variation
- Full range of motion
- Done on rings with full range
- One-arm ab wheel rollouts
Takeaway
The 5 best calisthenics exercises for your abs are optimal for developing strength, muscle, and more. Always choose the correct progression that suits your skill level. Each of these exercises has a progression to make them more challenging, so you can continue getting stronger and developing that six-pack. Choose the exercise that’s most comfortable for you and that offers the best gains aligned to your goals. You don’t actually have to do all five.
If you’re unsure where to start, we highly recommend taking a more personalized approach to your training. This offers a safer and more effective way to develop your core.
Not all beginners start at the same level. Begin the journey that suits specifically you by taking the short assessment below.
TAKE THE ASSESSMENT NOW!