Have you ever found the art of balancing in a freestanding handstand fascinating? This entails performing a handstand without relying on a wall or other support. It’s an impressive skill that requires a combination of strength, control, and technique.
📍Handstands have a timeless appeal, not only as a gymnastic skill but also as a fantastic way to improve your overall body strength, balance, and body awareness.
There is something for everyone here, whether you are an experienced gymnast looking to hone your technique or a complete novice just getting your feet wet in the world of handstands.
There are essential elements that form the foundation for a successful 📍Freestanding handstand. These include the following:
- ✅ Enhancing your wrist and shoulder mobility
- ✅ Building core strength
- ✅ Developing body awareness
In this article, we will embark on this exciting journey and unlock the secrets to mastering the freestanding handstand with 11 progressions.
✊ Remember: Before you start, remember, safety first! You should be confident in your ability to bail out safely from any of these progressions.
What is a Freestanding Handstand? 🤸
A freestanding handstand is a calisthenics and gymnastics position where a person balances upside down on their hands without any support from a wall, object, or other aid. It requires a combination of strength, balance, and control to maintain a vertical position with the body held straight and rigid.
They are used in calisthenics routines to build upper body and core strength and are a foundation for advanced calisthenics moves like handstand push-ups.
💥The 11 Progressions to Freestanding Handstand
If you’ve ever wanted to do a 📍Freestanding handstand, this is for you. These 11 progressions will make it easy to conquer the freestanding handstand.
Before diving into the eleven progressions, 📌check out our articles on handstands:
- 📍 Mastering the Perfect Forward Handstand Walk: Breaking Down the Elements
- 📍 Mastering the Art of Handstand: Progression, Muscles Used, and Benefits
- 📍 Mastering the Perfect Forward Handstand Walk: Breaking Down the Elements
- 📍 From Beginner to Pro: 7 Progressions for the Perfect Wall Handstand
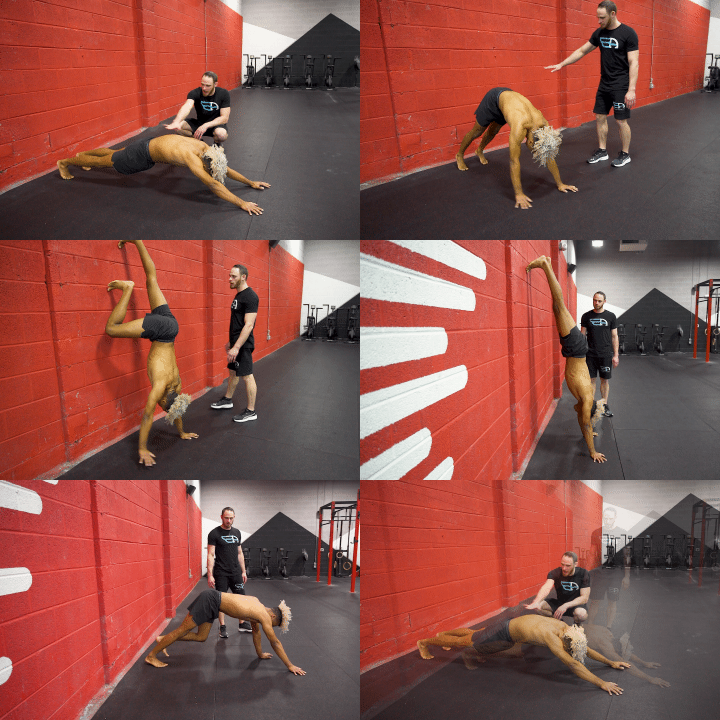
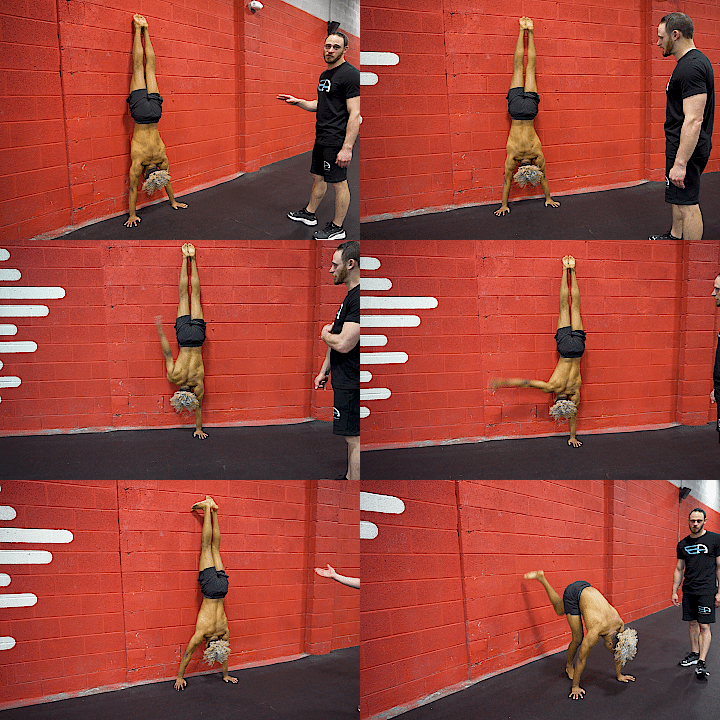
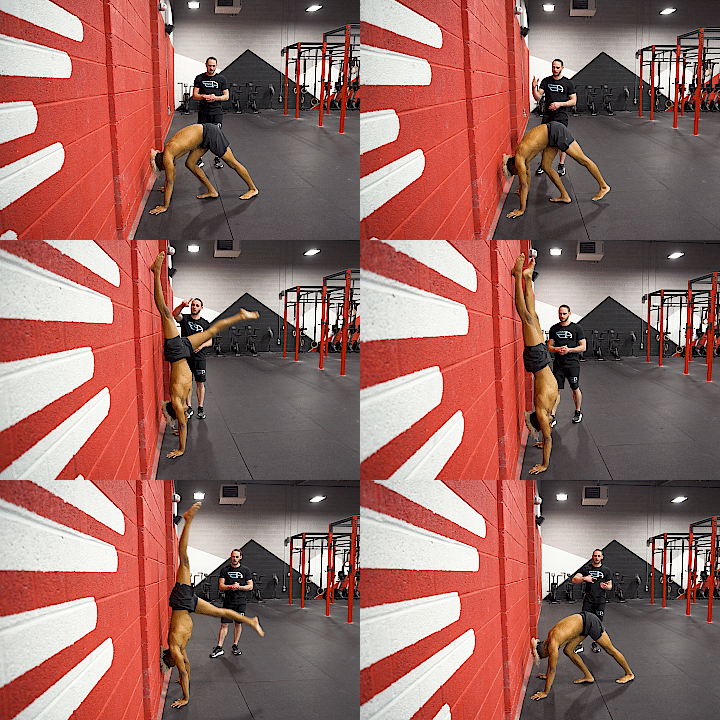
1. ✅ Wall Walk and Tension Bridge
The first progression focuses on building shoulder strength and control. Strong shoulders are crucial for supporting and stabilizing your body in a freestanding handstand position.
Without sufficient shoulder strength and control, maintaining balance and preventing wobbling or collapsing becomes challenging. From this foundation, you can build the strength and stability needed for advanced handstands.
🎯 How to: Begin in a straight-arm plank position and walk your hands up the wall until you’re in a handstand. Then, walk back down until your feet touch the ground. From here, transition into a “tension bridge” by shaping your body into a hollow position with straight arms and legs.
The “Wall Walk” progression not only strengthens your shoulders but also helps you understand the movements required for entering and exiting a handstand safely. It’s a crucial step towards mastering the freestanding handstand.
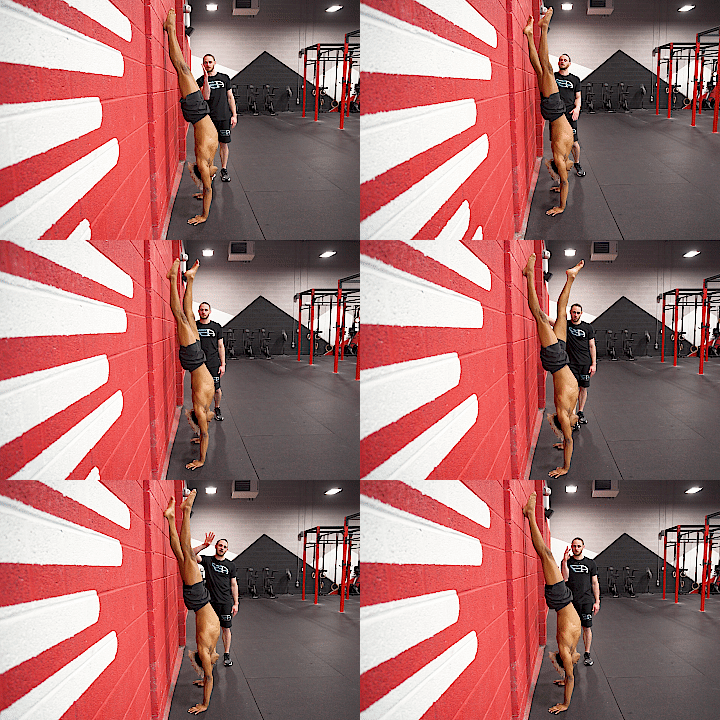
2. ✅ Wall Handstand and Shoulder Shrugs
In the second progression, you’ll stay close to the wall. This progression builds shoulder strength, reinforces handstand posture, and promotes control for freestanding handstands.
🎯 How to: Start in a handstand against the wall and practice shrugging your shoulders while maintaining an elevated position. Relax your trapezius muscles to bring your shoulders down, then actively push them up.
This exercise enhances your ability to maintain elevated shoulders, a key component of a stable handstand.
3. ✅ Wall Handstand with Pointing and Flexing Feet
For the third progression, you’ll work on coordination. Coordination is vital for freestanding handstands because it trains you to control your feet and balance when one foot is away from the wall.
In freestanding handstands, you’ll often need to make adjustments to maintain balance, and this progression helps you hone those skills by practicing foot control and balance near the wall.
🎯 How to: Start by setting up in the wall handstand position, just as you have in previous progressions. As you enter the handstand, begin with both feet flexed. Now, practice pointing one foot while keeping the other flexed, and then switch.
Continue this alternating motion of pointing and flexing, one foot at a time. It’s important to note that only one leg should be away from the wall at any given time, while the other remains in contact with the wall for support.
4. ✅ Shoulder Taps and Thigh Taps
The fourth progression introduces you to single-arm work. This progression combines strength and skill, preparing you for freestanding handstands and refining your technique. It helps build the necessary strength and stability in one arm at a time.
In freestanding handstands, you rely on single-arm support for balance and control, making this progression crucial for overall stability and control in the handstand position.
🎯 How to: To perform this exercise, begin in a wall handstand position. In an alternating fashion, shift your weight onto one arm while tapping the same-side shoulder. This challenges your balance and places most of the weight on one arm, helping to strengthen your wrists, elbows, and shoulders.
After mastering the shoulder taps, you can progress to the thigh taps. Here, with straight arms, shift your weight to one arm and tap your thigh on the same side.
This exercise increases the load on your supporting arm and further enhances your handstand stability.
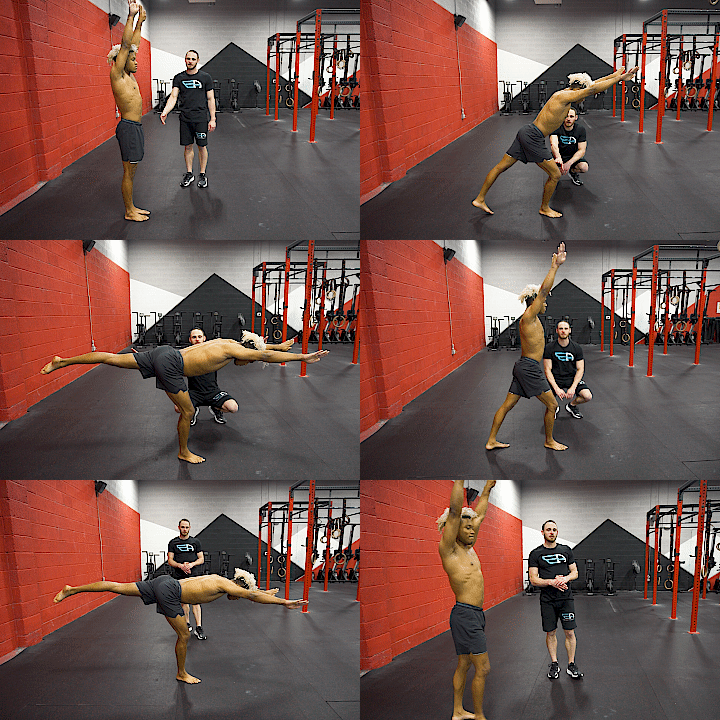
5. ✅ The T-Shape Drill
The T-Shape Drill combines strength and skill. This progression emphasizes control and balance between vertical and horizontal positions, an essential skill for achieving a stable freestanding handstand.
🎯 How to: To perform this drill, start in a standing position with your arms raised. Begin with your legs staggered and one leg extended in front of you. Shift your weight onto the front leg while keeping your body straight, aiming to find a horizontal position resembling a handstand.
Then, return to the starting position and shift your weight onto the back leg. This exercise emphasizes control and stability as you transition from a standing position to a handstand and back. Ensure you maintain good body alignment and avoid common errors like lowering your arms or bending at the hips
Common errors in the T-Shape Drill include dropping arms too low, bending hips, and becoming wobbly or loose.
📌Related article: 4 Reasons Why you can’t balance a freestanding handstand: Handstand balancing tips
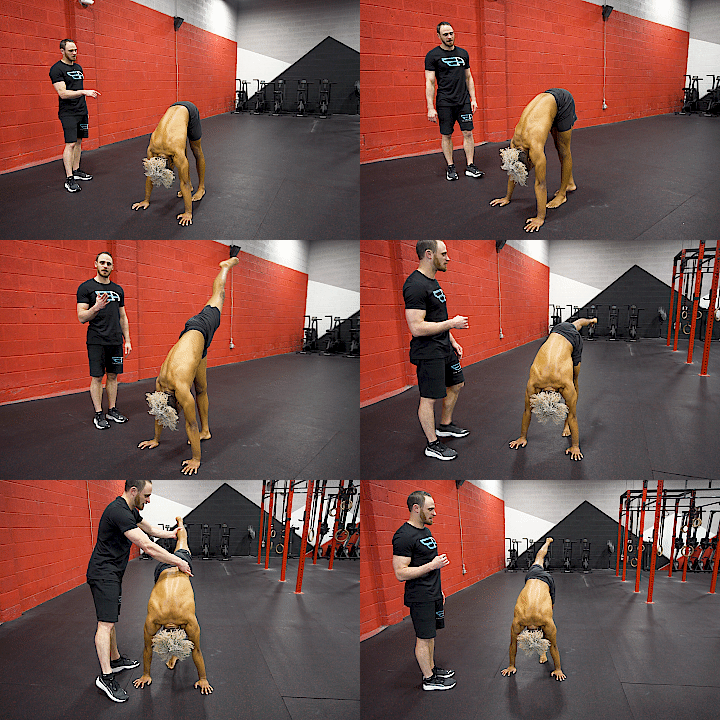
6. ✅ Pike Stand Leg Raise
In this progression, you’ll focus on the bottom part of the kick-up. This progression helps achieve a freestanding handstand by strengthening and developing control in the lower part of the movement. It helps improve the ability to smoothly raise one leg, which is essential for a balanced freestanding handstand.
🎯 Here’s how: Starting from a pike stand position with straight legs and arms, you lift one leg slowly and return it down, working on symmetry and hip mobility. Work on maintaining a square hip position while doing this exercise.
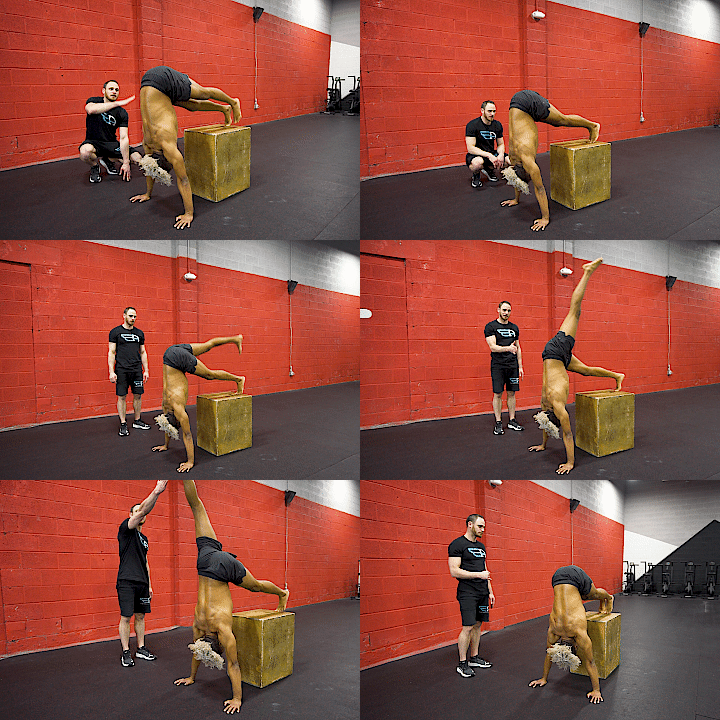
7. ✅ Figure 7 Single Leg Lift on a Box
Progress further by taking the leg raise exercise to the next level. This progression moves you away from external support, transitioning towards a freestanding handstand. It is more challenging due to the increased weight on the wrists, which requires hamstring flexibility.
You can aim to balance in such a way that it almost feels like your bottom leg is floating on top of the box, reducing the weight on it and emphasizing balance and hamstring strength.
🎯 How to: Starting from a Figure 7 shape handstand on a box, you lift one leg at a time to a vertical position and replace it, alternating between legs.
8. ✅ Mini Kickups
The eighth progression involves mini kickups. These are designed to practice the momentum and coordination needed for kicking into a handstand with real speed.
🎯 How to: Begin in a pike stand or down dog position with your hands firmly planted on the floor. Maintain your shoulders over your hands and a rounded shape in your body. One leg should be bent and positioned in the front, while the other leg is straight and extends behind you. To perform mini kickups, push off the floor with the bent front leg, allowing the straight rear leg to rise behind you.
The focus here is on consistency, rhythm, and coordination. Initially, you don’t need to aim for a high kick; instead, prioritize maintaining a consistent and controlled kick motion.
As you improve, work on extending the straight leg more towards the vertical. Practice on both sides to ensure balanced development. The goal is to build the skill of kicking into a handstand effectively and consistently.
9. ✅ Kick to Handstand at the Wall
In the ninth progression, you’ll aim for a handstand against the wall. This exercise enhances your ability to control balance during the transition from a kick to a vertical handstand position against the wall.
It also improves leg coordination, a crucial aspect of maintaining balance in freestanding handstands. By emphasizing consistency in your movements, this progression ensures you can execute the kick to handstand reliably.
How to: To perform it, stand in front of a wall in a handstand position. Gradually raise one leg, aiming for a vertical position without accelerating into the wall or losing balance. Ensure both legs are consistent, emphasizing a smooth transition to vertical, incorporating elements from previous progressions
10. ✅ Leg Switches with Back to Wall
The leg switch progression is an important step towards achieving a freestanding handstand. It hones your coordination and balance skills, which are critical when transitioning between different positions while in a handstand.
As you become proficient at leg switches, you’ll be better prepared to tackle the challenges of maintaining stability in a freestanding handstand.
🎯 How to: Start with your back facing the wall in a handstand position. Maintain balance and alternately lift one leg off the wall while lowering the other, focusing on seamless coordination and balance.
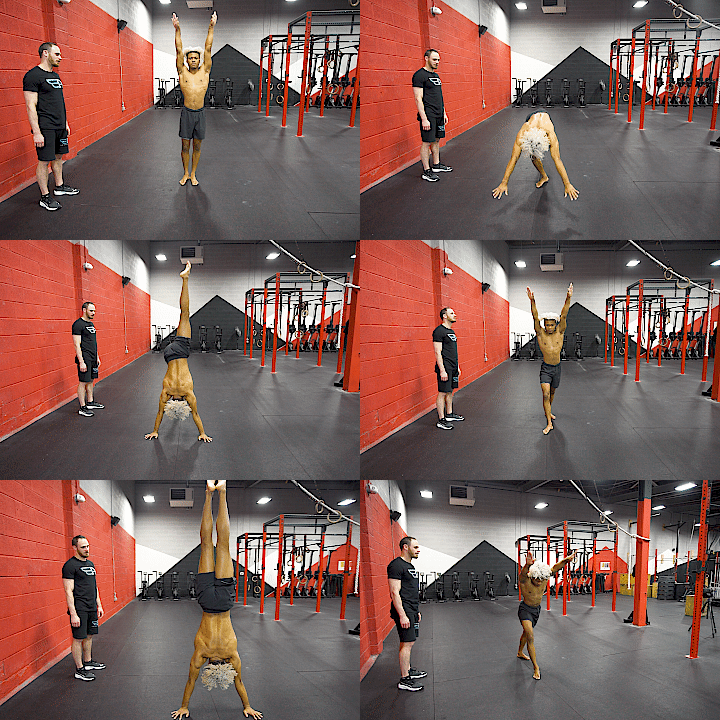
11. ✅ Freestanding Kick to Handstand
The final progression is combining all the elements covered to perform a freestanding kick to handstand.
🎯 How to: Start with arms up, kick through the phases (lunge, T-shape, needle, handstand), and return to the starting position. Focus on smooth, controlled movements.
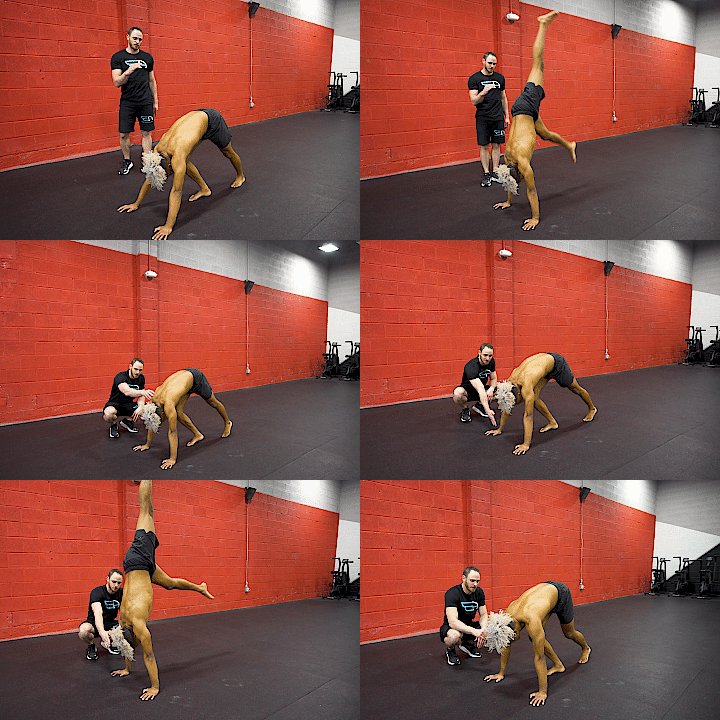
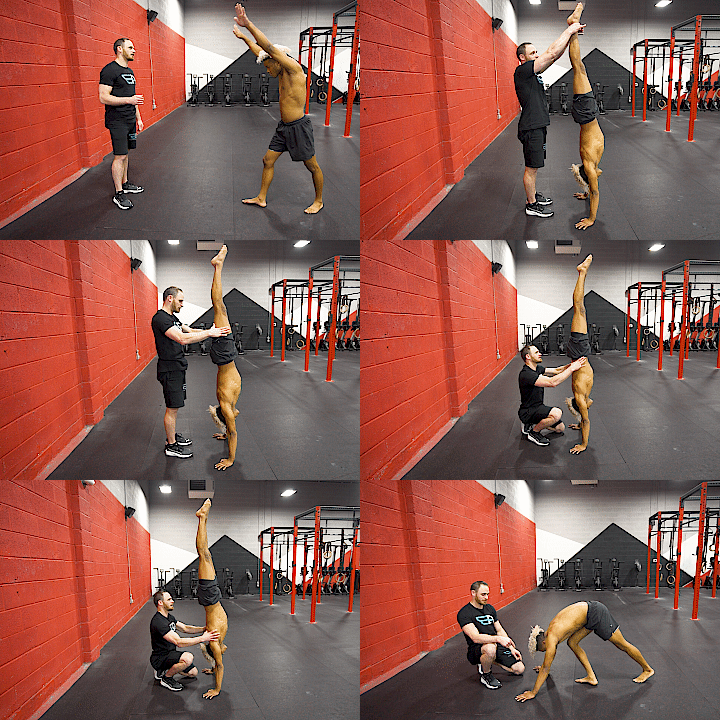
✨Bonus: Buddy Spotting
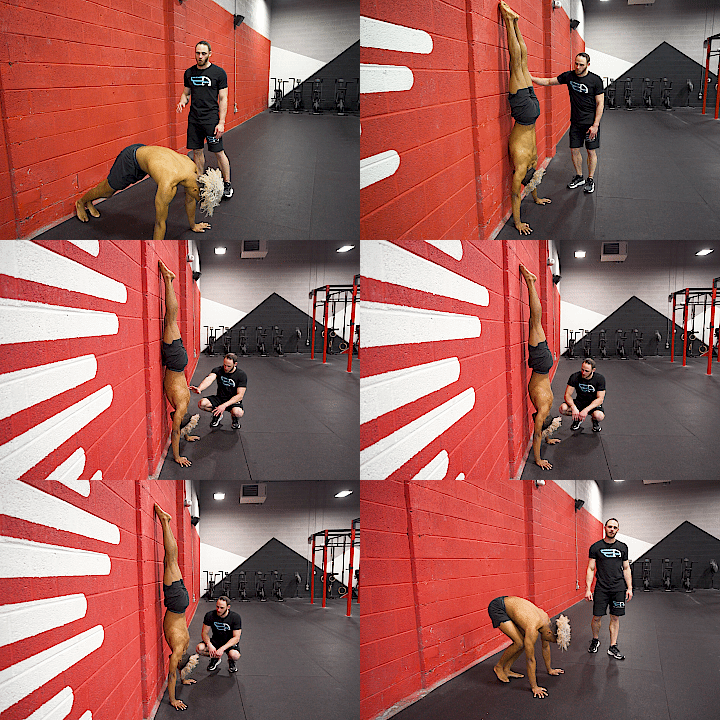
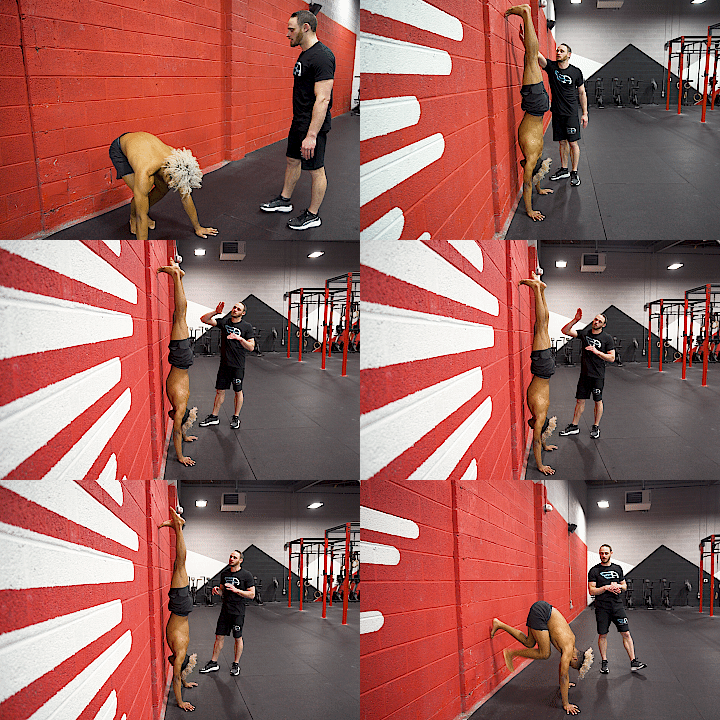
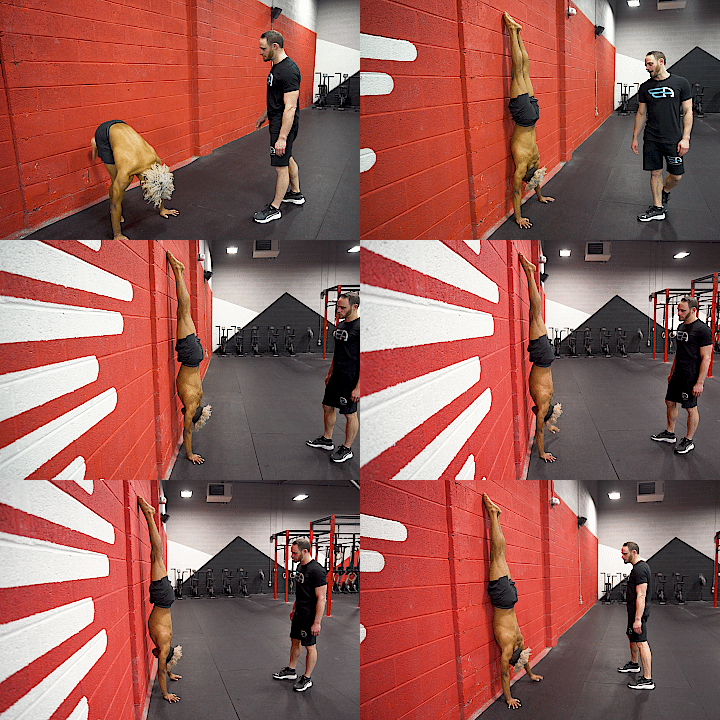
If you have a buddy, you can try a spotting exercise. This spotting technique serves multiple purposes—it aids you in the handstand by providing essential support during the initial kick-up, helping you learn to stabilize your position as you strive for balance.
🎯 How to: The spotter gradually moves their hands from the top to the wrists of the person doing the handstand.
Having a spotter is especially valuable for beginners as they develop the required strength and control. This collaborative approach can boost your confidence and improve your progress on the journey to achieving a freestanding handstand.
Here’s the link to the YouTube video for Freestanding Handstand, part 1:👇
And here’s part 2 of the progressions of a Freestanding Handstand:👇
🙌 Bailing Out of a Handstand
Bailing out of a handstand involves safely exiting the position to avoid injury. There are two common types of bailing out of a handstand:
1. Rolling Out 🧘🏻♂️
To execute this method, tuck your chin, bend your arms, and initiate a controlled roll to one side. This technique helps you safely exit a handstand without putting excessive strain on your wrists.
2. Cartwheeling Out 🤸
Cartwheeling out of a handstand involves bringing one hand down, followed by the other while allowing your legs to follow suit. This dynamic exit can be useful when you need to quickly regain your balance.
Both methods should be practiced to ensure you can safely exit a handstand in different situations. Check the YouTube video here:👇
📌Related article: Press to Handstand Fails: 7 Tips to Avoid Injuries!
🧐Frequently Asked Questions
🔎How long does it take to learn a freestanding handstand?
Learning times vary, but with consistent practice, it can take a few weeks to several months to achieve a solid freestanding handstand.
🔎What are the key exercises to strengthen my core for handstands?
Effective core-strengthening exercises include planks, hollow holds, and leg raises.
🔎Should I use a wall for support when practicing handstands?
Using a wall can be helpful for beginners to build confidence, but eventually, aim to practice away from the wall to develop balance and control.
🔎Are there any safety tips for practicing handstands?
Always practice on a soft surface, like a mat, and have a spotter or instructor if possible. Avoid over-arching your back to prevent injuries.
🔎Do I need special equipment to practice freestanding handstands?
While equipment like yoga blocks or parallettes can be beneficial, they are not essential. You can practice handstands with just an open space and a soft surface.
🔎Can anyone learn to do a freestanding handstand, regardless of age or fitness level?
Yes, with dedication and proper progression, people of various ages and fitness levels can work towards achieving a freestanding handstand. It’s important to start at your own pace and gradually build strength and balance.
🔥Conclusion
These 11 progressions are your roadmap to mastering the freestanding handstand. Remember, consistency and practice are key. Start with the earlier progressions and gradually work your way up to the freestanding kick handstand.
💯 Building a freestanding handstand is a journey that requires patience, practice, and dedication. Keep pushing your boundaries, and you’ll eventually achieve that perfect balance. Spot handstands from your feet and gradually work towards your wrists to further enhance your handstand skills.
Want to get started with calisthenics? The Movement Athlete Academy can give you the most comprehensive program.
Unlock the path to building real-life strength, bullet-proof joints, and a gymnast-like body with Adaptive Calisthenics.
TAKE AN ASSESSMENT with The Movement Athlete Academy 🏆 to access expert guidance, personalized workouts, and a transformative fitness experience!💪

