😲Can you imagine defying gravity and standing tall on your hands, turning the world as you know it upside down?
In a world where your feet are firmly planted on the ground, mastering the art of the handstand opens up a whole new dimension of physical prowess and mental focus. With the seven progressions to wall handstand mastery, you will change not only your world but also your perspective.
👊The seven progressions invite you to explore the boundaries of your strength, balance, and agility. Starting this thrilling journey, you’ll discover that handstands are more than just a physical feat; they’re a canvas for self-expression and a metaphor for defying limitations.
In this article, we will talk about the seven progressions to a perfect wall handstand that will turn your world upside down.👇
🔥7 Progressions to Handstand 🤸
The seven progressions are your ticket to mastering wall handstands. They’re the real deal, designed to help you build the strength and balance to flip your world upside down and stand tall on your hands.
Before diving into the progression, safety always comes first. It’s crucial to know how to enter and exit each position safely. Understanding the bailout options is paramount, from the first drill standing on the floor to the full wall handstand.
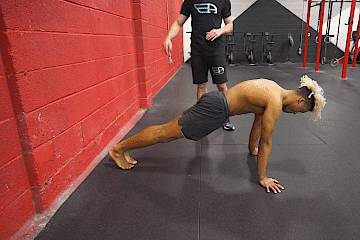
🌟Progression 1: Wall Standing Drill
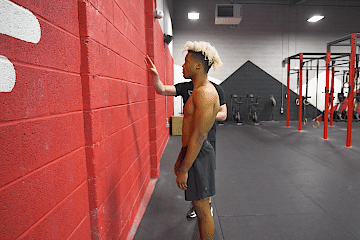
Begin by positioning yourself approximately one to two feet away from the wall. Extend your arms forward, aiming to create an angle of around 30 to 45 degrees with the wall. This fundamental exercise simulates the posture of a handstand.
Pay close attention to important elements. Ensure your arms remain fully extended and locked while your shoulders touch your ears. Keep your head in a neutral position and maintain a perfectly straight body. These are vital cues that demand your unwavering focus.
As you become more comfortable in this position, gradually shift your feet farther away from the wall. This adjustment transfers more weight onto your hands and intensifies the engagement of your core muscles.
You may feel an increase in strain, but consider it a positive sign of progress. Embrace the challenge, as it signifies you’re heading in the right direction.
Remember, this drill is designed to refine your form and 📍build strength. Concentrate on activating the specific muscle groups required for a successful handstand. Stay dedicated, and you’ll see improvement in no time.
Now, let’s delve into the subsequent progressions, each building upon the last to help you master the art of the handstand.
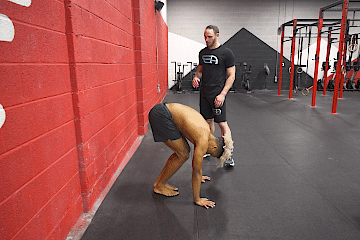
🌟Progression 2: Downward Dog and Shoulder Movements
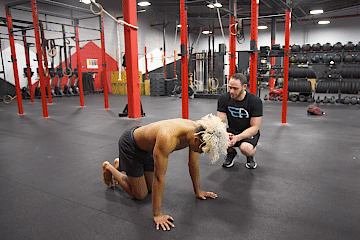
Start by positioning yourself on the ground, then transition into downward dog by straightening your legs and pushing your entire body toward the rear.
This move introduces you to inverted shapes, as your torso and head are now upside down. The focus here is on extending through the shoulders and creating an open angle between your wrists and hips. You’ll also notice increased hamstring flexibility in this position.
Next, incorporate shoulder shrugs into your downward dog. Elevate and depress your shoulders, pushing forward and downward into the ground.
This exercise mimics the extended position you’ll need for a handstand. This progression lays the foundation for being inverted and mastering scapular movements crucial for handstand control.
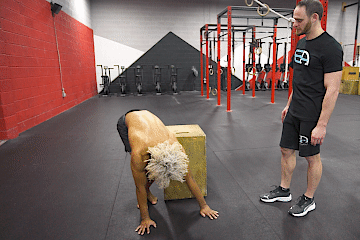
🌟Progression 3: Tucked Handstand on a Box
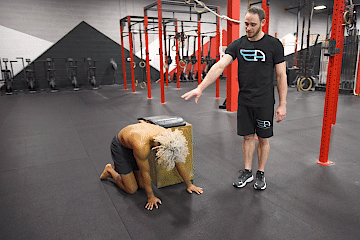
With a tucked handstand on a box, you place yourself beside a wooden box, keeping your legs next to it and your hands in front. Your knees will be the only part of your body touching the surface.
Focus on creating a stacked body line from hips to shoulders to hands, mimicking the handstand position. You’re still not bearing full body weight on your wrists at this point, but you’re working on an open shoulder line, arm locking, and proper positioning for a successful handstand.
Remember to maintain steady breathing throughout this exercise.
Related article: 📍The Proper Way to Breath during Exercise to Maximize Performance
🌟Progression 4: L-Handstand at the Wall
Now, you’ll explore the L-handstand, also known as the figure seven handstand.
Position yourself about 3 feet away from a wall and place your hands correctly on the floor. Gradually walk your feet up the wall, which requires good hamstring flexibility.
Ensure your hips, shoulders, and hands are stacked, and maintain a neutral head position. Your legs should be straight in this L shape. Using the wall as support, this progression allows you to focus on perfecting your form without worrying about balance.
🌟Progression 5: L Handstand on a Box with Shoulder Shrugs
To take the L-Handstand to the next level, transfer it to the box and add shoulder shrugs after holding it statically.
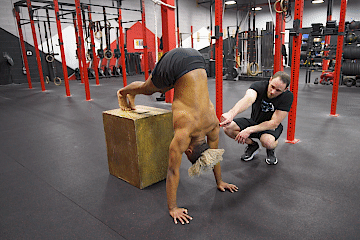
Start by standing next to the box and crossing one leg over it before crossing the other. Maintain a straight leg position, creating the familiar stacked figure seven or L-Handstand shape. Being on top of the box requires more core and hip flexor engagement. As before, concentrate on shoulder extension, hand placement, head alignment, and controlled breathing.
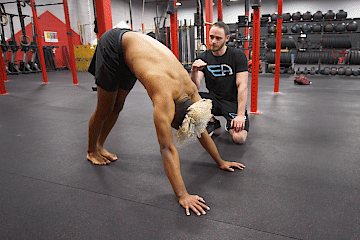
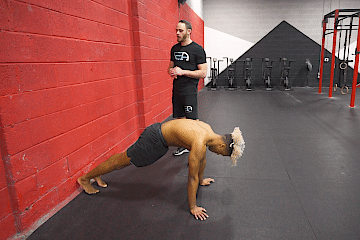
🌟Progression 6: Three-Quarter Handstand at the Wall
Moving to the sixth progression, you’ll focus on the three-quarter handstand at the wall. Start in a plank position facing away from the wall and step one leg at a time up the wall while walking your hands towards the wall.
You’ll find that this position places less strain on the wrists. While not fully vertical or stacked, you are in an inverted position. This is a crucial step, as it helps build the necessary strength and confidence to enter and exit the handstand safely.
🌟Progression 7: Full Wall Handstand
The final progression takes you to the full handstand. Begin on a plank on the floor, walk up the wall, and move your hands closer to the wall to achieve a near-vertical position.
In this advanced stage, you’ll feel the weight distributed more evenly between your hands and wrists, especially if you flex your feet. However, remember to learn how to safely exit this position to ensure your safety.
These seven progressions provide a comprehensive foundation for mastering the wall handstand. As you advance through each stage, you’ll develop the strength, balance, and control necessary to achieve this impressive feat. Remember to practice diligently and prioritize safety throughout your handstand journey.
Keep reading for more handstand-related articles: 👇
- 📌 Mastering the Art of Handstand: Progression, Muscles Used, and Benefits
- 📌 Mastering the Perfect Forward Handstand Walk: Breaking Down the Elements
- 📌 Mastering Advanced Handstand Walk Progressions: Taking Your Skills to the Next Level
Challenges and Obstacles During Handstand Progression
During the handstand progression journey, typical challenges and obstacles include:
🤜 Balance Issues
Maintaining equilibrium while inverted can be difficult. Learning to find the sweet spot and make small adjustments is key.
🤜 Wrist Discomfort
The wrists often bear the body’s weight, leading to discomfort. Strengthening wrist muscles and using proper hand placement can alleviate this.
🤜 Fear of Falling
Fear can hinder progress. Building confidence and practicing near a wall or with a spotter can help overcome this fear.
🤜 Core and Shoulder Strength
Developing the necessary core and shoulder strength takes time and consistent training.
🤜 Consistency and Patience
Achieving a freestanding handstand requires dedication and patience. Progress may seem slow, but consistency is crucial.
Addressing these challenges through consistent practice and proper technique can lead to successful handstand progression.
🧐Frequently Asked Questions
🔎 What are the key benefits of using progressions to learn a handstand?
Using progressions to learn a handstand offers benefits like improved balance, increased strength, enhanced body awareness, and a safer, more structured approach to mastering this skill.
🔎 How long does it typically take to progress through these handstand stages and achieve a freestanding handstand?
The time it takes to progress through handstand stages and achieve a freestanding handstand varies from person to person. It can range from a few weeks to several months of consistent practice.
🔎 What if I can’t hold a straight body position in the tucked handstand on a box?
It’s common to struggle initially. Work on core and hip flexor strength and practice the tucked position regularly to improve your form over time.
👊Conclusion
Mastering these seven progressions will lay a solid foundation for your wall handstand journey. Take your time, focus on each step, and always prioritize safety. Soon, you’ll be ready to move away from the wall and explore the world of freestanding handstands.
If you’re looking for more guidance, check out the Movement Athlete. It offers a lifelong, progressive, and effective bodyweight training program.
Take your FREE Assessment and explore the app for additional progressions, leading you toward mastery of the art of handstands.
Keep practicing, and you’ll soon find yourself defying gravity with confidence and control! 💪

