Have you mastered the fundamental handstand walk?🤔 Can you confidently walk forward, swerve into a safe bail from different angles, and now want a new challenge to change your perspective?🤔
If so, consider this your VIP pass to the next level. And by “proficiency,” it means having those fundamentals locked down and a knack for nailing those controlled handstand walks.
But if you haven’t dipped your toes into the world of handstand walks just yet, check out this full video on 📌Handstand Walk Tutorial: Learn 6 Key Tips and Recognize Your Perfect Walk
In this article, we will be diving into thirteen distinct handstand walk progression that will elevate your skills. So, let’s jump right in!👇
✨Handstand Walk Overview
The 📌handstand walk is a cool skill that involves walking on your hands while in a fully inverted position. Often seen in gymnastics and calisthenics, this technique demands a strong core, impeccable balance, and precise weight distribution.💯
🎯You can start by mastering stationary 📌handstands before progressing to walking. It requires coordination, upper body strength, and continuous adjustments to maintain equilibrium. The handstand walk showcases the harmonious fusion of strength, control, and agility, making it a remarkable feat of body movement.
⚡️13 Distinct Handstand Walk Progression
Here are the 13 distinct handstand walk progression that gets you up to a new level of challenge to level up your handstand walk skills.
Progression 1: 👊Plank Shoulder and Thigh Taps
Plank Shoulder Taps
In this handstand progression, you’ll be focusing on mastering weight transfer and building core strength. You start with plank taps, mimicking the weight shift by tapping your shoulders in a plank position.
Progressing further, you move on to thigh taps, extending your arm’s reach and intensifying the challenge.
Plank Thigh Taps
Finally, the single arm plank demands total weight support on one arm, with your shoulder slightly beyond your hand, preparing you for the handstand walk’s one-arm balance.
These exercises lay the groundwork for effective weight transfer and balance, crucial skills for advanced handstand movements. By practicing these drills consistently, you’ll develop the strength and stability needed to confidently execute handstand walks, maintaining control and poise throughout the journey.
Progression 2: 👊Quadruped Walk
In the second progression towards mastering handstands, you’ll be delving into the quadruped walk in four distinct directions. This exercise focuses on honing your core stability and ensuring your spine remains in a neutral, flat position while enhancing your ability to coordinate movements in diverse orientations.
Start by assuming the quadruped position, aligning your shoulders with your hands, and placing your hips directly over your knees. In this posture, you’ll practice walking by moving your opposite arm and opposite leg, all the while engaging your core for stability and maintaining controlled breathing.
The key here is to master weight transfer in various directions, preparing you for more advanced maneuvers. Pay close attention to keeping your arms straight when planting them and maintaining a slight bend when lifting them, which mirrors the natural mechanics of walking. This progression solidifies your core strength and movement coordination, essential components for advancing in your handstand practice.
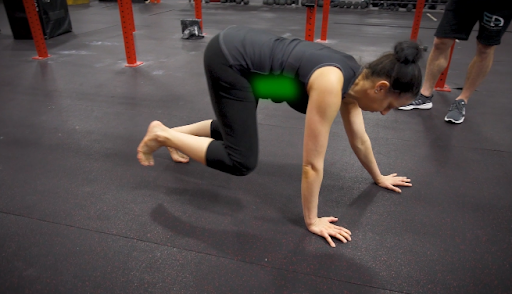
Progression 3: 👊Bear walk

In your third progression toward mastering handstands, we introduce the bearwalk, a multifaceted exercise in which you’ll navigate forwards, backwards, and sideways.
To begin, assume the bearwalk position, similar to a downward dog or a mountain pose. As you move forward, focus on a specific technique: gently bending your elbows as you lift them and then locking them back in place as you plant them, much like the precise movements required for handstand walking.
The backward bearwalk presents a unique challenge, as half of your body is inverted, giving you the valuable sense of walking upside down. By adding lateral movements to the mix, you’ll tackle four different directions while practicing the art of being half inverted, with your hips elevated above your head and hands.
This progression further enhances your ability to control your body’s movements, a vital skill for advancing in your handstand practice.
Progression 4: 👊Wheelbarrow Elevated
The fourth progression in your handstand journey is the wheelbarrow elevated. If you have a partner, this is the perfect opportunity to elevate yourself as close to a handstand as possible, or even anything lower will work too.
However, if you’re practicing solo, you can use a furniture slider or simply wear socks on a hardwood floor to begin getting accustomed to walking in various directions.
What’s intriguing about this exercise is that the angle you choose significantly impacts the muscles engaged.
When in a more horizontal position, it places more strain on your core, whereas a more vertical position shifts the workload to your shoulders and wrists.
To get started, assume a plank position, lifting one leg while your partner holds the other. Rest both ankles on your partner’s shoulders, and then commence walking. Take four steps forward, four steps backward, three steps to the right, and three steps to the left.
To conclude, lower one leg, and then the other, to the ground. This exercise doubles as endurance training as it eliminates the need for balance and handstands, allowing you to focus on walking. You can aim for longer durations, performing up to 30 steps in each direction, building endurance that will complement your handstand walk training and improve overall strength and stability.
Progression 5: 👊Elevated Pike Handstand Taps
Elevated pike handstand Thigh taps
Elevated pike handstand Shoulder taps
In the elevated pike handstand tap progression, you’ll work on your shoulder and thigh taps. This exercise requires hamstring flexibility and gets you used to shifting your weight while maintaining a handstand-like shape.
Begin by assuming the figure seven or bent body handstand shape, leaning onto one side, and tapping either the same shoulder or the opposite shoulder.
After mastering the shoulder taps, you’ll progress to thigh or hip taps. In this advanced position, you’ll spend even more time on one arm, which demands considerable hamstring flexibility.
If needed, you can opt for a regression by slightly bending your legs. The main objective here is to get comfortable in an inverted position with your hands supporting the majority of your body weight while swaying from side to side.
This progression further refines your handstand control and core stability, preparing you for the intricate movements and weight distribution required in advanced handstand walks.
Progression 6: 👊Handstand Taps at the Wall
In the sixth progression in your handstand journey, you’ll get into handstand shoulder taps at the wall, incorporating both shoulder and thigh taps for added complexity. Transitioning from the previous progression, the tight handstand, where your body was in a straight line, you’ll now be facing the wall with your chest.
To begin, shift your body weight onto one arm while maintaining your handstand position and tap either the same side shoulder or the opposite shoulder, depending on your preference. After mastering the shoulder taps, progress to the thigh taps, where you’ll be on one arm for an extended duration, requiring you to sustain that position while tapping your thighs.
This advanced exercise hones your balance, strength, and stability, making it a crucial step in your journey toward mastering handstands and handstand walks.

Progression 7: 👊Wall Walks
The next progression is on wall walks to further refine your skills. Begin in the straight arm plank position, facing away from the wall. Your initial movement involves lifting one foot onto the wall and matching it with the other.
As you do this, you’ll start walking backward toward the wall, allowing your legs to ascend the wall gradually. Eventually, you’ll reach a handstand position against the wall.
To reverse the movement, carefully walk your feet down while simultaneously moving your hands forward.
This exercise is designed to enhance your walking skills while transitioning into a familiar chest-facing handstand position at the wall.
Wall walks are an important step in developing the strength and control required for advanced handstand walks and maintaining proper alignment throughout your handstand practice. Keep practicing to refine your technique and build the necessary strength for handstand success.
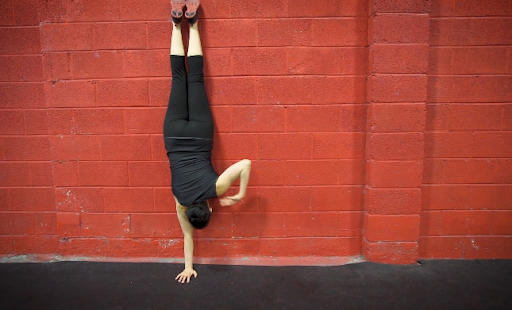
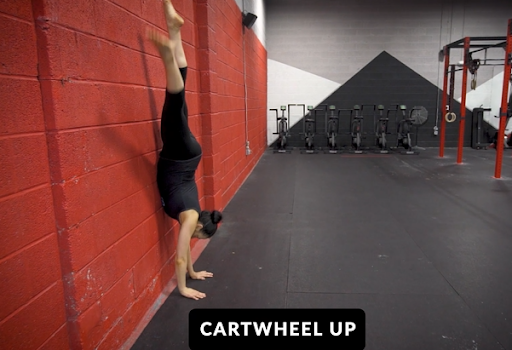
Progression 8: 👊Single Arm Handstand at Wall
Another progression is a single arm handstand at the wall, maintaining a chest-facing orientation. You have various entry options, such as the cartwheel up or the wall walk up, but for this, you’ll be using the cartwheel approach.
Pay close attention to the crucial role your hips play in this progression. As you shift your weight onto one hand, notice how your hips gradually align over the hand, ensuring your body remains straight and stable.
This progression is pivotal in addressing the strength component required for wall walks in any direction, whether it’s forwards, backwards, or sideways. As you briefly support your weight on a single arm, you’ll develop the strength and control necessary for advanced handstand walks, reinforcing your ability to maintain a straight and stable posture throughout your handstand journey.
Progression 9: 👊Planche and Reverse Planche at the Wall
Reverse Planche at wall
In this stage, you’ll focus on developing strength and control while balancing in a planche and reverse planche position at the wall.
Begin in a handstand facing the wall, with your hand-to-wall distance dictating the difficulty level. As you walk up the wall, focus on leaning your shoulders forward, extending them beyond your hands, and then gently glide off the wall to find balance in your handstand position. This exercise helps you adapt to various shoulder angles for better handstand control.
Planche at wall
For the reverse planche, begin with your back facing the wall and kick up to it. Maintain a tight arch position as you push your armpits away from the wall, transitioning into a handstand.
This movement emphasizes shoulder mobility and core engagement, with less emphasis on strength. The distance from the wall remains a factor: greater distance increases the challenge, while closer positioning provides support. Mastery of these movements enhances your ability to handle different shoulder angles during handstand walking.
Progression 10: 👊Lateral Handstand Walks at the Wall
Start in a standard handstand position facing the wall and practice walking sideways along the wall. This progression helps you refine your ability to navigate handstands in various directions, improving your balance and controlled movement to each side.
Progression 11: 👊Handstand Walks Forward with One Foot on the Wall
In this progression, you’ll practice handstand walks forward with one foot on the wall. Initiate from a handstand position facing the wall, with one foot for support. As you walk forward, you’ll strengthen your core and enhance your balance while gradually reducing your reliance on the wall for stability.
Progression 12: 👊Free-Standing Shoulder and Thigh Taps
Freestanding Thigh Taps
Freestanding shoulder tap
This progression challenges your balance and strength with free-standing shoulder and thigh taps.
Lift one hand off the ground to tap your shoulder and thigh while maintaining a free-standing handstand position. This progression refines your control and stability, preparing you for more intricate handstand walks.
Progression 13: 👊Free-Standing Handstand Walk
In progression thirteen, you reach the pinnacle of your handstand journey with free-standing handstand walks. Apply the skills you’ve developed in previous progressions to confidently walk on your hands without wall support.
This ultimate test of balance and control showcases your mastery of handstands and allows you to navigate various distances on your hands gracefully.
📌Here are the full videos of these 13 handstand walk progression:
🤯Why Is Progression Necessary in Handstand🤸 Walks?
On the journey to mastering handstand walks, embracing progression is paramount. Incorporating a variety of handstand walk progressions into your training routine offers several key benefits:
1. 🔥Balanced Development
Handstand walk progressions target distinct muscle groups and aspects of balance. By doing progressions, you ensure a well-rounded development that addresses various physical and technical aspects required for successful handstand walks.
2. 🔥Enhanced Adaptability
The world of handstand walks presents a diverse set of challenges. Engaging in various progressions prepares you to handle different surfaces, inclines, and obstacles, making you more adaptable in in full handstand walk.
3. 🔥Overcoming Plateaus
Progression often comes with plateaus. Introducing new progression shakes up your routine, preventing stagnation and sparking new growth. Overcoming plateaus becomes more attainable when your training continually evolves.
4. 🔥Continuous Motivation
Progressions inject excitement and motivation into your training. The challenge of conquering a novel movement keeps your journey engaging and rewarding, sustaining your enthusiasm over time.
Progressing your handstand walk not only diversifies your skill set but also ensures consistent progress and an enriched learning experience.
🧐Frequently Asked Questions
🔎What are the benefits of practicing handstand walks?
Handstand walks improve balance, shoulder strength, and core stability. They also enhance body awareness and control.
🔎How can I start learning handstand walks as a beginner?
Begin with wall-supported handstands to build strength and confidence. Gradually practice lifting one hand off the wall and taking small steps.
🔎What exercises can help me build the necessary strength for handstand walks?
📍Push-ups, shoulder presses, and core exercises like planks and hollow holds are effective for developing the strength required for handstand walks.
🔎How can I improve my balance during handstand walks?
Practice freestanding handstands against a wall and gradually decrease your reliance on it. Utilize handstand balance drills to improve stability and control.
🔎Are there any safety tips I should keep in mind while progressing with handstand walks?
Ensure you have a clear practice area, use proper wrist alignment, and practice under the guidance of a qualified coach or instructor to avoid injury during progression.
💥Conclusion
Across all these exhilarating progressions, there’s a common thread to the handstand walk—keeping your body tight, ensuring locked arms upon ground contact, and executing deliberate hand placements.
☝️By diligently progressing through these stages, you’ve developed the essential skills required to perform handstands and handstand walks with precision and grace.
☝️Remember, each step you take brings you closer to mastering this captivating skill.
If you’re eager to integrate handstand work consistently into your training routine, don’t forget to explore the Movement Athlete app.

👉 Do you want a free, customized training plan? Now is the time to take a FREE Assessment. The Movement Athlete provides a comprehensive assessment that determines where you are and creates a completely personalized training program just for you.
With each workout, you are pushed a little further, learning new and more difficult movements and unlocking new levels of strength, flexibility, and mobility.

