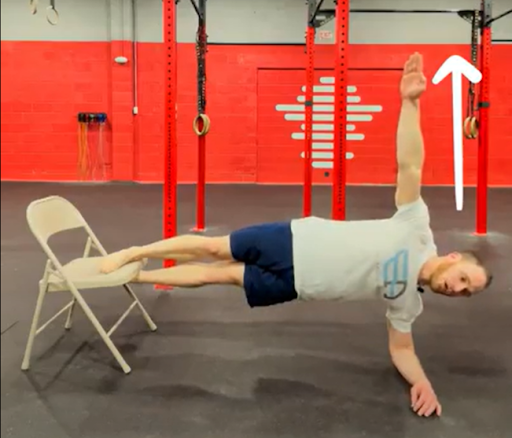
👊The Copenhagen plank is the most challenging exercise known to humans.
It targets the leg adductors, which are muscles often neglected in training, but they play an essential role in our everyday lives and workouts.
Many people find it challenging to hold this position for ⏰ 30 seconds or more, but it is a great way to see how strong your leg adductors are!
What are the techniques to master the Copenhagen Plank?😱
🔥Copenhagen plank, commonly referred to as adductor side plank, is a fantastic exercise to strengthen your hips, glutes, and core. It is a difficult move that requires you to hold yourself up in an isometric contraction while focusing on firing the adductor muscles.
So what are the techniques to master the Copenhagen plank?
🔥The main technique for mastering the Copenhagen Plank exercise is to keep your core and glutes tight. You should also strive to keep the legs together, as this will work your leg adductors more efficiently. Furthermore, you must keep your body straight while holding the plank position.
By the end of this article, you will clearly understand the vital aspect of the most challenging exercise and learn the essential techniques needed to master the Copenhagen plank.👇
🧐What is Copenhagen Plank?
Copenhagen plank is a side plank variation that targets our adductors or inner thigh muscles. It is an intense exercise that requires a lot of balance and strength to execute correctly.
The exercise is isometric, which means you hold your body in one position while contracting your muscles. It involves a squeezing movement to keep your legs together.
To master it, take note of the following techniques:
👍Keep core and glute tight
Keeping the core and glute tight will help you maintain proper form throughout the duration of the exercise, as well as help to increase the intensity of the exercise.
👍Keep legs together
It is also important to keep your legs wide when performing Copenhagen plank, as this will target the adductor muscles more effectively and add an extra challenge to the exercise.
👍Keep your body straight
Maintaining a straight body while doing Copenhagen plank is essential to ensure that your core and glutes are engaged and maximize the exercise’s effectiveness.
You can make the exercise easier by doing a regular side plank and make it more challenging by bringing your legs closer together.
Related article: 📍Advanced Plank Exercises for Insane Core Strength
🤔How to Do Copenhagen Planks?
Steps on how to perform:
- Start in a side-lying position with your elbow placed directly under your shoulder and the feet stacked one on top of the other or with the feet slightly wider apart.
- Activate your core muscles and raise your hips, so your torso is perpendicular to the floor.
- Squeeze your legs together and maintain this position for a few seconds before releasing them back to the starting position.
- Repeat on both sides for 10-15 seconds, rest for a few seconds, and do the exercise again.
🏆Benefits of Doing Copenhagen Planks
The Copenhagen plank is an excellent exercise to test your core strength, stability, coordination, and balance. Here are some of the many benefits of Copenhagen Plank:
🔥Adductor strength
Copenhagen Plank is a great exercise to target your adductors or inner thigh muscles. You will engage and strengthen your adductor muscles by squeezing your legs together. This help increases the strength of your adductors and improves your overall hip stability and balance.
🔥Core stability
The Copenhagen plank also works on core stabilization. By squeezing your legs together, you will engage your core muscles to keep yourself straight while holding the isometric contraction. This helps strengthen the deep core muscles, essential for everyday activities like lifting or carrying heavy loads.
🔥Reduce groin pain and injuries
Copenhagen Plank is an exercise to make your inner thigh muscles strong that can help reduce groin pain and injuries during sports activities. Strengthening your adductors through Copenhagen Plank will help create balance in the hip area and reduce injury chances.
💪Copenhagen Plank Progressions
Once you have mastered the basic form of the Copenhagen Plank, you can progress to more advanced variations. Here are some progressions to take your Copenhagen Plank to the next level:
💯Swiss Ball Copenhagen Plank
Do the regular Copenhagen plank on a Swiss ball for an added challenge. This exercise requires extra balance and stability, as you’ll need to maintain your balance while waiting on the unstable surface of the Swiss ball.
💯Single-Leg Copenhagen Plank
Once you have mastered the regular two-leg Copenhagen plank, try doing it on a single leg for an extra challenge. This variation requires more balance and stability to maintain the position.
💯Rotational Copenhagen Plank
For this progression, you will hold the same side plank position but move your chest toward the ground in a slow, controlled movement. Then return to the starting position and repeat. This variation will target the core muscles more intensely than the regular side plank.
🥺Common Copenhagen Mistakes
It’s essential to be aware of common mistakes when doing the Copenhagen Plank exercise:
☝️Not squeezing your legs
Make sure to squeeze your legs together correctly when doing the Copenhagen Plank. This will ensure that you are engaging and strengthening your adductors correctly.
☝️Unstable hips
Keep your core engaged and stable during the exercise by contracting the muscles in your abdomen. This will help ensure that your hips don’t drop or sway during the exercise.
☝️Holding your breath
Remember to breathe normally throughout the exercise. Holding your breath can cause you to become dizzy and affect your form, so make sure to keep breathing steadily while doing the Copenhagen Plank.
Here’s an article on proper breathing: 📍Proper way of breathing while doing Ab exercises
☝️Rotating shoulders forward
Make sure to keep your shoulders and chest aligned throughout the exercise. Rotating your shoulders forward will cause you to lose balance, so keep your shoulders in line with your chest throughout the movement.
Doing Copenhagen Plank is a great way to strengthen your core, improve stability and reduce injury chances. By avoiding common mistakes and progressing from basic form to more advanced variations, you can maximize the benefits of the exercise and get the most out of it.
👊Copenhagen Plank Progressions👊
If you want to make the Copenhagen plank more challenging, you can try the following progressions:
☑️Narrower grip
Take a narrower grip with your hands while doing the Copenhagen plank to increase the intensity. This will engage and strengthen more muscles in your arms, shoulders, and core.
☑️Elevated Copenhagen Plank
Elevate your feet onto a box or bench while doing the Copenhagen plank to increase the intensity. This will increase the resistance on your deep core muscles, making it more challenging to hold the position for longer.
☑️One Arm Copenhagen Plank
Lift one arm off the ground and extend it forward while doing the Copenhagen plank for an added challenge. This requires additional balance and stability to maintain the position.
☑️Resistance Band Copenhagen Plank
To increase the challenge of the Copenhagen Plank, you can wrap a resistance band around your legs while doing the exercise. This will add extra tension and difficulty to the exercise, targeting your adductors more effectively.
Check this article review of the best resistance bands: 📍Torroband Resistance Bands: The Best Resistance Bands for Home Fitness
😱What are the Alternatives to the Copenhagen Plank?
Alternatives to Copenhagen Plank are an excellent way to challenge your core and increase stability. Here are some options:
⚡️Side Plank
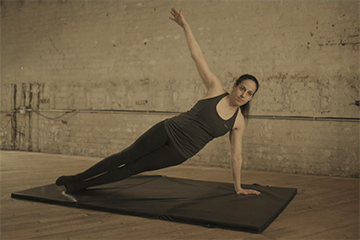
Also known as the Vasisthasana in yoga, the side plank is excellent for strengthening the core muscles and activating stabilizer muscles. To do this exercise, lie on your side with your feet and legs stacked, then prop yourself up on one arm while keeping the other arm extended. Focus on contracting your core and hold for 30 seconds or longer.
⚡️Plank Tap
This variation is similar to the regular plank but requires more coordination as you alternate tapping each hand forward into a pushup position. This will increase shoulder and core strength and improve coordination and balance.
⚡️Plank-Up Downs
This variation requires you to alternate between a high plank and low plank position while keeping your core engaged and stable throughout the motion. Focus on controlling your movements through the transition from one position to another, all while maintaining perfect form.
⚡️Monster steps
This variation requires you to move your hands and feet in a walking motion while keeping your hips steady. This will challenge the stabilizer muscles in the core and strengthen your shoulder muscles, making it an excellent alternative for Copenhagen Plank.
All these variations are excellent alternatives to the Copenhagen Plank that you can use to challenge your core and build stability in different ways. So give them a try and find out what works best for you!
🧐Frequently Asked Questions
🔎How often should I do Copenhagen Plank?
You can do Copenhagen Plank up to three times a week, making sure to give your body enough time to recover between sets.
🔎What muscles does the Copenhagen Plank work?
The Copenhagen plank works your arms, shoulders, core, and adductors.
🔎What is the proper form for Copenhagen Plank?
The proper form for Copenhagen plank involves squeezing your legs together, keeping your core engaged and stable, breathing normally throughout the exercise, and keeping your shoulders in line with your chest. Make sure to progress from the more accessible variations to the more challenging ones as you get stronger.
🔎How can I make the Copenhagen Plank harder?
You can make the Copenhagen Plank harder by elevating your feet on a box or bench, lifting one arm off the ground, and using a resistance band around the legs. These modifications will add extra difficulty to the Copenhagen Plank and challenge your core and stabilizer muscles.
🔎What are the risk factors for Copenhagen Plank?
Copenhagen Plank can cause strain on the lower back if done incorrectly. Make sure to maintain proper form with a neutral spine throughout the exercise and stop immediately if you feel any pain or discomfort. Additionally, be careful not to overexert yourself – start with more accessible variations and work your way up as you get stronger.
📌Conclusions
The Copenhagen plank is a great way to test the strength of your leg adductors and work on building up those muscles! While it may seem daunting at first, with some practice and focus on the techniques, you’ll be nailing this exercise in no time.
Being able to master the Copenhagen plank will help you in other aspects of your workout, as strong adductors are essential for stabilization and balance, as well as helping to prevent injury.
Additionally, the variations mentioned can help you challenge your core and give those muscles extra work.
☝️Remember to maintain proper form throughout the exercise and stop immediately if you feel pain or discomfort.
Do you want to be doing more core strengthening exercises like Copenhagen Plank? 😎


