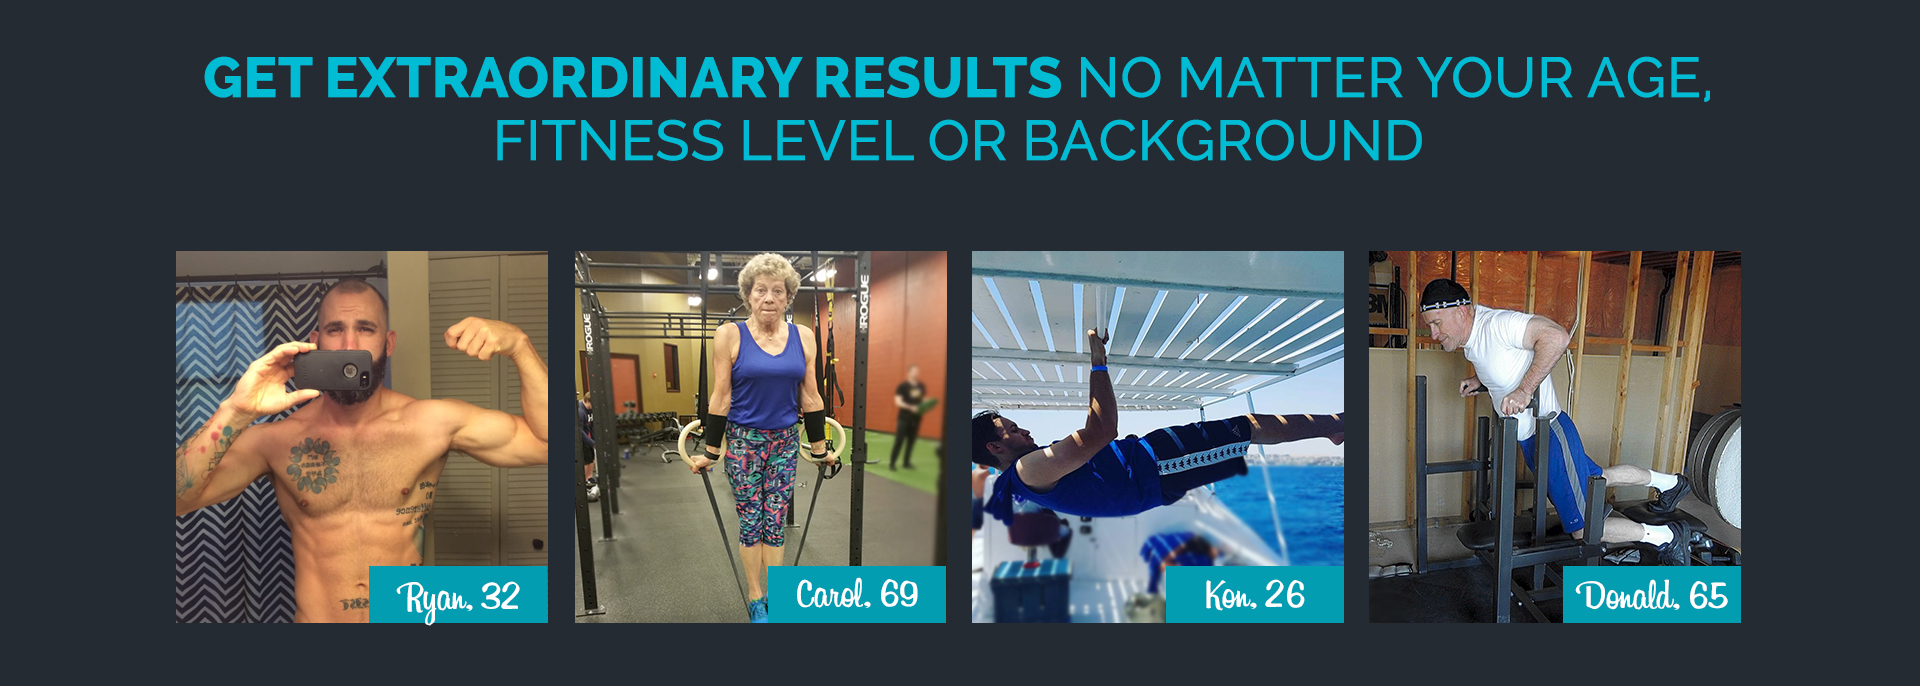
Join the tribe of Movement & Calisthenics Athlete - people just like you that are working with their own body weight to get strength, lose fat build muscle, recover from injuries and live their best lives!
Some exercise routines appear seemingly easy. You are so motivated to just do it at the start, but when you’re two minutes soaking sweat into the routine, you find yourself sighing in defeat. Your struggling muscles and aching body are screaming “too much struggle!” and they make you want to quit.
Front and back lever exercises are good examples. Sure, trained gymnasts can do it with their eyes shut. But a regular person? Nah. You better hustle and train hard if you want to achieve those movements and reap the benefits.
Also, these “easy” but “difficult” exercises are not only good for you but they also have some insane benefits. But first, research time! Read on to find out more about the front and back lever exercises!
Getting strong lats or latissimus dorsi (a.k.a. the largest muscles in the upper body) and phenomenal core strength is no easy task. You’d have to take on the immense and the grueling challenge to train, and dedicate precious time really working to enhance your skills.
What is the best way to achieve it, you say? Simply incorporate front and back lever exercises in your Calisthenics trainings!
Here is a simple table to help you visualize the important muscles being activated for front and back lever:

Front and Back Lever Exercises: A Fundamental Gymnastics Strength
The interesting thing about front and back lever exercises is that these are rated A in the Gymnastic Code of Points. That’s right, A. If you’re not familiar with Gymnastics, their scale goes from A to F, with A being the easiest and F being the most difficult. Simply put, they consider it as a basic strength which just shows how difficult the sport really is. It’s not just prancing around or twirling elegantly in the air. The proof of superhuman strength is the training and the gymnast’s skills.
In fact, there’s a meaningful reason behind having this as their basic exercise. Instead of lifting weights, gymnasts work through progressions where they manipulate the leverage, range of motion and momentum.
But of course, you need to be equipped with the right knowledge to do the proper forms.
What is front lever exercises?
We’ve said it before and we’ll say it again! These “easy” but “difficult” exercises have some insane benefits.
A front lever exercise is a kind of Calisthenics movement that probably looks like an easy resting position, but is actually designed to build and develop your core strength. With the help of your back muscles, such as the lats, rhomboids, and spinal erectors, as well as your abdomen, you can maintain the proper posture during the movement.
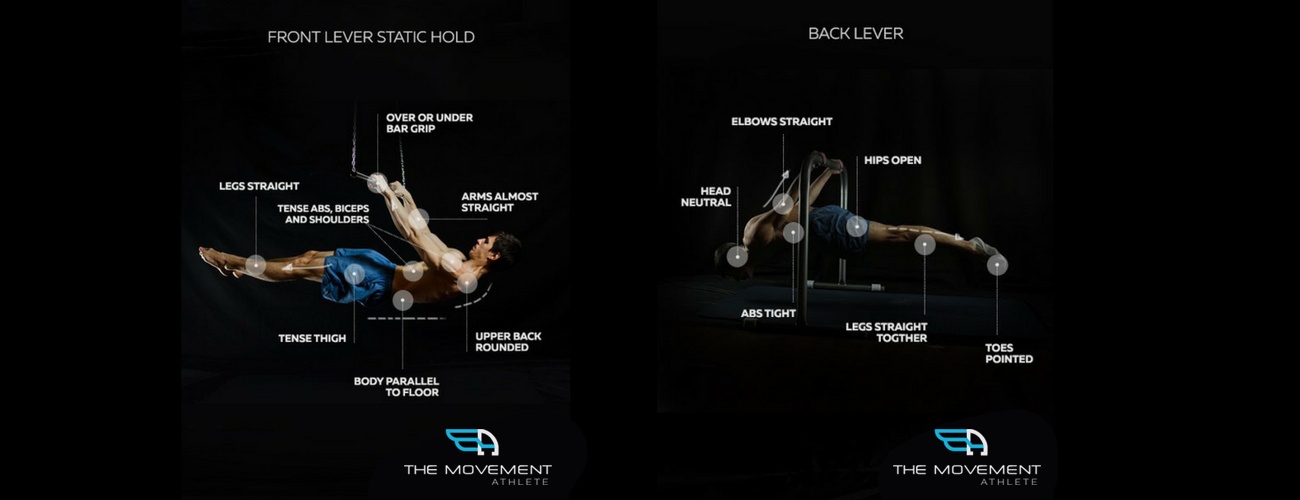
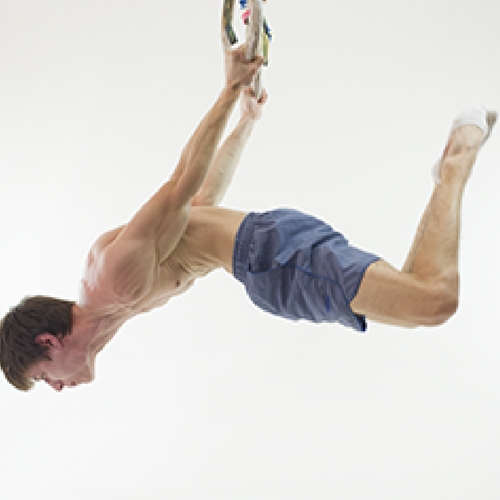
However, make no mistake. A front lever is both difficult and cool-looking. It’s a common gymnastic move wherein a static hold is performed on still rings or a pull-bar, and the person is lowering his or her body from an inverted hang until the body is completely straight and horizontal. With this position, it seems like the person is floating on air, or is in a rigid plank.
Training for the front lever is considerably safer for your joints than learning some of the other high-level strength skills because you don’t have to work on locked elbow joints.
However, the front lever exercise is easier said (and seen) than done. It requires a high degree of back and core strength before you can do it. If you think it’s something you can achieve, then stay with us, and we’ll show you the proper progressive steps in attaining this exercise!
Perfecting the Front Lever
The front lever exercise is simple, but requires personal commitment, dedication, and focus to master. The steps to complete the exercise are done in a progressive manner to build the necessary strength to advance and to avoid unnecessary confusion from complicated and ineffective shortcuts.
Here’s how you can perfect the front lever:

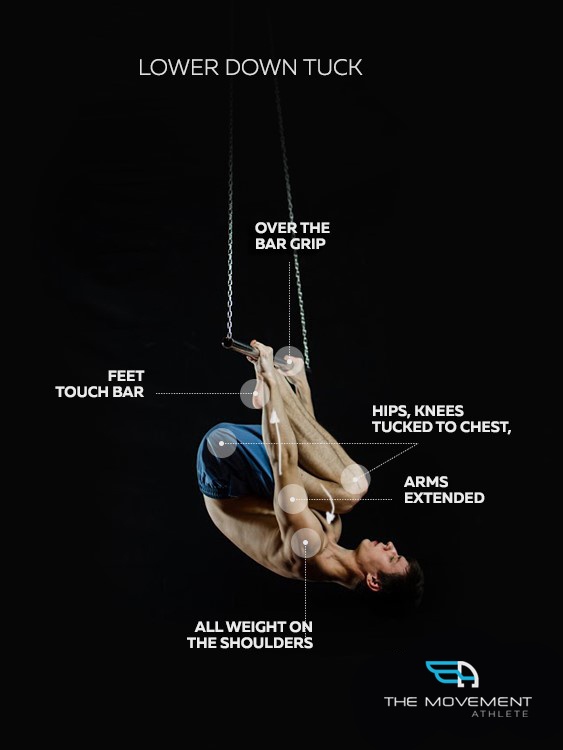
TUCK FRONT LEVER
This will be the first or the basic position as you advance in the training. To do this posture, grasp the bar within overhand grip. Pull your legs and hips up while you are leaning back. Your back should be rounded and your body tucked up like a ball. Try to keep your back approximately parallel to the ground.

ADVANCED TUCK FRONT LEVER
Begin with the tuck front lever position. Once your body is up, straighten your back (instead of a rounded one) and see that it forms a line parallel to the ground. At the same time, pull your shoulder blades back in retraction. You may open your legs slightly so that your thighs are perpendicular to the body.
ONE BENT LEG FRONT LEVER
From your tuck front lever, extend your bent leg out so that it seems like it’s floating in the air. The lower leg will be perpendicular to the ground with your hip opened up completely. If your leg feels wobbly or tired, don’t worry. You may alternate legs between practice.
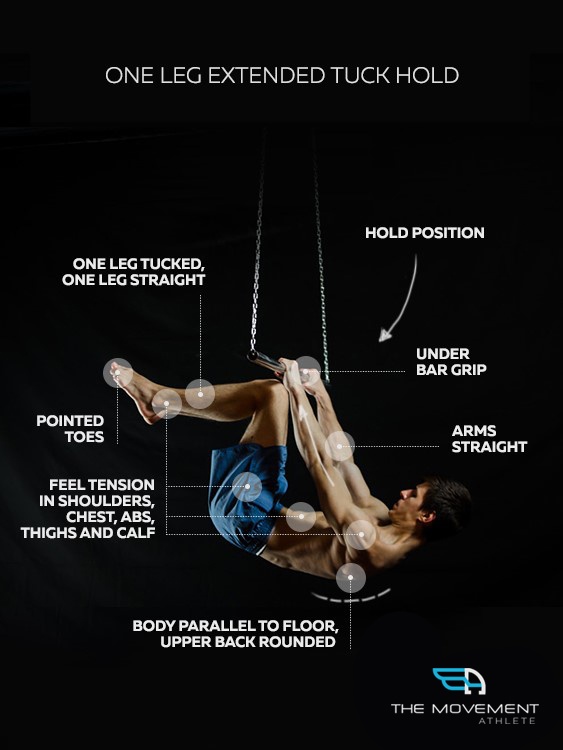

ONE LEG FRONT LEVER
A more advanced technique than the bent leg is this one! Front the first position, while extend one leg out completely straight. That means your back, hips, and extended leg all make a horizontal line, parallel to the ground. The other leg, whichever side it is, will be tucked in hard to the chest.

ADVANCED ONE LEG FRONT LEVER
From the tuck front lever, extend one leg completely straight, and the other partially untucked and away from the chest. The foot of the untucked leg will be in line with the knee of the extended leg. Keep your back and straight leg parallel to the ground! This “halfway open” form is designed to increase the leverage dramatically. Alternate legs.
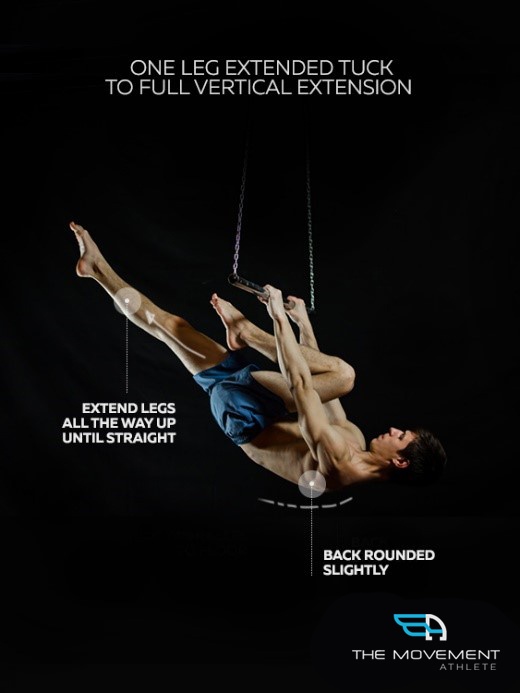
FRONT LEVER
Starting from the tuck lever position, keeping both legs together, gradually extend them out at the hips and knees, until they are completely straight. Your entire body should be a one straight line that is parallel to the ground. Pull down hard with the hands and the lats, as well as working the pulling-apart action to assist in stabilization.

“With the progression of holds, you can definitely achieve this!
What is back lever exercises?
Now let’s move on to the counterpart of front lever- the back lever exercise, which is on another level of awesome!
This whole-body exercise places an emphasis on your back and core. It also requires strength and flexibility in the shoulders and arms in a typically untrained position. It would be good to have a spotter (just ask a friend to help you out) who can assist you in case you fall.
The back lever can be an awkward position, and because you are somewhat inverted, you may feel like you don’t quite know where your body is in space. Have your spotter friend also point out if you’re doing the correct form or not! You don’t want any injuries.
How to do the back lever?
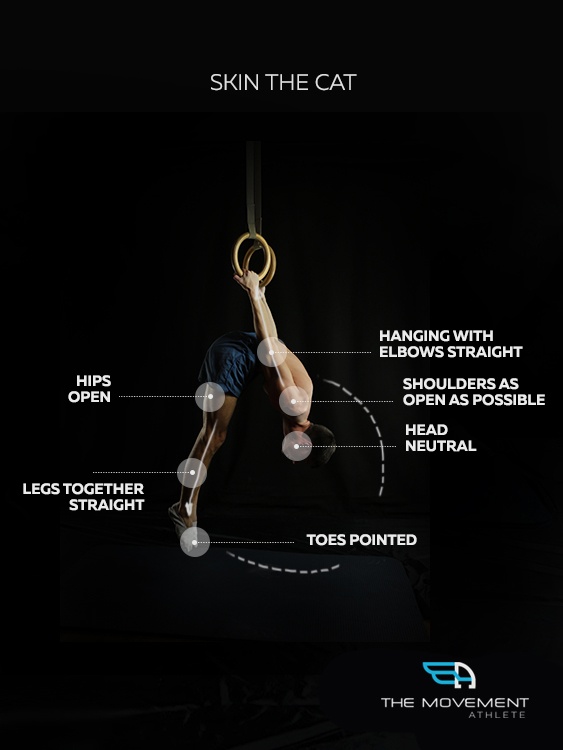
Before you even try doing this exercise, you must first skin the cat
Don’t worry! We don’t mean it literally. The Skin the Cat is a preparatory exercise you should do to get your muscles warmed up. It mostly focuses on the shoulders, so that it builds flexibility, as you use it for a full extension later on.
To do Skin the Cat: Raise your legs up from a hanging position. Now, thread your feet under the bar, and lower down as far as you can behind you. Reverse the movement to come back up, and practice several times. Slowly but surely.
Now that you’re done with your preparatory exercise, here are the steps on how to do a back lever:
TUCK BACK LEVER
First, start by grabbing the bar in an overhand grip, jumping, and then tucking yourself into a ball into a Skin The Cat manner. After that, lower yourself (slowly) until your back is parallel to the ground. You can stay tucked up tightly, with a rounded back. Or you can slightly open your legs.
ADVANCED TUCK BACK LEVER
Start from the first form. From there, straighten your back instead of having it rounded up. By doing this, your hips are opened, increasing the leverage of the exercise. To ensure that your back is really straight, ask your trusty pal spotter to check on you.
LEGS BENT STRADDLE BACK LEVER
Begin by doing the tuck back lever. As you complete that form, pull yourself up until your head is directly facing the ground, and your legs overhead. Next, Straighten out your hips, but bend your knees. Spread the legs at the knees as wide as you can. If you feel like it’ll cause you to lose balance or grip, then just spread it a little. Keep this alignment lower until you are parallel with the ground. Practice this patiently because it will help you lower into the back lever easily than extending into it once you’re horizontal. It’s all about the progression.
LEGS BENT BACK LEVER
Next, pull yourself up until your head is facing the ground and your legs are overhead. Straighten the hips out, but keep the knees bent. This time, keep the knees together. Hold this position.
STRADDLE BACK LEVER
You need to pull yourself up until your head is facing the ground with your legs overhead. Straighten your legs at the knees and hips and spread your legs wide into a straddle position. Stay low while holding this form. The tip in here is to widen the straddle so it’s easier.
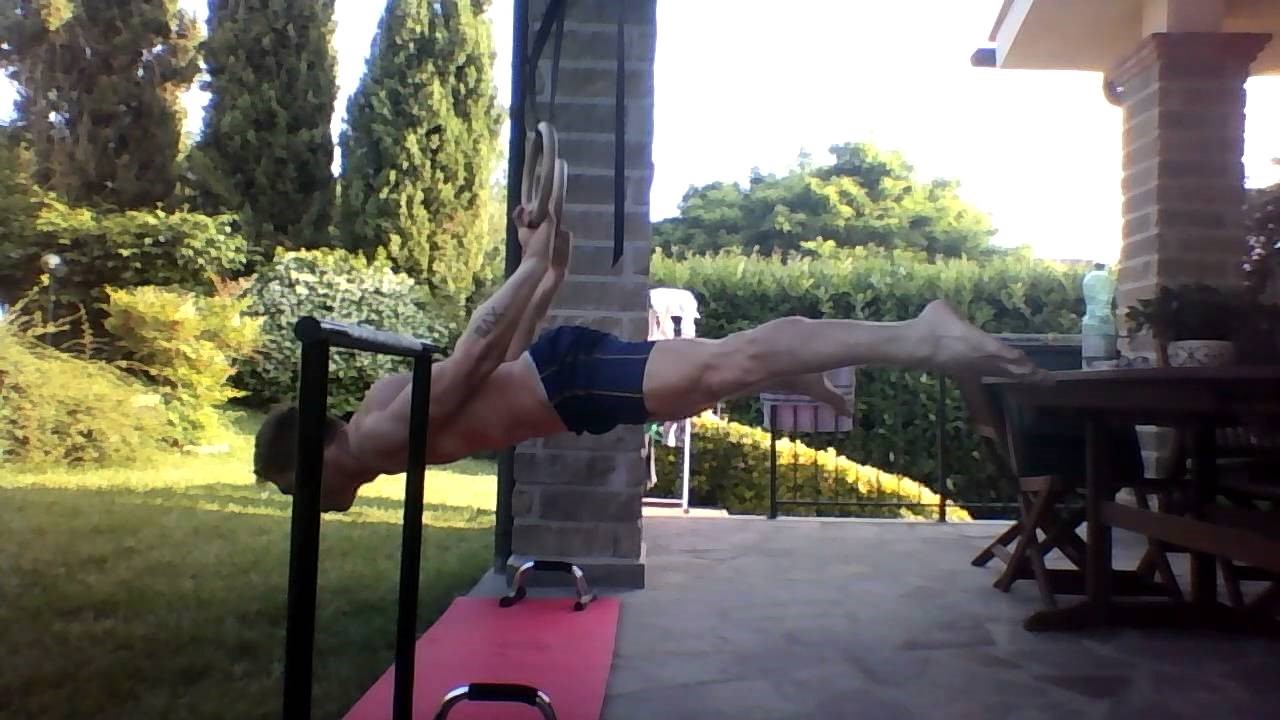
BACK LEVER
Again, pull yourself up until your head is facing the ground with your legs overhead. Straighten out the legs at the knees and hips, and make sure to keep the legs together. Your body must form a one straight line through your legs. Keep this alignment lower until you are parallel with the ground, and hold.
Don’t think I can do it, should I stop?
Remember, you can’t build your strength overnight. In the same way, you can’t practice all the steps right away just because you want to. The simple progression may take months, depending on how you train your body; hence, you have to be patient. Work through the steps and you’ll get there. Practice your willpower, so you can overcome this physical challenge.
Unparalleled foundation
Mastering the front and back lever exercises are a great way to build a foundation for Calisthenics trainings. Why?
1. These are essential calisthenic strength movements that will provide incredible stimulation for total body strength. You can’t get that from any ordinary exercise.
2. Training with these bodyweight exercises will motivate you to train harder and achieve more advanced skills.
3. These exercises already provide you with the basics. When you advance in your Calisthenics training, you can always return to these fundamental concepts to attain other progressions.
If you want to get started but don’t know how to work with the progressions, you can check out The Movement Athlete and do their free assessment to gauge where your skill levels at. Once you know your calisthenics fitness level, you can slowly develop your strength to do front and back lever and other crazy calisthenics movement with the in-depth training progressions from The Movement Athlete
Don’t hesitate to work more and be more! These front lever and back lever exercises are the keys to training Calisthenics easily.
You still want that powerful and toned body, don’t you?

READY TO GET ON THE JOURNEY OF A LIFETIME?
See what our users are saying:
“Would you rather have the ability to boast of bench pressing 300 pounds or to do a one-arm pull-up? To me, pulling my entire body up with one arm is much more impressive. – Michael – The Movement Athlete Academy User”
“The Movement Athlete Academy is not the kind of program that demands you to be this physically fit to be able to perform. Instead, it caters to your own strengths and capabilities and keeps track of your progress.”
“Stick with it! It is hard at first, especially if you are stuck on a lower-level, high rep exercise. But persevering is worth it! Finally reaching each goal is so exciting.”