If you’re looking to get a great workout but don’t have any equipment, look no further than calisthenics! Although calisthenics is known to involve some form of equipment such as a pull-up bar and dips, how to get a calisthenics workout without equipment is possible if you know the exercises alternatives and the options you can do to swap some equipment.
In this article, we’ll be covering these topics so you can get started on your calisthenics workout even without using any equipment at all:
- ✊ Ideal pieces of equipment
- ✊ How to maximize gains without equipment
- ✊ How to progress using this method
- ✊ 5 Additional tips for no-equipment workout
- ✊ Calisthenics workout without equipment
- ✊ List of exercises and progressions
IDEAL: Get SOME equipment💯
We have to point this out first. While you can still get an amazing workout that delivers results even without using any piece of equipment, you can maximize your gains by getting a FEW set of equipment.
Here is a list of the BEST CALISTHENICS EQUIPMENT you need to get optimal results while assuring convenience and safety.
- 🏆 Pull-up bar – For pull-ups, chin-ups, muscle-ups, inverted rows
- 🏆 Dips station – For dips, push-up variations, L-sits, tuck planche
- 🏆 Resistance band – Adding or reducing the difficulty of an exercise. Perfect for learning pull-ups, dips, and lever works
- 🏆 Gymnastics rings – This is ideal for more experienced calisthenics athletes who would want to push their workout to the next level
Read more here: 📍7 Must-Have Calisthenics Equipment for Your Home Gym
These are very much affordable and accessible. No need to get fancy about the brand because the main function of each piece of equipment is primarily what you need. You will probably spend more or less than a hundred dollars to get these sets.
Although these are the ideal items you would want to get, you CAN still make the most out of your workout even if you have 0 equipment.
🤔How to workout without any equipment
One major advantage of calisthenics.
Read more on calisthenics PROs & CONs:📍Is Calisthenics Really a Better Way to Train?
There are a lot of ways to do this. But we’ll just give you some exercises that target different muscle groups to get a full-body workout.
Doing calisthenics without any equipment is still possible and very much effective. You don’t need any weights or machines to get a great workout. There are exercises that can produce similar results similar to weight training.
For example, a 2020 study revealed that regular push-ups can build muscle similar to bench presses granted that the variation and training volume are adjusted to make the exercise challenging for the specific individual.
Training without equipment is mainly about:
- 🤜Choosing the proper exercises to meet your goals
- 🤜Following progressive training protocols
- 🤜Getting enough rest and proper nutrition
We’ll dig deeper into these topics in a later part of the article.
🔥How to make progress using this method
Making progress is about staying 📍progressive with your training in a smart way. Sounds obvious, but this means changing small factors in your workout gradually to make every training session more challenging compared to your previous one.
Even if you don’t have any equipment, you can still keep it progressive by adjusting some of the factors below:
- 👉Body angle
- 👉Training volume (reps + sets)
- 👉Unilateral exercises
- 👉Using your furniture as equipment
- 👉Training to failure
✨5 Tips for no equipment workout
With no equipment, creating more intensity will be restricted by our body weight. While it’s still possible to increase intensity up to an extent, you still reach a cap if you’re not going to use the equipment mentioned above.
Don’t worry as we still have a work-around for this issue. That’s the beauty of calisthenics! We can always make something work!
✅Train near failure
If you can’t increase the intensity or how hard the exercise is, you can always adjust the training volume by training close to failure. This means doing reps until you’re physically incapable of performing another with good form.
While training to failure, in most cases, isn’t necessary, if you lack equipment and are already more experienced, doing so will help you get the results.
If you’re a 📍beginner, just go near failure to avoid overfatiguing since you’re still getting used to the new loading.
Read more: 📍Is training to failure necessary?
✅Choose an appropriate progression
Not everyone can immediately perform a 📍regular push-up with good form. The primary reason why you might not still be able to do so is that you’re not strong enough to handle the exercise.
Don’t be ashamed! Everybody starts from somewhere. This just means that you need to move to an easier push-up progression to keep you challenged without sacrificing good form and technique. Continuing bad form can lead to injuries, aches, and impingement.
Here’s a brief of a push-up 📍progression:
- 💪 Wall push-ups
- 💪 Incline push-ups
- 💪 Knee push-ups
- 💪 Negative push-ups
On the opposite side, advanced athletes will find the regular push-ups too easy. So you have to up your intensity by moving into a harder progression:
- 👊 Archer push-ups
- 👊 Decline push-ups
- 👊 Gymnastics rings push-ups
- 👊 One-arm push-ups
✅Reach optimal sets
We use to hear that 3 sets are enough to progress. While this can be effective for heavier loading, this might not be sufficient enough once you get used to 3 working sets.
Aim for higher working sets like 4 – 6 to continue challenging your muscles.
✅Use your environment as equipment
Like we said earlier, it’s still ideal to get the minimum set of equipment. If you don’t have access to these, you can always get creative using the STURDY things around you.
For example, using a solid tree branch as your pull-up bar. Use two stools for your inverted rows and dips. Another major advantage of calisthenics is that it’s flexible in terms of equipment.
Full equipment guide here: 📍The Ultimate Guide to Calisthenics Equipment and Cheap Ways to Replace Them
✅Stay consistent
Have you heard the phrase, “consistency is the key?” It’s often used for many things because it’s true!
The same goes for working out. If you don’t stay consistent with your training, you won’t get the results that you want regardless of how often or hard you train.
You need to find a balance between pushing yourself and allowing enough rest for your body to recover. This is different for everyone so it’ll require some trial and error on your part.
Start with at least training three times a week and then adjust as you go.
If you want to see results, make sure that you’re consistent with your workout routine! Even if you’re following the best workout program, you will never gain progress if you don’t stay consistent.
An in-depth discussion on these tips here: 📍5 Simple Tips to Build Muscle at Home
🏆Full-body Calisthenics workout without equipment per body part
The most efficient way to work out is to break down each workout per body part.
Here is a general workout plan you would want to build on for your home workout.
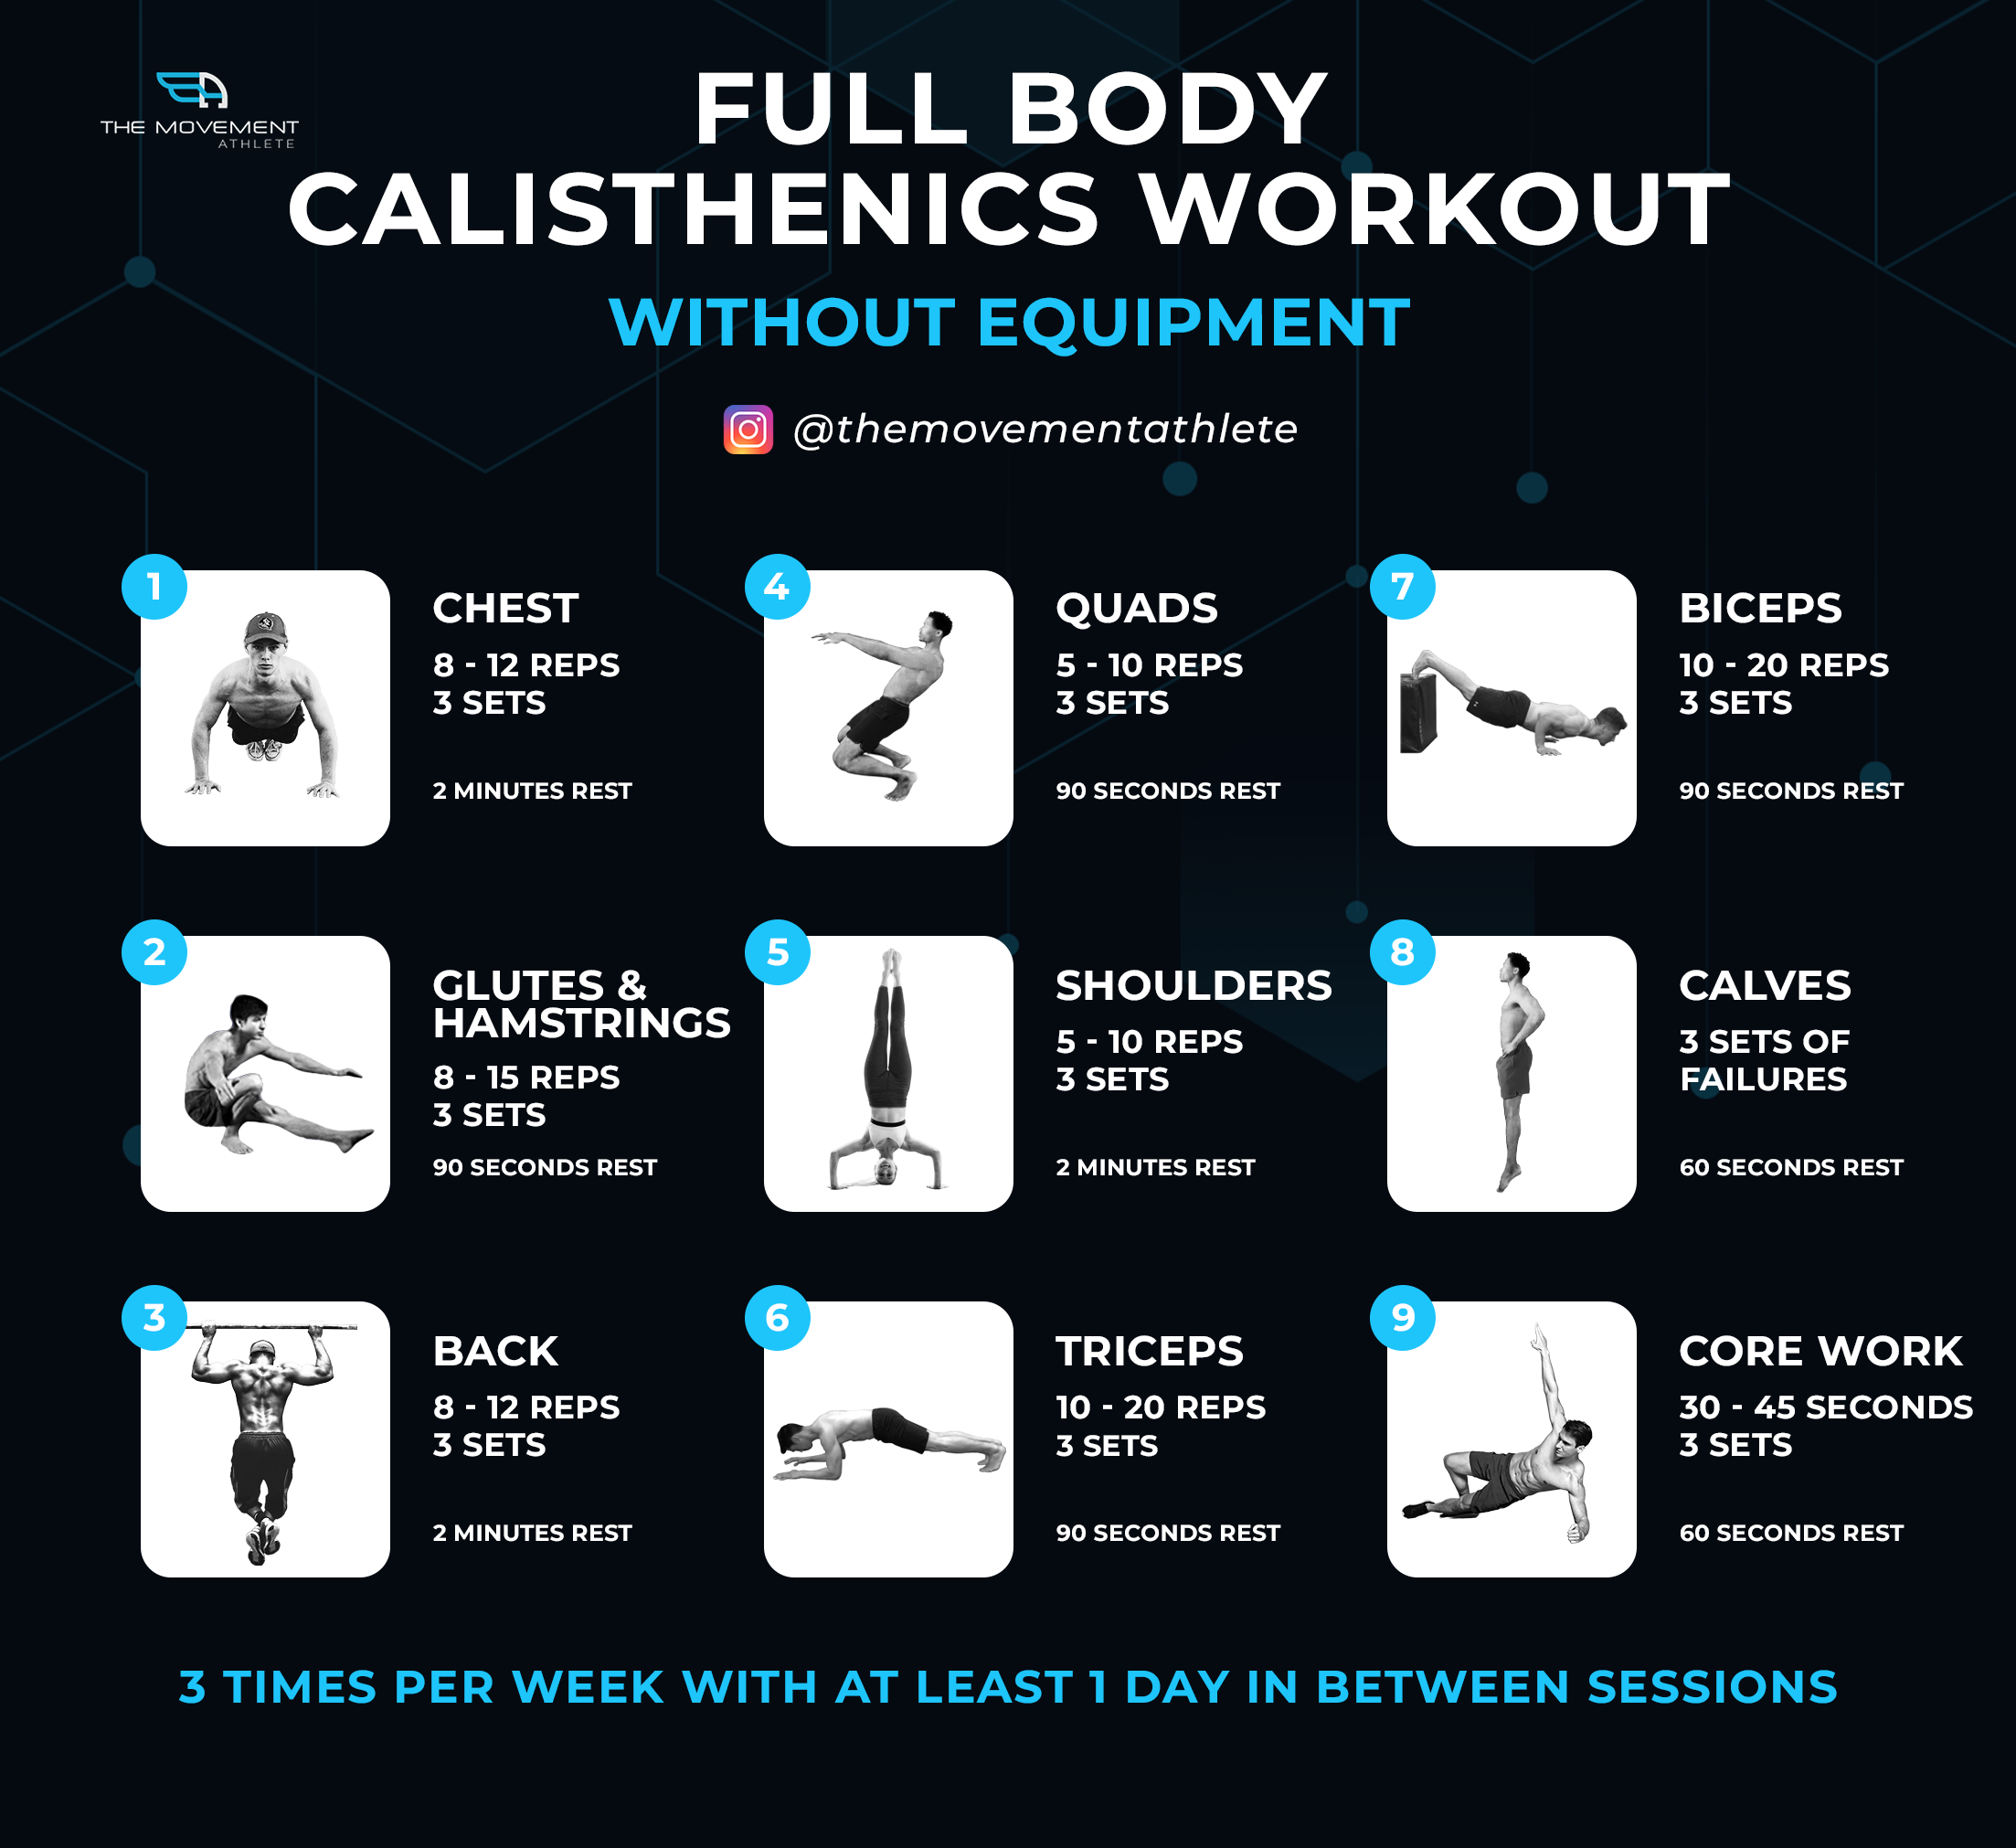
Full Body Calisthenics Workout Without Equipment
Exercise 1: Chest 3 sets of 8 – 12 reps: 2 min rest
Exercise 2: Glutes & hamstrings 3 sets of 8 – 15 reps: 90 secs rest
Exercise 3: Back 3 sets of 8 – 12 reps: 2 min rest
Exercise 4: Quads 3 sets of 5 – 10 reps: 90 secs rest
Exercise 5: Shoulders 3 sets of 5 – 10 reps: 2 min rest
Exercise 6: Triceps 3 sets of 10 – 20 reps: 90 secs rest
Exercise 7: Biceps 3 sets of 10 – 20 reps: 90 secs rest
Exercise 8: Calves 3 sets of failure: 60 secs rest
Exercise 9: Core Work 3 sets of 30 – 45 secs: 60 secs rest
Chest
For the chest muscle group, we’ll be covering two basic exercises. You can choose whichever is more accessible for you, but ideally, you would want to choose the more difficult exercise. Dips are usually more difficult for more experienced athletes.
You can also use both exercises by prioritizing the dips first and then using the push-ups in place of the tricep exercise since push-ups can also have a heavy emphasis on the triceps.
Dips
For dips, it’s ideal to have a dip station. However, you can also use two sturdy chairs or tables placed together so you can safely hold a support dip position.
☝️How to perform:
- From the support position, lower down with control until the shoulders are aligned or just below the triceps.
- Pause at the bottom for a second.
- Push back up to the starting position.
⭐️Coaching pointers:
- Keep your shoulders away from your ear at all times.
- Always have locked out arms at the top position at the beginning and end of each rep.
- Don’t let the elbows flare.
Easier: Negatives, leg supported, band supported
Harder: Weighted, ring dips, supinated dips
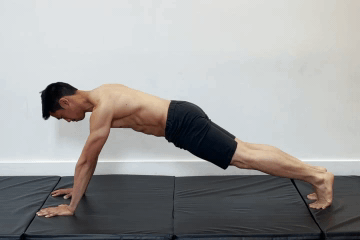
Push-ups
Push-ups are a staple chest developing exercise. There are many variations for the pushups to keep you challenged so you will definitely keep push-ups as an option to build strength and muscle.
☝️How to perform:
- Begin in push-up position with arms roughly shoulder-width apart.
- Lower down until your chest nearly touches the ground.
- Push back up into the starting position.
⭐️Coaching pointers:
- Bodyline straight at all times.
- Elbows tuck as you lower down
- Shoulders pushed down and away from your ears and the ground
- Arms straight at the top position
- Retract your scapula as you go down
For more push-up tips, read this: 📍Push-up Mistakes Than Can Sabotage Your Gains!
Easier: Knee push-ups, Incline push-ups
Harder: Archer push-ups, One-arm push-ups, Decline push-ups, Diamond push-ups
Triceps
Building bigger triceps is made easier by implementing isolation exercises in the last parts of your workout. The go-to exercise for this goal is the tricep extension.
Tricep extensions
This exercise can be done with or without equipment. Don’t worry. The equipment needed is very much accessible. Any sturdy inclined surface that can accommodate your body weight will do.
Moving to an inclined surface doesn’t necessarily mean the exercise will be easier. It will depend on the height of your hand placement. The lower you go, the more challenging the exercise is as you can go through a deeper range of motion.
☝️How to perform:
- Begin in a push-up position.
- Lower your elbows down to the floor.
- Push back up to the starting position by engaging your triceps.
⭐️Coaching Pointers:
- Keep your bodyline straight
- Don’t flare out your elbows
- Choose a comfortable position for your elbows
- Shoulders pushed away from your ears
Easier: When on the floor, move your hands away from the center of your body, higher incline
Harder: When on the floor, hands closer to the center of your body, gymnastics rings, lower incline
Biceps
For the bicep work, we’ll cover two exercises so you can have an option to train with or without equipment. Just take note that the equipment needed isn’t something fancy.
Bicep push-ups

The bicep push-ups are a good way to create tension in your biceps even without using any equipment. While this move stimulates the biceps and can help it grow, it’s not as efficient as the bodyweight bicep curls.
This exercise, however, can help develop straight-arm strength and condition the elbows for straight-arm skills such as the planche and handstands. Interestingly, the top straight-arm position creates also good stimulation for your biceps.
👆How to perform:
- Begin in a regular push-up position.
- Twist your hands outwards so that the fingers are pointing backward.
- Perform regular push-up motions.
⭐️Coaching Pointers:
- Maintain a straight arm at the top position.
- Scapula in natural or in protraction if specifically working towards the planche
- Scapula depressed.
- Keep the bodyline straight.
Easier: Knee push-up variation, incline variation
Harder: ring variation, lean forward further
Bicep curls
In weight training, bicep curls are the most popular exercise for developing bigger biceps. Bodyweight training also offers a counter-part that’s equally effective.
The bodyweight bicep curl can “isolate” the biceps to lessen the assistance from the other back muscles so you can build up the volume for your biceps. The motion is quite similar to a bodyweight row, but changing the hand position a bit makes a massive difference.
Ideally, you would want to have a low pull-up bar or better yet, a pair of gymnastics rings to perform the exercise easily and with scalability. However, you can use two sturdy chairs or a kitchen countertop to perform the exercise.
👆How to perform:
- Hold onto a surface with a supinated grip (palms facing up).
- Position into a horizontal hang so that your feet are forward of your body.
- From a horizontal dead hang, pull your body upward by flexing your elbows and engaging your biceps.
- Lower down with control.
⭐️Coaching Pointers:
- Keep a straight bodyline.
- You can bend your legs to make the exercise easier, but still, keep the core engaged and don’t flex at the hips.
- Don’t let the elbows flare.
- Using gymnastics rings is optimal also for elbow and shoulder joint health (it’s a very excellent investment that doesn’t break the bank!)
Easier: Higher incline, Legs bent
Harder: Lower incline, Legs straight, one-arm variation
Shoulders
We’ll divide the shoulder exercises into two: straight-arm work and bent-arm work. Both are essential for strong and healthy shoulders so alternating these throughout your weekly session is ideal. If you did some straight-arm work for your shoulders on Monday, do bent-arm work for your Wednesday, and so on.
Pike push-ups
The pike-handstand is optimal for building up your boulder shoulders. It’s not the easiest exercise out there so developing at least a basic level of strength from normal push-ups is key. If even the easiest variation is too difficult, you can work on the easier handstand progressions first.
👆How to perform:
- Begin in a regular push-up position.
- Walk your feet forward so that you are piked in your hips.
- Lower down your body by leaning forward and bending your elbows.
- Lower until your head nearly touches the floor.
- Push back up the L-shaped handstand position.
⭐️Coaching Pointers:
- Keep your weight on your hands and lean forward to put the stress on your shoulders.
- Shoulders in an elevated position or pushed towards your ears.
- Hands positioned most comfortably for you which is around shoulder-width apart.
- Don’t let your elbows flare outwards.
- Avoid arching your back which can place more weight on your chest.
Easier: Feet further from your hands, Limit range of motion, lower reps
Harder: Deficit (deeper range of motion), handstand push-up variation
Handstands
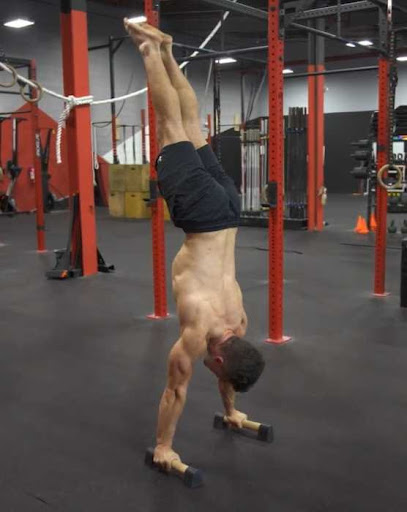
In a handstand, your shoulders act as your glutes and hamstrings which will bear the most of your body weight. This will allow for stronger, more mobile, and healthier shoulders.
Take note that you need to go through the proper handstand progression (although all exercises need progressions). You also don’t necessarily have to work on the freestanding variation if you don’t want to since wall assistance with other variations can also develop stronger shoulders.
More tips here: 📍The Ultimate Handstand Guide
👆How to perform:
- Position near a wall.
- Place your hands close to the wall and press against the floor.
- Jump into the handstand position with your feet and back touching the wall for balance.
- Hold the position for a specified time.
⭐️Coaching Pointers:
- Practice good body alignment.
- Core engaged at all times.
- Maintain a solid shoulder elevation or push your shoulders close to your ears.
- Arms straight at all times.
- Hands shoulder-width apart.
Back
The back is a commonly neglected body part in a no-equipment workout. This is because pull-ups are commonly associated with exercise. And that’s ok because pull-ups are definitely the ideal exercise which is why we also include this in our exercise list.
However, if pull-ups are really not possible at the moment, we’ve included two pulling exercises that can also challenge your back muscles.
Pull-ups
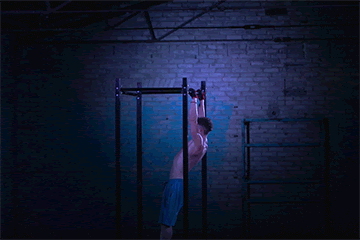
We have to start off with the actual pull-ups first. If you don’t have a pull-up bar, then it’s time to be a little creative. Using your house beams or a sturdy tree branch will be enough as long as you make sure that it can hold your weight.
Pull-up is the king of pulling exercise work so ideally, you would want it to be your priority exercise for back development.
For now, we’ll be using the term pull-ups, but neutral grip and chin-ups can also be an option for developing a solid back. Don’t be limited with the pronated grip alone.
Learn the best pull-up grip here: What is the BEST Pull-up Grip
👆How to perform:
- Begin in a dead hang position with hands roughly shoulder-width apart.
- Activate your scapula to initiate the pull-up motion.
- Pull your body upward until your chin is over the bar.
- Lower down with control.
⭐️Coaching Pointers:
- Keep your core engaged and your hips tilted backward (Posterior Pelvic Tilt)
- Depress and retract your shoulders as you begin and complete the pull-up.
- You can lower down into an active hang (shoulders depressed and retracted) instead of a dead hang after each rep.
- Drive your elbows towards your hips to further activate your back.
Inverted rows
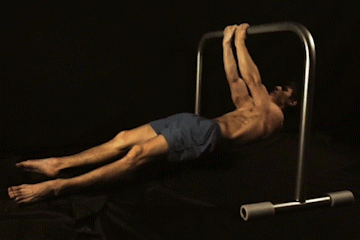
Inverted rows can work as a supplementary exercise for your pull-ups or also be the main back-developing exercise. Similar to the bicep curl, it’s ideal to have a low pull-up bar or gymnastics rings to easily perform the exercise.
If these pieces aren’t accessible, you can do a make-shift low pull-up bar with sturdy furniture or even a broom.
👆How to perform:
- Hang in from the low pull-up bar with your feet forward of your body.
- Pull your upper body towards your hands.
- Lower down with control.
⭐️Coaching Pointers:
- Retract and depress your shoulders as you initiate the movement pattern.
- Keep your core engaged.
- Ideally, you would want to keep your legs straight and have a straight body line, but you can also have your legs bent to make the exercise easier.
Easier: Legs bent, higher incline
Harder: Lower incline, feet elevated, weighted
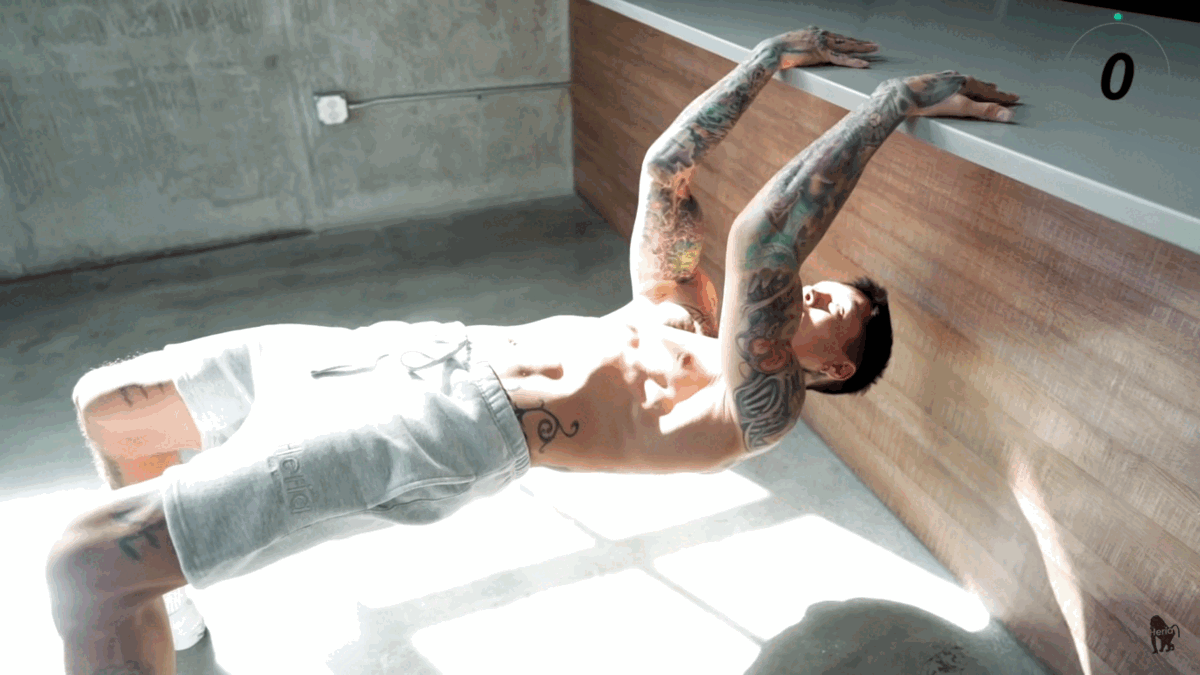
Reverse floor push-ups
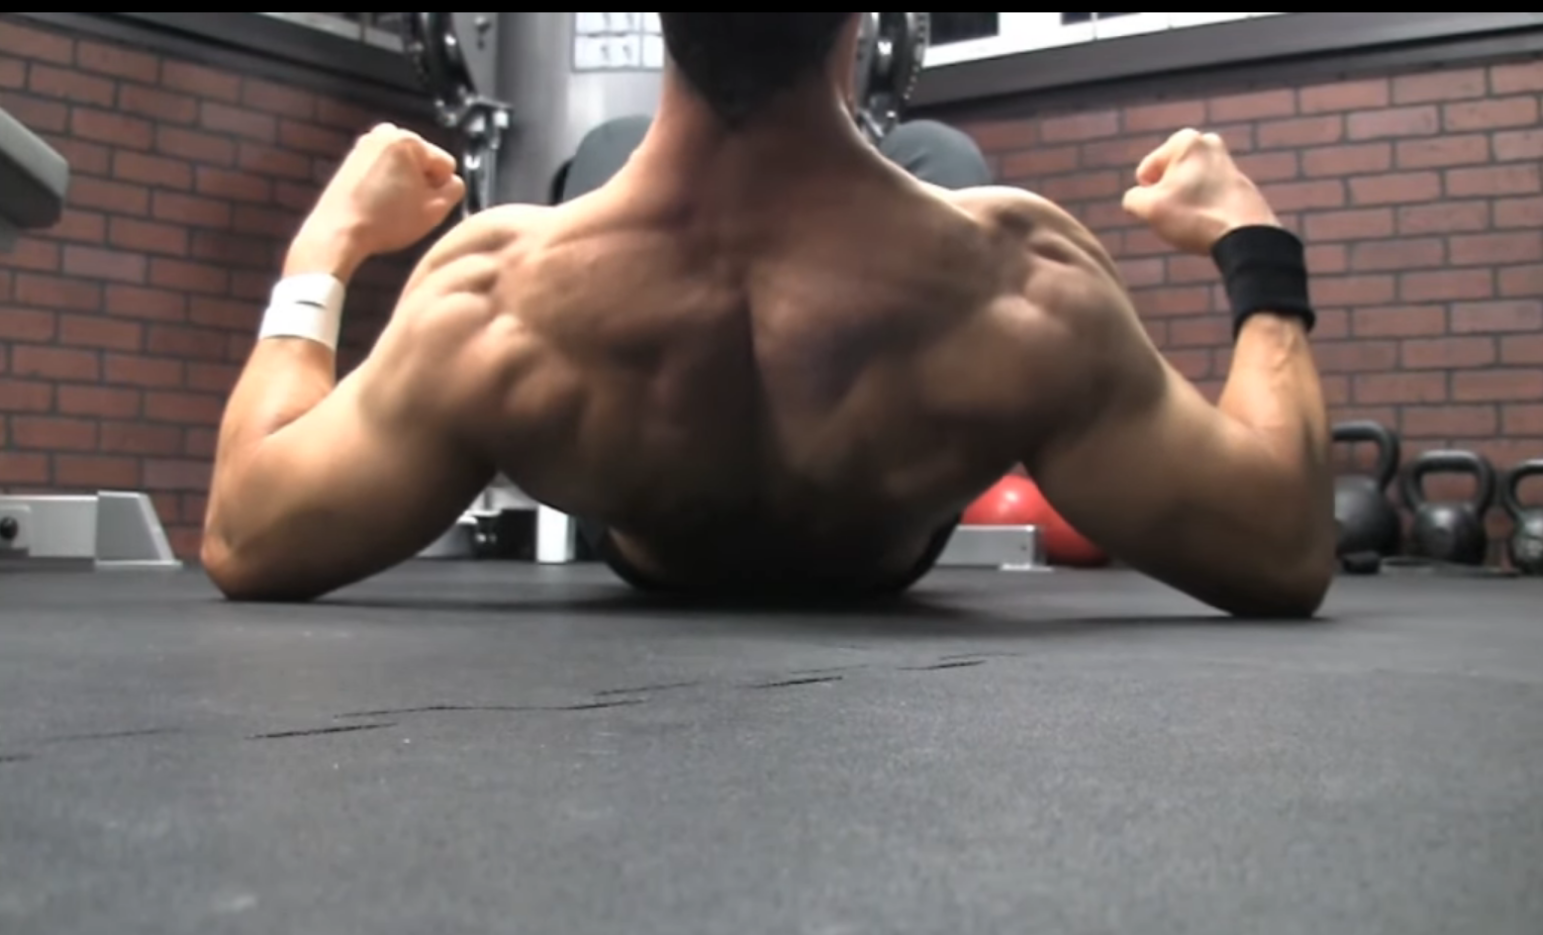
Another option for your back if you don’t have any equipment at all is reverse push-ups or also known as the back window. Don’t underestimate this exercise. It looks easy, but it’s very challenging once you get into the position.
👆How to perform:
- Lie down on the floor with your legs bent, feet planted on the floor.
- Place your elbows slightly lower than your shoulders.
- Drive your elbows to the ground to lift your upper torso.
- Pause at the top position then slowly lower to the ground.
⭐️Coaching Pointers:
- Engage your back muscles to execute the movement.
- Shoulders depressed and retracted.
- Don’t use momentum or use much of your ab muscles.
Easier: Bent body only the upper back lifts from the floor
Harder: Whole lifts with heel planted on the ground, longer pauses at the top position
Quads
There are tons of quad exercises when working with calisthenics, but for now, we’ll focus on the two that deliver the best bang for your buck.
Quad extensions
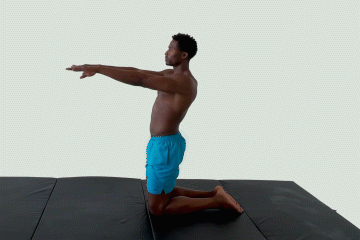
Bodyweight quad extensions deliver both mobility, muscle, and strength. Contrary to some myths, quad extensions are good for your knees. It actually strengthens the knees by improving the range of motion of your quad muscles.
Getting assistance from a wall or any sturdy furniture at the side helps when first learning the movement. The deeper you go, the better the quad activation.
👆How to perform:
- Begin in a high kneeling position.
- Hinge at the knees and lower your body backward slowly.
- Rise back to reset and repeat the reps.
⭐️Coaching Pointers:
- Don’t hinge at the hips.
- Keep the core engaged.
- Place your weight backward and activate your quads.
- Posterior pelvic tilt and avoid arching of the lower back.
- After your first rep, stop just before the vertical position so you can keep your quads engaged before doing another rep.
Easier: Limit range of motion, wall assistance, band assistance
Harder: Deeper range of motion, weighted, longer pauses
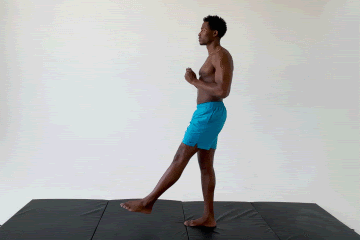
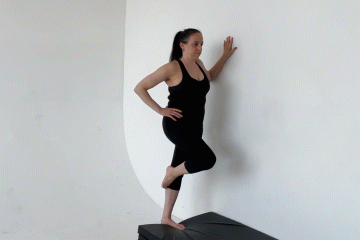
Quad-dominant lunges
Lunges are very versatile and can develop the legs holistically. You can also make slight adjustments with your lunges to put emphasis on your quads rather than getting more assistance from your glutes and hamstrings.
To do this, you need to simply step a bit closer so that when your lunge down, your knees go past your toes. Don’t worry, the “don’t let your knees go past your toes” principle is only an outdated and busted myth.
👆How to perform:
- Begin in a standing position with good posture. Feet around shoulder-width apart.
- Step one leg forward.
- Lower down your body and shift your weight towards your forward foot.
- Push back up to the starting position.
- Repeat the motion with your other leg.
⭐️Coaching Pointers:
- Let your knee go slightly past your toes.
- Keep your upper torso vertical.
- Push through the whole foot to stand back up.
Glutes
The glutes are arguably the most powerful muscle of the body. We use it when we walk, stand, run, and jump, which is why it’s already fairly strong. However, neglecting this muscle group can lead to a muscle imbalance which can cause lower back pains and lower body tightness.
Nordic curls
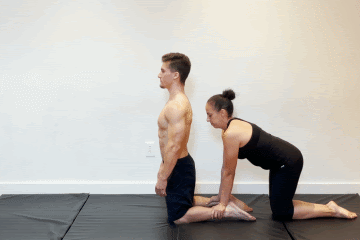
This is a great exercise for both developing the glutes and the hamstrings in isolation. The main issue with this exercise is the anchor which most people are having problems with and activating the correct muscle group.
For the anchor, you can get creative and ask someone to hold you during your sets or have a piece of heavy furniture around your heel or calf safely to perform the reps.
Activating the glutes and hammies can be problematic if you’re not executing the exercise correctly. First,, do a proper warm-up to pre-active your glutes and hamstrings. After that, performing the nordic curls with assistance and good form can help you get comfortable with the movement pattern.
The nordic curl has a high skill threshold so you will be using this exercise for a long time.
👆How to perform:
- Begin in a high kneeling position with your feet anchored safely.
- Lower your body forward by hinging at the knees slowly as possible until your body is close to the floor.
- Pull back up to the starting position by engaging your glutes and hamstrings.
⭐️Coaching Pointers:
- Keep your bodyline straight.
- Posterior pelvic tilt.
- Move as slowly as possible.
- Hips extended.
- Flex at the knee.
Easier: Hinge at the hips for beginners, active assistance using bands, eccentrics
Harder: Full range of motion with no assistance (Easier said than done!)
Pistol squats
How can we forget about the squats, specifically the pistol squats! This exercise is a general lower body exercise that covers lower body strength, mobility, control, and balance. You can never go wrong working with this exercise. This isn’t actually for the glutes but also hits the quads, hamstrings, and hips!
Pistol squats are not easy, so you can also use the easier progressions such as the regular two-legged squats and lunges while you’re still improving certain aspects of your lower body.
👆How to perform:
- Begin in a standing position with good posture.
- Lift one foot forward and raise your arms forward for balance.
- Lower down into one leg with control.
- Push back up to the starting position.
- Repeat for reps then perform the same for the other leg.
⭐️Coaching Pointers:
- Working foot flat on the floor.
- Keep upper torso upright.
- Let your knee go past your toes.
Easier: Two-legged squat, lunges, skater squats, assisted pistol squats
Harder: Full range of motion, weighted
Hamstrings
You can also develop the hamstrings using the nordic curls or you can also use the glute-ham bridge exercise which targets the posterior chain and is excellent for the lower back if done correctly.
Glute-ham bridge
The glute-ham bridge exercise can also be considered as an easier progression of the nordic curls. However, you can definitely take advantage of its other progressions to hit the glutes and hamstrings.
👆How to perform:
- Begin in a lying position with your legs bent and feet close to your glutes.
- Push your hips forward by activating your glutes and hamstrings.
- Pause at the top position.
- Lower down with control.
⭐️Coaching Pointers:
- Avoid arching the lower back.
- Drive the weight into your heels.
- Feet shoulder-width apart.
Easier: Two leg version, shorter pause
Harder: Move the feet further from your glutes, feet elevated, one-leg variation
Calves
Some people think that calisthenics doesn’t have the capacity to build bigger and stronger calves. This is because they don’t know how to properly take advantage of the progressive overload principles.
More on how to build bigger calves: 4 Biggest Secrets to Bigger Calves with Bodyweight Only
Calf raises
Keep it simple. Calf raises are excellent for building bigger, stronger, and more mobile calf muscles.
There are tons of ways to target the calves even without adding weights, but the number one secret is adding proper TRAINING VOLUME (reps x sets).
You can perform this exercise on the floor, but it’s much better to do it on an elevated surface where you can let your heels drop lower than your toes. This allows for a wider range of motion for more potential for growth.
👆How to perform:
- Begin in a standing position with good posture.
- Push through the balls of your feet to elevate your heels off the floor.
- Pause at the top range of motion.
- Slowly lower down with control.
⭐️Coaching Pointers:
- Move with control and slowly add time under tension.
- Full range of motion.
- Do not use momentum.
- Aim for failure on each rep.
Easier: Two-legged version.
Harder: One-leg variation, with weights, longer pauses, and slower movement, adding an explosive element
Core
Building a strong and stable core is easy with calisthenics. It’s naturally inherent in the approach that you will build up core strength since basic fundamentals already demand so much from the core.
Additional core exercise helps build certain weaknesses especially when you tend to forget to work on some aspects of the core such as the obliques and lower back. Remember that the core isn’t just your abs!
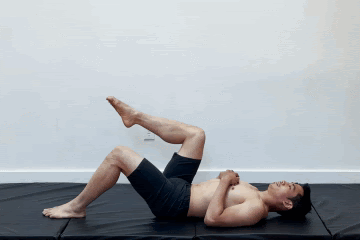
Hollow body hold
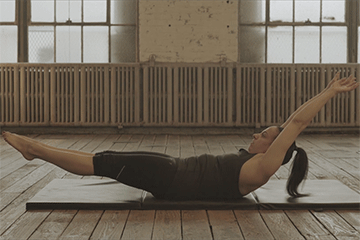
Hollow hold is one of the best core exercises that develops core strength and proper body positioning for many calisthenics exercises. Hollow body teaches the core to be stable similar to when you’re in a handstand, push-ups, and pull-ups.
👆How to perform:
- Begin by lying on the ground.
- Place your arms overhead.
- Engage your core and lift your upper back and arms off the floor along with your feet. Just hover a few centimeters off the ground.
- Hold for a specified time.
⭐️Coaching Pointers:
- Posterior pelvic tilt.
- Perform a “mini-crunch” with your upper and lower body so that your lower back is flat on the ground.
- Full-body tension.
- Breath.
Easier: Tuck legs, and arms beside you
Harder: Add weights to your arms and/or feet
Plank
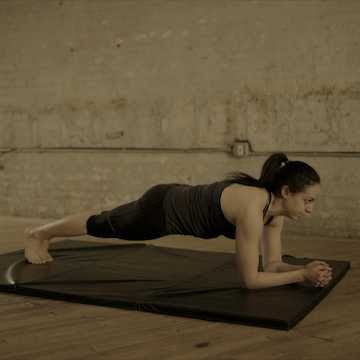
Planks are similar to the hollow body position but also develop good shoulder stability for exercises such as the planche push-ups. It helps develop a strong and stable bodyline.
👆How to perform:
- Place your elbows on the floor, shoulder-width apart.
- Extend your legs.
- Adjust your body so that your whole body forms a straight line.
- Hold the position for a specified time.
⭐️Coaching Pointers:
- Shoulders depressed and in a neutral position. (Protraction can be added for more planche-specific work)
- Posterior pelvic tilt.
- Don’t let your lower back arch.
- No hinging at the hips.
- Breath.
Easier: Done on your knees
Harder: One leg elevated, feet elevated, one-arm plank, move your elbows further from your trunk
Arch ups
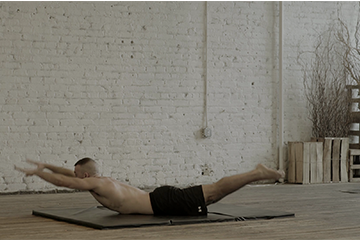
The lower back plays a major role in stabilizing your core, especially with general daily posture. A weak lower back usually manifests as lower back pain, leg pains, and poor posture.
Arch ups is a good mix of improving your mobility and strength of the posterior chain.
👆How to perform:
- Lie down on the floor with your belly facing the floor with your arms overhead.
- Simultaneously lift your arms, upper torso, and lower body upward performing a “reverse crunch”.
- Lower down with control.
⭐️Coaching Pointers:
- Do not use momentum when performing the movement.
- Go through the range of motion you are capable off.
- Use the easiest progression first.
Easier: Break down the movement, move just the upper body or the lower body, use bent arms or legs
Harder: Add holds at the top position
Side planks
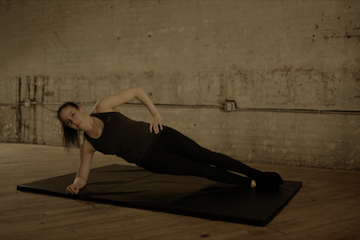
The obliques help in the stabilization of the core in general. It also helps translate for more oblique-heavy movements such as he human flag. But even if you’re not looking into specific movement patterns, having strong obliques is vital for healthy daily movement.
👆How to perform:
- Place your one elbow on the floor and extend your legs forward and aligned with your elbow.
- Twist your torso so that it’s facing forward.
- Hold for a specified amount of time.
- Repeat for the other side.
⭐️Coaching Pointers:
- Make sure your elbow is underneath your shoulder.
- Straight bodyline with hips not sagging.
- Push your shoulder down and away from your body.
- Hips squared.
- Core engaged.
📌TAKEAWAY
Now that you know how to get a calisthenics workout without equipment, what’s stopping you from getting started? There are plenty of exercises that can be done with little to no equipment. So get out there and start moving! And don’t forget to have fun too!
Remember, the key is to find something that you will enjoy. Calisthenics, overall, is a fantastic resistance training that can develop your strength, mobility, endurance, and physique. However, if you don’t enjoy bodyweight training, then you might want to look into other training approaches.
If you’re having a difficult time with the basic form of exercises, then regressing to an easier exercise would be the solution.
We are all different and our starting points, strengths, weaknesses, and current lifestyle are all different. This is why we need a PERSONALIZED and ADAPTIVE approach to calisthenics. Begin your journey by first knowing what you’re body can and cannot do.
TAKE A SHORT ASSESSMENT NOW!