Are you looking for a workout that will increase your strength, muscle, and ability to perform calisthenics skills?😲
Try this complete calisthenics workout.
This type of fitness routine is based on bodyweight exercises which means there are no expensive gym memberships or equipment to buy! Plus, it can be done anywhere – in your home, park, or even at work. The best part about this workout is that you can make it as difficult as you want by different methods of keeping calisthenics progressive. 💯
No matter what level of fitness you are currently at, doing these exercises will help push your limits and get stronger faster than any other exercise program out there!
✨What’s included in the complete calisthenics workout?
In this workout, we’ll target the full body while incorporating calisthenics skills that we love. We’ll work on calisthenics fundamentals but also share effective ways to keep the exercise progressive even for advanced athletes.
👊You will build muscle, specific and real-world strength, mobility, and skill with this workout.
How to prepare before working out?🎯
Warm-up is an essential component of any workout. It helps to increase the heart rate, loosen up the muscles and prepare the body for physical activity. Not only does it prepare you physically, but priming the mind for the workout ahead is just as important. A good warm-up will help to focus your mind on the task at hand and get you mentally pumped for the main event!
There are many ways to do a proper warm-up, but here is a sample to get you started.
✊Try this simple warm-up routine before your next workout:
- 🔥 Jog in place for one minute
- 🔥 Do 20 jumping jacks
- 🔥 Perform 10 easy variation push-ups
- 🔥 Hold a plank position for 30 seconds
For a better and more comprehensive understanding of warm-ups and guides, check this out: 📍 The Ultimate Calisthenics Warm-up Guide
What is the goal of the workout?🏆
The complete calisthenics workout focuses on building fundamental strength while letting your train your calisthenics strengths skills. It can be scaled to suit your skill level whether you’re a beginner, intermediate, or advanced.
🥺Don’t worry. You will also build muscle using calisthenics with this exercise as long as you keep on pushing harder every session and getting in the right nutrition and recovery.
In this article, we’ll also discuss how you can stay progressive in your workout so you can keep on making gains!
Progressive overload is the name of the game in resistance training. We’ll also go over the necessary basic principles of calisthenics training so you can easily apply them in your workout.
If you’re ready to get started, let’s go over the exercises that you’ll need to do for the complete calisthenics workout.
👊Why supersets?
Supersets are a great way to increase the intensity of your workout while still using good form. By combining two exercises that work for different muscle groups, you can keep your heart rate up and continue working without taking a rest. This is especially beneficial if you’re short on time or want to get a quick workout in!
🔎How to do a superset?
In a superset, you’ll complete one set of an exercise and then move immediately to another set of different exercises. There is no rest in between the two exercises. After you’ve completed both sets, then you can take a rest.
✔️Rest periods
We’ll keep the rest periods at a respectable time to allow recovery while maintaining muscle tension. This is important because it’s in the muscle tension that gains are made!
Keep in mind that the rest periods in this workout are recommendations. You can also increase them if you’re capacity is still limited.
If you’re interested in better understanding the rest periods, check out this article: How Long Should I Rest in Between Sets?
💥Full-body Complete Calisthenics Workout Summary:
2 to 3 times per week (non-consecutive workout days)
Exercises are GROUPED into supersets.
Take note:
- Follow general workout guidelines
- Use a progression for each exercise that’s appropriate for your level
Superset 1:
We’ll begin the workout with the two strength-based calisthenics skills so you can train them while you’re still fresh. This allows you to exert maximum effort while keeping good form.
A1: Front Lever 3-5 sets of 8-15 seconds
A2: Planche 3-5 sets of 8-15 seconds
Superset exercises A1-A2 Rest 90 seconds after A2
⚡️A1: Front lever
The front lever is a pulling exercise that works the entire backside of your body including your lats, traps, rhomboid, and rear delts. It’s one of the most coveted calisthenics skills in the community and definitely an eye-catching because of the gravity-defying aesthetic.
For more front lever help, check this out: The Ultimate Front Lever Guide
How to perform:
- Dead hang on a bar.
- Retract and depress your shoulders.
- Pull your body backward while lifting your lower body until your body is fully horizontal and parallel to the floor.
- Hold the position for a specific time.
🤜Coaching Pointers:
- Arm locked out and straight
- Head in a neutral position
- Point your toes for added global body tension
- Posterior pelvic tilt
How to progress:
The front lever is a lever (no duh!) exercise meaning you can adjust the difficulty of the exercise by either lengthening or shortening the lever body. You can do this by adjusting the leg position.
Easier:
Tuck, advanced tuck, pike frog, lower down variations (negatives)
Harder:
Full frog, pike straddle, straddle, one-leg, half lay, full front lever, lever variation to full extension (isotonic + pauses)
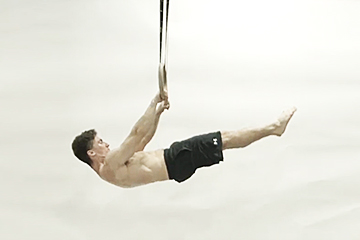
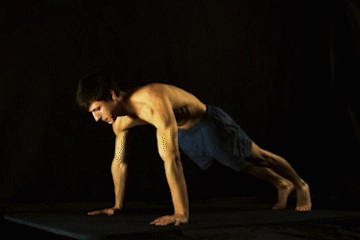
⚡️A2: Planche
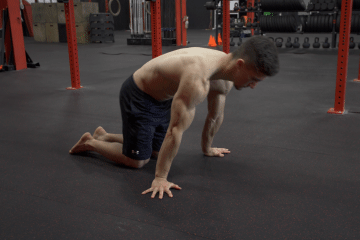
Planche is another coveted calisthenics skill. It is a pushing exercise that primarily works the chest, shoulders, and triceps. This skill takes a lot of time and patience to develop so don’t get discouraged if you can’t do it right away!
For comprehensive help on planche, check this out: The Ultimate Planche Guide
How to perform:
- Begin in a normal push-up position.
- Lean forward while maintaining the hollow position.
- When you lean forward enough, lift the legs until it’s shoulder height.
- Hold the position.
🤜Coaching Pointers:
- Maintain shoulder protraction and depression
- Posterior pelvic tilt
- Lean forward enough to lift the lower body
- Straight locked out arms
- Externally rotated shoulders
- Body parallel to the ground
- Head in a neutral position
- Hands shoulder-width apart
- Hand position depends on preference but a 45-degree angle is the most efficient for most cases
How to progress:
Similar to the front lever, planche is also a lever exercise. It’s basically an inverted front lever so instead of pulling into position, you need to push into position. Many fail to understand that to be able to lift the lower body, you simply need to lean far forward enough to do so to adjust the center of gravity. Easier said than done!
Easier:
Tuck, advanced tuck, pike frog, lower down variations (negatives)
Harder:
Full frog, pike straddle, straddle, one-leg, half lay, full planche, planche press, planche on rings
Superset 2:
The next superset includes the basic vertical pushing and pulling patterns for general strength gains.
B1: Vertical Pull (Chin up): 5×5
B2: Vertical Push (Handstand Push Up): 5×5
Superset B1-B2 Rest 90s after B2
⚡️B1: Chin-up
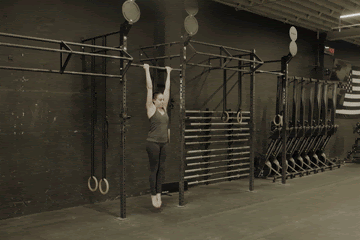
The chin-up is a vertical pulling exercise that works the muscles of the back and biceps. It’s a great exercise for building strength and can be progressed by adding weight, doing more reps, or changing the grip.
We decided to use the chin-up to also target the biceps since we’ll hit the lats again in the horizontal pulling section. Although if you prefer, you can still perform pull-ups (pronated grip) or neutral grip if you want to.
Performing chin-ups has a slightly higher risk of getting elbow pain, but you shouldn’t worry about that if you read this article: Why do your elbows hurt during chin-ups?
How to perform:
- Begin in a dead hang position with a supinated (underhand grip).
- Retract and depress your shoulders.
- Pull until your chin is over the bar.
- Lower down with control.
- Repeat for reps.
Coaching Pointers:
- Hollow body hold
- Grip width more or less shoulder-width apart depending on preference
- Imagine driving the elbows down towards the hips and behind
- Shoulder retraction and depression throughout the range of motion
- Head in a neutral position
How to progress:
The concept of progressing in chin-up is by adding resistance or adding assistance in the exercise. For adding assistance, you can use a resistance band or your legs to help you complete the motion. For a harder variation, you can add resistance by adding weights or going unilateral with your chin-ups.
Easier:
Banded chin-ups, Eccentrics (negatives), Leg assisted chin-ups
Harder:
One-arm chin-up progression, weighted variation, Mantle ring chin-up,
⚡️B2: Pike push-up
For building stronger and bigger shoulders, pike push-ups are the best option. It is a vertical pushing exercise that works the muscles of the shoulders, chest, and triceps. This exercise eventually leads to handstand push-ups which are a must-have for bouldering shoulders. It also opens to many other calisthenics skills if you’ve unlocked this overhead pressing exercise.
How to perform:
- Begin in a regular push-up position.
- Walk your feet closer to your arms while hinging at the hips and moving your arms in a more vertical fashion.
- You should now be in a piked “handstand” position.
- Lean forward.
- Lower your upper body towards the ground until your head nearly touches the floor.
- Push back up to the starting position.
- Repeat the push-up pattern for reps.
🤜Coaching Pointers:
- Keep leaning forward to put the weight mostly on your shoulders.
- Shoulders fully elevated
- Forearms should be perpendicular to the ground even at the bottom position of the push-up
How to progress:
Pike push-ups are an amazing overhead shoulder pressing exercise that can be scaled into a handstand push-up. We can add weight by gradually introducing the full body weight into the movement pattern.
Easier:
Limited range of motion (pike up to 90-degree), bent legs
Harder:
Elevated feet pike push-ups, wall handstand push-ups, chest-to-wall HSPU, freestanding HSPU, weighted HSPU
Superset 3:
This covers the lower body muscle groups. There are clear advantages of choosing calisthenics to develop the legs. One of them is that you DEFINITELY CAN BUILD MUSCLE using bodyweight exercises even without using any equipment at the comforts of your own home.
C1: Step Up 3-4 sets x 6-8 reps
C2: Nordic Curl 3-4 sets x 3-6 reps
C3: Single Leg Calf Raises 3 sets x 8-15 reps
Superset C1-C3, no rest after C3.
⚡️C1: Step Up
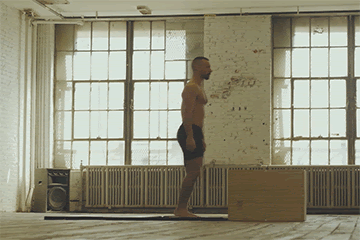
Step up is a compound exercise that simulates a pistol squat but is more scalable and can reduce the mobility requirement compared to pistols. Step-ups are also convenient and accessible as you only need any elevated surface to perform the exercise. This exercise primarily targets the quads but can also hit the glutes if adjusted to the setup.
How to perform:
- Begin at the bottom of the exercise by standing close to an elevated surface.
- Step one leg up the elevated surface.
- Lean forward to put the weight on your foot on the elevated surface.
- Stand up on that one leg while keeping the other leg behind.
- Slowly lower down to the ground.
- Repeat for reps.
- Switch legs.
Coaching Pointers:
- Keep a straight body posture.
- Only push using the forward foot
- Hands in front for balance
How to progress:
There are various ways to keep the exercise progressive, but the option is using a set-up that keeps you challenged while not getting hindered by other factors such as mobility.
Easier:
Regular bodyweight squats, lunges, lower elevation, negatives
Harder:
Higher elevation, slower tempo, weighted variation
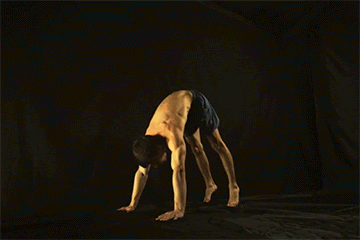
⚡️C2: Nordic Curl
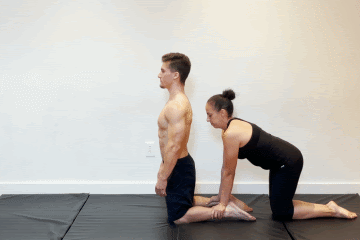
Nordic curls isolate the glutes and hamstrings for more added volume while not getting limited by other muscle groups such as the quads.
How to perform:
- Position in a high kneeling position with your calves or feet anchored to the ground.
- Begin to hinge at the knees and lower down your upper body towards the floor until you’re near the ground.
- Using your glutes, pull yourself back up to the high kneeling position.
- Repeat for reps.
Coaching Pointers:
- Maintain leaning forward
- Upper body in a straight posture
- Use a full range of motion until close to the ground
- Extend your hips in the high kneeling position
- Actively flex your glutes and hamstrings to facilitate the movement
How to progress:
There are various ways to adjust the intensity of nordic curls. The easiest one is to hinge at the hips so you can lessen the lever. Other ways emply progressive calisthenics techniques such as using bands, eccentrics, and increasing the range of motion.
Easier:
Hinge at the hips at first, use resistance bands, negatives
Harder:
Deeper range of motion, completely straight body, slower tempo
⚡️C3: Single Leg Calf Raises
Isolating the calves is a MUST for bigger and stronger calves. During compound exercises such as squats, the calves don’t get enough stimulation to reach muscular failure to build muscle and size.
Read more on calisthenics calf training here: 4 BIGGEST Secrets to BIGGER Calves Without Using Weights
How to perform:
- Begin in a standing position near an edge of an elevated surface.
- Place one leg closer to the edge so that the heel is off the surface.
- Lift one leg off the edge.
- Lower down the heel of the standing leg so it’s closer to the ground.
- Push through the ball of the standing leg to raise you into your toes.
- Lower back down to get a stretch on your calf muscle.
- Repeat this motion for reps.
- Repeat on your other leg.
🤜Coaching Pointers:
- Always aim for a full range of motion
- Focus on controlled tempo
- Don’t bounce or use any momentum
- Pause briefly at the top and bottom position per rep
How to progress:
Calf raises can easily be adapted to suit any skill level so it’s a highly effective exercise for beginners to advance. Beginners can begin with two-leg calf raises then move into the single-leg variation as you progress in the exercise.
Easier:
Two legs, wall assistance, partial range of motion, slow negative but fast concentric
Harder:
Slower tempo, higher reps, banded variation, weighted variation, longer pauses at the top and bottom
Superset 4:
This superset compliments the vertical general strengthening exercises. We’re moving to the horizontal movement patterns to improve both pushing and pulling. We’re still going back to the basics as they are effective and easy to implement. Basics are also easy to scale to accommodate any level.
D1: Horizontal Row (Bodyweight row) 3 sets x 8-15 reps
D2: Horizontal Push (Push-ups) 3 sets x 8-15 reps
Superset D1-D2, 60s rest after D2.
⚡️D1: Horizontal Row (Bodyweight Row)
Bodyweight rows are amazing for developing a bigger back in conjunction with your pull-ups/chin-ups.
How to perform:
- Hang on a bar with your legs on an elevated surface.
- Thrust your hips to straighten your body while keeping your arms straight at the bottom.
- Retract your shoulder blades.
- Pull your upper body until your hands are close to your chest.
- Lower down with control.
- Repeat the pulling motion for reps.
🤜Coaching Pointers:
- Keep the shoulders retracted and depressed throughout the range of motion.
- Posterior pelvic tilt
- Elbows tucked close to your body
- Head in a neutral position.
How to progress:
Although seemingly easy, there are ways to keep the horizontal rows progressively harder. More advanced rows can also be transitioned to front lever pulling work. You can use a bar but gymnastics rings are easier to adjust for your skill level.
Easier:
More vertical/diagonal body position.
Harder:
Weighted variation, tuck front lever rows, L body row, one-arm bodyweight row
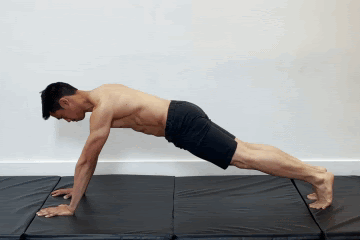
⚡️D2: Horizontal Push (Push Up)
Up next for this superset is the good, old, classic push-ups. Push-ups are amazing for building your chest, shoulders, and triceps that are easy to scale from beginners to advanced.
How to perform:
- Begin in a quadruped position.
- Extend your legs straight.
- From the top position, lower down until your chest is close to the ground.
- Push back up to the starting position.
- Repeat for reps.
🤜Coaching Pointers:
- Elbows tucked close to your body
- Posterior pelvic tilt
- Shoulders depressed at all times
- Scapula retracted during the decent
- Body in a straight line
- Full-body tension
Also check out the technique mistakes you should be avoiding: 10 Push-ups Mistakes That’s Sabotaging Your Gains!
How to progress:
When the advanced push-ups on the floor are too easy, you can make your way to gymnastics rings push-ups for more push gains: 6 Best Advanced Gymnastics Rings Push-up Variations.
Easier:
Knee push-ups, incline push-ups, partial rep range
Harder:
Ring push-ups, one-arm push-ups, weighted push-ups
Superset 5:
This last upper body superset is meant to increase the training volume of the arms to build more muscle. This approach is highly effective for more advanced calisthenics athletes that can recover quickly in their upper body training.
E1: Bodyweight Bicep Curl: 3 sets x 8-15 reps
E2: Bodyweight Tricep Extension: 3 sets x 8-15 reps
Superset E1-E2, 60s rest after E2.
⚡️E1: Bodyweight Bicep Curl
Who says bodyweight exercises can build bigger biceps? With the right exercise and exercise training protocol implementation, you can easily grow one of the most popular muscles to train!
How to perform:
- Begin in a hanging position on a lowered bar or low rings with feet on the floor and arms extended. Hand in an underhand grip position.
- Extend the pelvis so straighten the body.
- Retract the shoulders.
- Pull your body towards the ring/bar by engaging and flexing your biceps.
- Pause at the top position.
- Lower down with control.
- Repeat the bicep bodyweight curl for reps.
🤜Coaching Pointers:
- Always retract and depress your shoulders
- Keep your core engaged
- Neutral head position
How to progress:
The progression of this exercise is very similar to the bodyweight rows since the exercise and movement pattern is basically the same. The small change from an overhand or neutral grip in the bodyweight row into the underhand grip plays a massive role in shifting the muscle activity in the biceps.
Easier:
More vertical/diagonal body position, bent legs
Harder:
More horizontal body position, single-arm variation
⚡️E2: Bodyweight Tricep Extension
The triceps muscles are bigger than your biceps which is why adding muscle to this area will definitely make your arms look bigger. Bigger triceps also shows a higher potential in strength that translates to many pushing exercises such as planche, push-ups, and handstands.
How to perform:
- Begin in a push-up position.
- Lower down your body by letting your elbows cave downward towards the ground.
- Push back up to the starting position.
- Repeat for reps.
🤜Coaching Pointers:
- Keep your elbows tucked close to your body.
- Posterior pelvic tilt.
- Adjust your grip width that be comfortable based on your anthropometry.
- Focus on tricep engagement and contraction to facilitate the movement.
How to progress:
Progressing is easier to scale when done on rings since you can adjust the height where you place your hands. Rings also allow you to move based on what’s comfortable for you. If you’re working on a fixed surface, make sure you have good form and that you’re comfortable performing the movement pattern.
Easier:
More vertical/diagonal body position, bent legs, hands close to the center of your body
Harder:
More horizontal body position, single-arm variation, arms start close to an overhead position
Superset 6:
Let’s move to the final superset which will focus on developing your core. Core stability is important for your overall strength and performance in calisthenics. It also translates to better health. Not only these exercises will help you build aesthetic abs, but you will also get functional abs that are capable of movement.
F1: Hollow Body Hold 3 sets x 30-45 seconds
F2: Arch hold 3 sets x 10-15 reps
Superset F1-F2, 60s rest after F2.
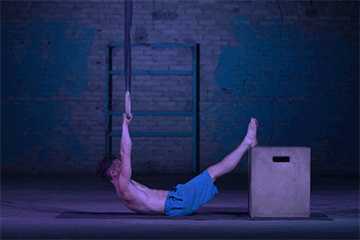
⚡️F1: Hollow Body Hold
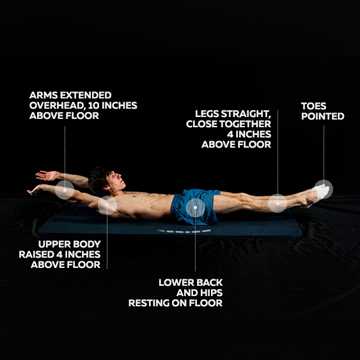
The hollow hold is an excellent calisthenics exercise to develop abdominal and lumbar spine stability, improve posture, and increase strength in the anterior chain muscles. Core strength developed from this exercise transfers directly to many calisthenics exercises such as planche, handstands, push-ups, pull-ups, squats, and more.
How to perform:
- Start lying on your back with feet together and arms extended overhead.
- Engage your core by sucking your belly button into your spine.
- Press your lower back into the ground.
- Lift your legs, shoulders, and head off the ground.
- Hold the position for a specified time.
🤜Coaching Pointers:
- Maintain lower back flat on the ground at all times
- Full-body tension
- Breath normally
How to progress:
This exercise is similar to the lever concept so adjusting the difficulty relies on lengthening or shortening the lever.
Easier:
Bent arms and legs, arms by the side, tucked hollow body
Harder:
Weighted variations, hollow body rocks
⚡️F2: Arch hold
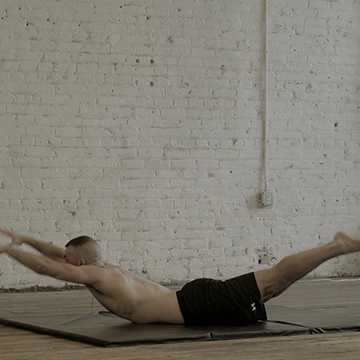
When training the core, never forget about the back. Strengthening the lower back (erector spinae) allows balance and overall strength development of your core. A healthy lower back means a more powerful body that has a low risk of getting injured or getting aches and pains. This exercise also improves upper back and overhead shoulder mobility.
How to perform:
- Start lying on your stomach with legs fully extended.
- Squeeze your glutes and raise your legs, arms, and chest off the ground.
- Engage your lower back to facilitate the motion of the lower body.
- Hold this position for a specified time.
🤜Coaching Pointers:
- Move along your current mobility
- Breath normally
- Make sure to flatten the stomach on the floor
How to progress:
Like the hollow hold, this is a lever exercise. Shortening the lever or increasing it can adjust the difficulty.
Easier:
Better range of motion, isolation of lower half or upper half first, Isotonic movement, hands by the side
Harder:
Full range of motion, arch rocks
📌Takeaway:
This concludes the complete calisthenics workout. This workout is designed to give you full-body strength and muscle development while also helping you develop the main calisthenics skills you might be interested in learning. Although if you’re primarily interested in certain aspects such as skills, the complete calisthenics workout might not be as efficient compared to specified training workout programs. Other than that, this work out is a solid option for holistic development.
👊Remember to focus on quality over quantity, and always warm up properly before starting your workout.
I hope this was helpful in some way!
If you’re still having a hard time following the workout, then that’s ok. Pre-made workouts similar to this one aren’t the best and most efficient for progress. In fact, cookie-cutter workouts can actually hinder your progress if not implemented currently!
Taking a PERSONALIZED approach will yield better results. If you’re interested in taking a personalized calisthenics journey, begin by taking an assessment so you can get to know your body’s strengths and weaknesses before beginning with your workout.
Train smart to make faster and safer progress.
TAKE THE ASSESSMENT NOW!