Looking to sculpt your upper body? Well, look no further than the bodyweight dip! This simple yet effective exercise can help you build muscle and strength in your chest, shoulders, and triceps. In this guide, we will discuss the proper form for doing dips, as well as some of the benefits they offer. We will also provide a few tips on how to make dips even more challenging.
This is actually the most comprehensive article you will find about the exercise. We’ll cover EVERYTHING you need in order to master the dips!
- ✊ How to perform dips
- ✊ Coaching Pointers
- ✊ Benefit of dips
- ✊ Muscles Used
- ✊ Technique & Forms
- ✊ Common Dip Mistakes
- ✊ Dip progressions for Beginners
- ✊ Dip progressions for Advanced
- ✊ Bodyweight Dip Equipment
- ✊ Dips at Home
- ✊ How to add Dips into your workout
Let’s get started!👊
🤔 What are Bodyweight Dips
Bodyweight dips are a great way to work your upper body. They are typically done using a set of parallel bars, but can also be done using a chair or other stable object.
If the squat is referred to as the king of the lower body exercises, then dips can also be referred to as the king of the upper body pushing exercises. They share the same mechanics and both hold the full body weight with their respective limbs.
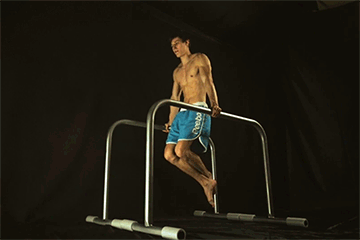
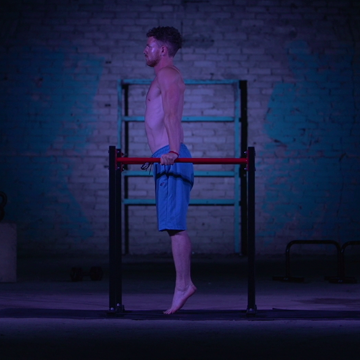
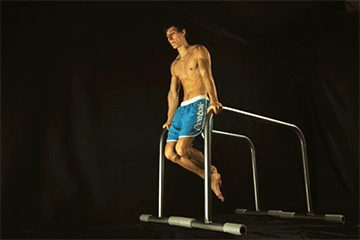
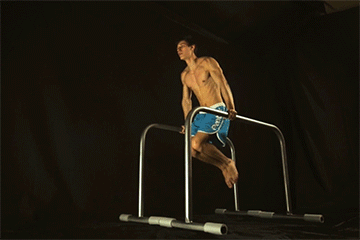
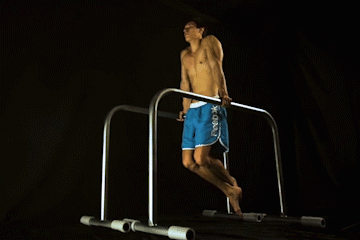
☝️ How to Perform Dips
- Setting up – Prepare your parallel bars, dip station or two pieces of sturdy furniture. For movable parallel bars, place them slightly wider than shoulder-width so you can activate your chest a bit more.
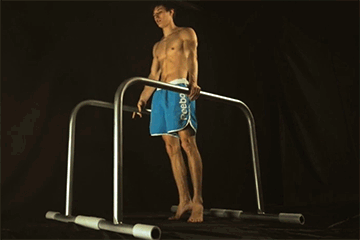
- Starting position – The support hold is always the starting position on the dip. Hands-on the bars and shoulders pressed down. Your body off the floor so that your full weight is supported only by your upper body.
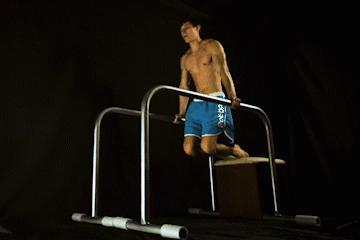
- Movement – From the support hold, slowly lower your body by bending at the elbows.
- Bottom position – Continue to lower down until your elbows are at a 90-degree angle or slightly lower.
- Complete the rep – Finish one full range of motion by pushing back into the starting position with LOCKOUT arms.
- Repeat for reps & enjoy the gains.
🎯 Coaching Pointers – Form & Technique for Dips
Good form equates to optimal and safe progress. Be strict with your form. When form breakdown sets in during your final reps of the set, make sure your form breakdown is minimal to avoid injuries.
Scapula retracted
To perform scapula retraction, you can imagine pinching your shoulder blades together so that you can squeeze a pencil in between your shoulder blades. Scapula retraction stabilizes your shoulders while allowing for more chest activation. Do this throughout the range of motion of your dips.
Scapula depression
To perform scapula depression, push down your shoulders away from your ears. This position keeps your shoulders safe and maximises your power output.
Read more: 📍What is the Scapula?
Posterior Pelvic Tilt
The posterior pelvic tilt or PPT position helps you achieve activate your core. Engaging your core will maximize your power output so you can push more for your dips. To do this position, tilt your hips backwards so that your lower back curves forward.
PPT is the similar torso position seen in the hollow hold position.
Arms straight at the top
This one is a controversial topic. Most nay-sayers will tell you that locking out your arms will damage your elbows and shoulders.
If that’s the case, then why strong gymnasts are able to hold gravity-defying positions such as the planche with completely straight arms?
The support hold with fully locked out arms makes the exercise more challenging but that’s the reason why it is also effective. Locking out not only conditions your elbows and biceps but also provides more chest activation.
Just like in squats where you extend your legs at the top position, the same thing goes with dips. Maximize your dip gains with full extension.
Grip width
As a general rule, play around with the shoulder-width grip. However, it’s still best to choose a grip width that’s based on your body proportions. Not everyone is the same. Some people prefer a slightly wider grip. Some people prefer a slightly narrower grip.
Opt for a grip width that provides comfortability without any irritation on your shoulder joints, elbow joints, and wrists when performing the dips.
Grip orientation
There are bars that are angled outward where you can perform dips with your body facing against the wall. In this setup, you can either have your grip angled inward or outward. There are also bars that can be placed in a parallel position.
Like the grip width, opt for a grip orientation that will suit your individual preference. Experiment where you will feel the strongest and most comfortable so you can always maximize your performance in your dips.
Forearms
Aim to keep your forearms perpendicular to the floor. If the forearms shifts backward, emphasis will be put on your triceps. Lean your weight slightly forward so you can keep your forearms vertical. Otherwise, your forearms will naturally push back.
Elbows
The elbows are tucked close to the body and avoid flaring out to minimize the risk of shoulder impingement. If you’re going wider with your parallel bars, be sure you’re using angled bars to prevent an over-external rotation with your shoulders.
At the top position, rotate your elbow pits to point forward to add chest activation.
Lower down until elbows are around 90 degrees of flexion
Doing so improves tricep and chest activation. You can go lower but it would require more shoulder mobility. A deeper dip can also assist in muscle-ups and further improve your shoulder and chest mobility.
Ideally, go deeper than 90 degrees if your mobility permits it. However, stopping at 90 is also good enough for targeted muscle activation.
If you’re experiencing pain in your shoulders or elbows when going deeper, then you’re probably going too deep too soon. Lack of shoulder extension mobility will result in your shoulders collapsing and moving forward which can irritate your shoulder joints when performing dips.
Focus on improving your shoulder extension through shoulder dislocates and lessen the degree of your range of motion just until your 90-degrees for your dips in the meantime.
Controlled movement
Don’t use momentum. As a general rule, slowly lower your body for two seconds, pause at the bottom, and then explosively push to the top position. Pause and repeat. You can vary the tempo depending on your skill level and needs.
Using momentum, especially when going back up by kipping your lower body defeats the purpose of the exercise.
Adding a pause at the top and bottom briefly
Pausing for longer periods builds strength for the specific position you are holding. A slower tempo also helps muscles for advanced athletes.
Slightly upper torso lean
When going down, let your body lean slightly forward. Your body won’t necessarily go down in a straight line since that will put so much emphasis on your triceps and it will feel a lot more difficult.
Neutral head position
A common neglected small detail that has a huge impact on your body function is the head position. Don’t jot your head forward to give you an illusion of getting more range of motion in your dips. Instead, keep a neutral head position looking forward.
Proud chest position
Along with the neutral head is having your chest high and up. This will also naturally follow if you start by setting up your shoulder depression and retraction. A proud chest position offers maximum activation of your chest as well.
🏆 Benefits of Dips
The benefits of dips are plenty. Here are some of the main ones:
- Improve shoulder, chest, and tricep strength
- Increase muscle size in the shoulders, chest, and triceps
- Improve overhead pressing performance
- Primary pushing exercise that compliments your pull-ups [INSERT PULL-UP ULTIMATE GUIDE]
- Enhance your posture by strengthening the muscles that hold your shoulders back
- Great exercise for those who can’t do traditional bench press due to shoulder pain
- Can be done anywhere as long as you have access to a dip station or two sturdy objects
Dips should be the main component of your bodyweight calisthenics pushing regimen. It’s calisthenics fundamental after all. Whether you’re a complete beginner or an advanced athlete, there are always ways to continue progressing with dips and this is through 📍progressive calisthenics.
Progressive calisthenics is simply implementing progressive overload to your workout. This means using methods such as progressions, reps and sets, reduced rest periods, slower tempos and such to keep your training more challenging.
However, if you want to get a more efficient and safer way to train with faster results, then progressive calisthenics is usually best paired with an ADAPTIVE & PERSONALIZED approach.
If you’re interested to try out this type of training method, then begin your journey with a free assessment to know where exactly should you start in your workout:
FREE ASSESSMENT FOR A PERSONALIZED & ADAPTIVE CALISTHENICS PROGRAM

💪 Muscles Used
The main muscles used in dips are the:
- Anterior deltoid – front shoulder muscle
- Pectoralis major and minor – chest muscles
- Triceps brachii – back of the arm muscle.
There are also several stabilizing muscles that work isometrically (contract but don’t change length) to maintain good posture and joint stability. These muscles include the:
- Rhomboids
- Trapezius
- Levator scapulae
Dips also work the following muscle groups to a lesser degree:
- Latissimus dorsi – a back muscle which is primarily trained through pull-ups
- Core musculature – abdominal and lower back muscles
🔥 Dip Technique
Regular Dip
Let’s begin with the most basic technique of dips, the regular dip. With this technique, all you have to do is to go down and follow the rest of the guidelines mentioned above in the coaching pointers section.
This dip technique has a good balance of chest, tricep, and shoulder activation. This is excellent for beginners to advanced since regular dips are best for weighted dips. The reason why is that it’s the safest form among the other techniques when loading is increased.
Chest Dip
If you want to target more of your chest with body weight only, then the chest dip technique can be used. To do this move, simply exaggerate your forward lean while maintaining the rest of the cues for dips. Leaning forward puts emphasis on your chest and also on your anterior deltoids.
The chest dip technique, however, is not ideal for weighted variation. It increases the risks of injuries by putting too much tension on your shoulder capsule instead of relying mostly on your muscles.
If you want to do weighted dips, stick to the regular dip technique.
Tricep Dip
Another option is the tricep dip technique. However, this can actually be more challenging than the other two techniques since the focus is shifted to a smaller muscle group compared to the shoulders and chest. With this technique, most of the loading is handled by the triceps.
To perform the technique, focus on having a more vertical body when going down. This shifts your elbows backwards into an angle which makes your tricep work.
In the example above, you will see the more advanced variation which is the Russian dip. A similar concept applies and targets more of your triceps.
Straight Bar vs Parallel Bar Dips
When doing dips, you’re given the option to either use a straight bar or a parallel bar. So, what’s the difference and which one should you choose?
The biggest difference between the two is that a straight bar puts your palms facing each other while a parallel bar has your palms facing away from each other. The reason why this is a big factor is because of how your shoulder works.
Straight bar dips

When your palms are facing each other (as in a straight bar), your shoulder is in what’s called internal rotation. This position puts your rotator cuffs in an inward position towards your torso. The internal rotation causes you to shift more emphasis on your chest. While that might seem great, the range of motion of straight bar dips is limited because the bar blocks your body unless you create an excessive lean when going down. If you can use this exercise for added chest size with bodyweight only.
In addition, the shoulder position is also similar to a more advanced ring dip variation, the Bulgarian ring dip. If you’re working towards this skill, then adding the straight bar dip into your routine can improve your progress.
This exercise is best for specific training for straight bar muscle-ups. It directly trains the movement that has a phase of the straight bar muscle-up. It’s best used as an accessory for the muscle-up or if you really don’t have access to equipment that allows you to perform dips in a parallel position.
Parallel bar dips
On the other hand, when your palms are facing away from each other (as in a parallel bar), your shoulder is not necessarily forced into external or internal rotation. You are freer to choose while allowing for a more comfortable shoulder position.
This is the most common dipping position you’ll see everywhere. Calisthenics athletes and gym-goers alike are more familiar with this technique.
Another advantage of the parallel bar dips is the range of motion. Since there’s no bar that’s blocking your body, you can go a lot deeper if your shoulder mobility permits it. In addition, you can easily add weights for more advanced individuals.
Which one is better for you?
This depends on your preference and goals. Choose the one that works towards your specific goal while serving you a comfortable position for you to perform the dip optimally.
Legs Crossed vs Legs Straight
Ideally, you would want to have your legs straight while your hips are in a PPT position for maximum body tension so you can produce maximum force from your upper body.
However, if you’re limited in space, you can still produce the same results with your legs crossed. To do so, be sure you’re still in a PPT position so that your legs are behind your torso. You can also simply bend the legs behind you. Crossing them isn’t necessary.
🤯 Dip Mistakes
Poor range of motion
Some people make dips easier by not doing low enough to complete the range of motion of dips. This is not optimal for your shoulder, chest, and tricep development. While studies show potential for muscle growth in a partial range of motion, this can be muscle-specific and performing dips in a limited range (especially when just doing to the top phase)
Get at least into a 90-degree position with your elbows. If you can go deeper, the better. However, make sure that you have enough shoulder extension mobility for lower dips.
Not going all the way up
Another common mistake and cheating by making it easier is through quarter reps with the bottom half. This means not going all the way to the top from the bottom of the dip. You will be robbing yourself with potential strength gains if you’re not performing the complete range of motion of dips.
Always push until your arms are locked out but don’t rely passively upon resting on your joints and passive structures. Activate your muscles even at the top position.
Inconsistent performance
We’re not talking about if you can do dips for 5 reps one day and then do 10 reps the next. We’re talking about inconsistency in how you perform the dip. If you’re doing different tempos in each rep or not locking out in each rep, progress will not also be consistent as expected.
Be mindful of your movement. Focus on your technique in each and every repetition so you can make consistent gains from the exercise.
Uncontrolled negative
You don’t want to go down without control in the eccentric phase of the exercise. This usually happens when you’re performing the dips lazily. The forces are applied to your passive structures such as your ligaments and joints that can cause injury. Use your muscles to control the movement and don’t allow gravity to pull you down easily. You’re losing muscle-building and strength-building potential with this mistake.
Shrugging the shoulders
A common weakness when performing dips is the shrugging of the shoulders which is also known as scapula elevation. This puts necessary strain on your joints and prohibits you from maximizing your force output of the chest and shoulders.
Instead, push your shoulder down into progression. In The Movement Athlete app, the dip position shrugs are one of the first parts of progressions so you can strengthen this position. Keep the shoulders depressed throughout the range of motion.
Hunching upper back
A hunched back makes the exercise easier but prohibits maximizing strength gains on your shoulders and chest. Instead, you would want to extend your spine into a proud chest position and retract your scapula by pinching your shoulder blades together. This position prevents injuries and optimizes the targeted muscles of your upper body.
Training through the pain
I know you guys love to train, even when there is pain involved.
Pain is a manifestation that there is something wrong in your body. Don’t fight the pain by continuing a movement that exacerbates the pain point.
Calisthenics is excellent for 📍injury treatment but within context. If dips are flaring up some points, then slow down, regress the movement, or better yet, consult with a specialist to better address the issue.
Here are common pain points when performing dips.
Chest pain
Chest pain is a common occurrence in dips if not done correctly. The first thing you want to check is your current dip training. Are you doing too much too soon?
If you’re not yet strong enough to perform full dips or add heavy weights too soon, you’re most likely to experience chest pains, especially in the sternum area. Commonly, you need to watch out for:
- Doing too much volume
- Poor technique
- Lack of strength and mobility
Elbow pain
If you’re experiencing elbow pain during dips, it’s most likely due to shoulder impingement. This is when the head of your humerus (upper arm bone) rubs against the acromion process, a bony projection on your shoulder blade.
To avoid this, keep your elbows close to your body and tuck them in. This position prevents your shoulder from going into internal rotation and keeps the head of your humerus in its socket.
Similar to what’s mentioned in the coaching pointers, find a proper grip width and orientation that’s comfortable for you. This massively affects the impact on your elbow joints.
Take note that a straight arm lockout at the top in every rep does not result in elbow pain. If your elbows are hurting when doing this motion, then there’s probably a weakness in the area that did not result from the lockout.
Shoulder pain
Common shoulder pain from dips stems from the wrong scapula position or incorrect execution of the dips.
Again, shrugging of the shoulders in a combination with a protracted scapula commonly results in shoulder pain.
Another one is lacking the proper shoulder mobility to complete the range of motion of the dip. Go down only until at least 90 degrees. Then add mobility exercises until you can go lower. However, if you’re not able to reach the minimum, then work on your shoulder mobility and general pushing strength.
Read more here: 📍Shoulder Mobility Course
Wrist pain
When on the parallel bars, some might have extended wrists which puts pressure on these small joints. Instead, you would want to hold the wrists in a more vertical position to put less stress on the wrists.
You can also perform strengthening exercises to improve your wrist mobility and strength.
Read more here: 📍How to Bulletproof Wrists for Calisthenics
If you’re still experiencing pain, then consult with a physiotherapist or certified strength and conditioning coach to help identify the root cause of the issue.
Read here for a detailed explanation of each Dip mistake: 📍Common Dip Mistakes You Need to Avoid!
💯 Dip Progressions for Beginners
When performing dips, you’re basically holding your whole body weight on your upper body. Naturally, not all beginners are capable of performing such strength requirements. This is when we use dip progressions to lessen the loading of the exercise while still developing strength and mobility for the dip.
Take note that these are just a summary of the progressions. You can check out the more comprehensive progress guide here: 📍Bodyweight Dips for Beginners: Progressions to Master the Exercise
Bench Dip
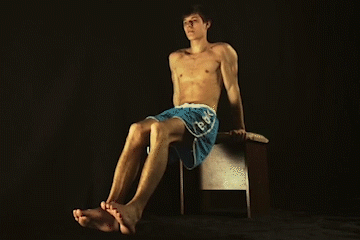
The starting point for building strength towards dips is the bench dip. With this exercise, you’re being fully supported by the bench which takes away a lot of the body weight.
While a study shows a risk of a shoulder injury, this is granted if the exercise is performed with an incorrect technique or lacking sufficient shoulder mobility to perform the exercise.
To prevent the injury, keep your shoulder fully depressed, retracted, and externally rotated by pointing your fingers backward.
Dip shrugs
Once you have developed the necessary strength for the full dip support hold, the next progression targets the common weak link which is the scapula.
Dip shrugs stabilize your shoulders so you can safely perform the full range of motion of the dips.
Assisted Dip
The next progression covers the full range of motion of the dips. However, you will be assisted so you’re not fully holding your full body weight.
There are two ways to go about this:
Leg-assisted dip
The first assisted variation is with leg assistance. In this progress, you’re using your legs to hold up your body weight. You will need to have a dip station that’s low enough so you can reach the floor or you can place something below your legs to stand on if the dip station is high.
The issue with leg assistance is that the amount of leg assistance could potentially be inconsistent. You can easily get too much assistance from your legs especially when fatigue starts setting in.
However, leg-assisted dips are an excellent option for those who do not have any equipment.
Band-assisted dip
Resistance bands are very much affordable. If you can buy a set of varying thicknesses, this becomes a powerful tool for you to use in building strength towards dips and many other calisthenics exercises such as pull-ups, muscle-ups, planche, levers, and more.
The one issue with band assistance is that the amount of assistance you get isn’t the same throughout the range of motion. You get the most assistance at the bottom and get less as you get to the top position.
Regardless of this issue, band assistance is still a great option especially if you’re following the correct technique of the dip.
Eccentric Dip
Many studies show that we are able to perform at a higher intensity during the eccentric phase of an exercise. In dips, this is the lowering phase.
Once you have built enough strength from the band assistance, it’s time to work on the eccentric phase. The eccentric dip focuses only on the lowering phase. Once you reach the bottom, you reset by getting off the dip and just jumping back into the starting position.
Eccentrics are fantastic for developing strength and muscle, not only for the dips but for many calisthenics exercises as well. Eventually, you will build enough strength to perform the concentric phase (pushing back up) of the dip.
🥇 Dip Progressions for Advanced
For those who have already mastered the full dip with good form and at least 15 reps, it’s not the end of the line of dips for you.
In fact, this is the phase when training gets more exciting since you can play around with more challenging progressions.
Weighted Dips
If you’re looking to build absolute strength and relative strength at the same time, then weighted dips are a fantastic option for you.
With weighted dips, you’re no longer bound by your body weight. You can continue to increase the difficulty of the regular dip by implying adding weights.
You will need a dip belt for this exercise so that you can easily add weights to the exercise.
The main thing you need to remember when working on weighted dips is gradual progress. It’s tempting to ramp up the weights week by week, but this can easily result in overtraining or injury.
Instead, you would want to add minimal weight per week and focus first on building up higher training volume first.
Longevity is the key to safe and meaningful progress.
Read more: 📍How to Use Weights with Calisthenics for Ultimate Strength Gains
Ring Dips
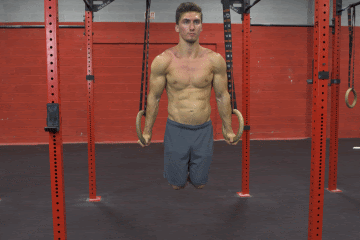
If you want to work dips with just body weight, then ring dips are the best option for you.
Since gymnastics rings are free to move in many different directions, you will first need to stabilize yourself before you can even do a support hold. Ring dips exponentially increase the difficulty of the dips on a stable surface.
If you’re advanced enough, you can even combine ring + weights for an extra challenge. But if you just came from regular dips, expect to be working on ring dips for quite some time. The jump is actually huge.
Another advantage of ring dips is that they make your dips more portable. Rings can be set up in various places as long as it’s sturdy enough. So if you’re on the go, you can easily train your ring dips anywhere at any time.
We highly recommend checking out our complete guide on ring dips so you can master them in a safe and efficient manner: 📍The Ultimate Guide for Ring Dips
😎 Bodyweight Dip Equipment
While 📍one of the main advantages of calisthenics is that you can train without any equipment, training with SOME equipment is still the best way to progress, especially with exercises such as dips and pull-ups.
For dips, you would need a dip station. There are many types of dip stations available. The most accessible one is in a form of portable parallel bars. You can easily move them from place to place and the width can easily be adjusted.
If you have some space at home and a bit more budget, then we recommend getting a doorway dip station or power tower. These offer much better stability and a wider range of exercises than portable parallel bars.
Of course, if you’re looking for an all-in-one solution, then you can get a home gym that comes with a dip station. These are more expensive but can if your budget permits this setup, you’ll definitely enjoy having this type of setup.
There are various options for dip bars that can suit every budget and lifestyle. Choose the one that suits your accessibility.
Read more: 📍7-MUST-HAVE Equipment for Calisthenics
👀 How to Perform Dips at Home

Supinated dip on a stable surface
Dip stations are accessible. However, if you’re still limited in resources or ways to get a set of bars, or just prefer a no-equipment setup, then you can easily perform dips by placing two pieces of sturdy furniture or chairs side by side.
The only difference with this is the grip. You will be forced into a wrist-extended position which places more pressure on these small joints. If your wrists aren’t prepared enough to hold this position, you will get some aches here.
An easy way to prep your joints is by performing some wrist mobility exercises as well as doing your regular push-ups.
Read more: 📍Ultimate Guide to Calisthenics Equipment & Cheap Ways to Replace It
💥 How to Add Dips to Your Workout
Dips are a heavy fundamental which is why they should be at the beginning phase of your workout. Of course, this is should be after your📍warm-up!
Dips are best combined with your push-ups in a workout. The dips become the primary pushing exercise with higher intensity compared to the push-ups. Push-ups are definitely easier since research shows that you’ll be holding around 63-75% of your body weight compared to the full weight of your body unto your upper body with dips.
Here’s an example of a dip-focused portion of your workout:
Dip Progression of choice: 3 sets of 6 – 12 reps
120 secs rest
Push-up progression of choice: 3 – 4 sets of 8 – 20 reps
90 secs rest
This type of workout combines a higher intensity exercise + low volume with moderate intensity exercise + moderate to high volume. Doing so allows strength-building potential while maximizing muscle gains as well.
You can then add other exercises to the workout above such as your abs or pull work such as pull-ups.
👊 The Bottom Line on Dips
Dips is a great exercise for building strong and defined shoulders, chest, and triceps. They can be done with little to no equipment and are perfect for at-home or gym workouts.
If you’re new to dips, start with the bench dip progression. As you get stronger, move on to the assisted dip and then the eccentric dip. For a real challenge, try weighted dips or ring dips.
Most importantly, focus on your form and technique. Dips are a great exercise with many benefits. If you want to improve your upper body strength, you can’t neglect to add dips to your routine.
Now that you know all about dips, it’s time to add them to your workout routine!
What are your thoughts on dips? Let us know in the comments below!
And don’t forget to check out our other blogs for more workout tips and tricks.