When it comes to bodyweight exercises, the dip is one of the best moves you can do. Dips are a great exercise for anyone looking to improve their upper body strength. It works your chest, triceps, and shoulders, and there are endless ways to customize your routine.
However, if you work on your dips consistently, there will be a point when it will eventually become too easy for you. And if you want to build more strength, muscle, & body control, the regular bodyweight dips might no longer be enough. So you need to keep your workout progress with more advanced dip progressions.
In this article, we will discuss 15 advanced dip variations that will take your calisthenics routine to the next level! 👊
🔥 Forward Dips
The forward dip tweaks slightly the regular bodyweight dips by adding a forward lean in the exercise. The forward lean of the upper body shifts the emphasis more toward the chest and the front of the shoulders making your triceps work less compared to regular movement. For that reason, forward dips are excellent for building your chest and shoulder muscles.
The additional lean of the upper torso forces the functions of the chest to work harder. A good cue you can do for added chest recruitment is by squeezing your hands together when going up.
One disadvantage of using this technique is that the risk-reward ratio becomes not worth the effort when going weighted. The additional loading through weights can be too much on the shoulder capsule when performing weighted dips with this technique. If you’re going weighted, we recommend opting for the regular dipping technique.
However, forward dips are still a fantastic option for chest development with body weight only. You can 📍build muscle with calisthenics!
☝️ How to Perform:
- Begin in a support hold position on parallel dip bars.
- Lean forward with your upper body and keep your legs forward of your hips and torso.
- Lower down with control until elbows are at least at a 90-degree angle.
- Pause at the bottom.
- Push back up to the starting position.
- Repeat for reps.
🎯 Coaching Pointers:
- Slightly wider hand placement
- Elbows slightly flared
- Torso forward position maintained throughout the motion
- Not excessive flaring of elbows
- Controlled movement
- You can go lower if your mobility permits
🔥 Straight-bar dips

Like the forward dips, the straight bar dips require a forward lean since the bar will be blocking your body. Because of this, the straight-bar dips inherently work your chest and shoulders like the first dip variation. If you’re interested in targeting more of your chest, then this is a great option for you.
In addition, the straight-bar dips offer strength that translates to learning the straight-bar muscle-up.
The straight-bar muscle-up is basically connecting your pull-ups to a straight-bar dip. If you train in this exercise as well as the explosive pull-up, then you’re surely be doing muscle-ups in no time.
Take note that the straight-bar muscle-up’s requirements are different from the ring muscle-up. Specificity is key.
If you want to learn muscle-up on bars, then opt for this exercise. If you want to learn the muscle-up on rings, then train the ring dip that we’ll get into later.
Learn more here: 📍How to Do a Muscle-up
☝️ How to Perform:
- Begin in a support hold position on a straight bar.
- Lean forward with your upper body and keep your legs forward of your hips and torso.
- Lower down with control until your chest touches the bar.
- Pause at the bottom.
- Push back up to the starting position.
- Repeat for reps.
🎯 Coaching Pointers:
- Slightly wider hand placement
- Elbows slightly flared
- Torso forward position maintained throughout the motion
- Not excessive flaring of elbows
- Controlled movement
- You can lean more forward with the exercise to go deeper but this puts more tension on your shoulders
- At the bottom position, don’t rest on the bar but maintain muscle tension
🔥 Russian Dips
If you’re building crazy tricep strength, then the Russian dips are a good choice. The reason is that your elbows are tucked at your sides instead of flared out. This position puts more emphasis on the triceps.
In addition to the dip movement, an additional dropping of the elbows toward the bar adds difficulty. Getting over the bottom position without the use of momentum or a shift of torso position requires a high level of tricep strength.
This is a highly advanced tricep exercise that shouldn’t be attempted by beginners. The risk of injury to the shoulder and elbow joint is too high if you’re body isn’t prepared. If you have the strength and mobility, then this is a great move for you to try out.
☝️ How to Perform:
- Begin in a support hold position on parallel dip bars with your elbows at your sides and close to your torso.
- Lower down to a regular dip until your elbows are at a 90-degree angle.
- Transition backward so that your elbows rest on the parallel bars.
- Engage your triceps to push yourself back into the bottom of the dip.
- Push back up to the starting position.
- Repeat for reps.
🎯 Coaching Pointers:
- Elbows closer to your body but this still depends on your own anthropometry
- Practice this exercise supported to master dropping into your elbows without slipping off the bar
- Use a forward when pushing from the bottom position into the dip to first learn the movement
- You can go lower at the dip if your mobility permits
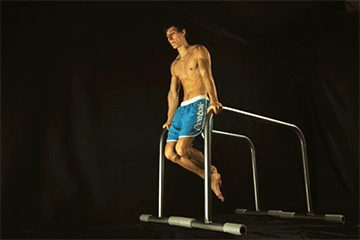
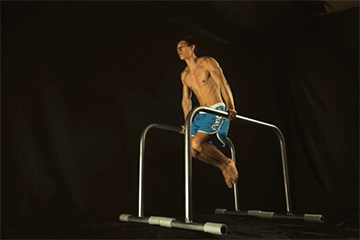
🔥 L-sit Dips
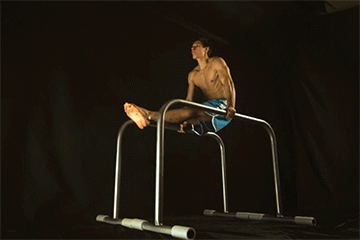
L-sit dips are a crazy dip variation that combines amazing upper body strength and core strength.
There are two reasons the L-sit position makes the dip much more difficult.
The first reason is that the L-sit forces more muscles to activate even just to hold the position. Your core works overtime to hold the extended legs and piked hips. Your quads also assist in holding the position which is why many people shake violently when holding an L-sit.
The second and primary reason why L-sit dips are much more difficult is that the position limits your ability to lean forward. Because there’s no forward lean, you would need to either rely more on your triceps to execute the movement which it’s more like the later dip variation we’ll get into ( the impossible dip) or you would need to flare your elbows out within the scapular plane.
This is a brutal dip variation reserved for the more advanced athletes.
☝️ How to Perform:
- Start in your parallel bars in a support hold.
- Lift your legs until parallel to the ground.
- Lower down your body to perform the dip while maintaining a 90-degree angle with your troso.
- Push back up to reverse the motion.
- Repeat for reps.
🎯 Coaching Pointers:
- Flare your elbows out to be able to lower your body without tilting your upper torso
- We recommend it on rings for better shoulder movement and safety (although making the exercise much more difficult)
- Upper torso upright
🔥 Walking Dips
The walking dip is a fun variation of the dip that allows you to move your body through space. This movement also challenges your stability since you have to maintain balance throughout.
Training for walking dips improves coordination and control for harder dip variations such as the ring dips. In this exercise, you need to transfer your weight from side to side, so in a sense, it’s a unilateral exercise. You’ll be able to tax both sides of your body equally to minimize weak links and 📍muscle imbalance.
For this exercise, you would want to have a set of parallel bars where you can walk on. However, if you don’t have space to walk, you can just shift your weight from side to side.
☝️ How to Perform:
- Start in the support hold position.
- Lean your weight on the right arm.
- While the weight is on one side, lift your left arm to move forward.
- Catch with your left arm and balance into the dip position.
- Continue into a dip movement until your elbows are at least at a 90-degree angle.
- Push back up to the starting position.
- Repeat the process for the other side.
- Continue walking forward until your space permits.
- Walk backward if you have reached the end of the space.
🎯 Coaching Pointers:
- Maintain scapula positioning throughout the movement
- Lockout at the top even after your walk
🔥 Supinated Arm Dips

A small shift in hand placement has a big effect on the muscle activity of the exercise. With supinated arm dips, the exercise engages the biceps because of the elbow flexion with the supinated grip. A similar effect is achieved when performing the 📍bicep push-up.
This exercise is perfect for developing lockout strength for your arms which is a requirement for ring dips. It mimics the ring-turn-out motion on the rings.
☝️ How to Perform:
- Begin in a support hold position but with your hands supinated which means your fingers are pointing backward.
- Proceed to lower down similar to your regular dip motion.
- Repeat for reps.
🎯 Coaching Pointers:
- To achieve the most from the exercise, lockout at the top position
- Externally rotated shoulders
- Elbow pits facing forward
- Elbows close to the body
🔥 Ring Dips
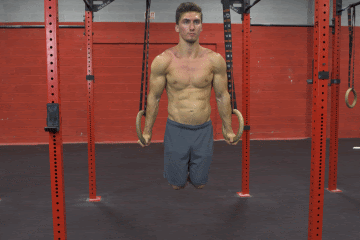
This recent 2022 study shows among the other dip apparatus variations (bench vs dip station vs rings), the rings have the highest intensity and muscle activation. But, you don’t need this research to tell this.
If you get on the rings, you will immediately feel the difference in intensity coming from a stable surface. This is because gymnastics rings can freely move in different directions.
Gymnastics rings are a great tool for improving your upper body strength and stability. The instability of the rings challenges your muscles to work harder in order to keep your body stable and in control. Even just holding the support hold will be a challenge when first getting introduced to ring work.
Ring dips are one of our favorite dip variations. It develops amazing strength and muscle control in the upper body. It builds a strong foundation if you want to get into any advanced skill work on gymnastics rings.
If you need any help learning the ring dips, we have a comprehensive guide that will help you progress toward this skill granted that you already have mastered your basic bodyweight dips, of course!
Learn here: 📍The Ultimate Guide to Ring Dips
☝️ How to Perform:
- Begin in a ring support hold position.
- Lower your body by following the dip movement pathway.
- Push back up to starting position.
- Repeat for reps.
🎯 Coaching Pointers:
- Rings turned out at the top
- Twist inward the rings into a neutral position when performing the dip movement.
- Follow the regular ring dip protocols
🔥 Bulgarian Ring Dips
Credits: Gymnastics Method
For more advanced athletes, you can work on the Bulgarian ring dips for more chest activation. The exercise targets the lower chest more than the regular ring dips. This is done by training the chest adduction function of the chest. You get to hit more of the chest muscles by squeezing them together when pulling your hands together.
Bulgarian ring dips require regular ring dips. It’s much more challenging as you isolate the chest more with the exercise.
To maximize chest activation, be sure to flare out your elbows WITHIN the scapular plane. This means keeping your elbows slightly behind your shoulders.
☝️ How to Perform:
- Begin in a ring dip position with rings turned out.
- As you begin to lower down, spread your arms to the side until your elbows are at a 90-degree angle.
- Push back up to the support hold.
- Repeat for reps.
🎯 Coaching Pointers:
- Flare your elbows within the scapular plane
- Rings turned out at the top position
- Lower until Elbows are at a 90-degree angle
🔥 Korean Dips
Credits: Hanley Fitness
This exercise is a cool-looking dip variation that interestingly targets different muscle groups compared to regular dips.
The chest, triceps & front of your shoulders are commonly targeted in dips. However, in Korean dips, the biceps and rear shoulders are the focus points of this exercise. This makes Korean dips build strength that transfers to other advanced exercises such as the back lever, planche, and Hefesto’s).
Korean dips are performed on a straight bar with your body in front of the bar. Hands are placed behind your body and in a supinated position.
The downside of Korean dips is the loading it puts on your elbow joints and shoulder joints in a shoulder-extended position. If you’re not prepared to perform this movement, it might be too risky.
Weigh the pros and cons of the exercise based on your goals and current skill level.
☝️ How to Perform:
- Begin in a support hold position on a straight bar with a supinated grip and with the bar behind your body.
- Lower down with control until your elbows are at a 90-degree angle.
- Push back up to the starting support hold.
- Repeat for reps.
🎯 Coaching Pointers:
- Keep your body straight
- Your body will go into a more horizontal position as you lower down
- Lower down until your mobility permits
🔥 Weighted Dips
Credits: Simonster Strength
For superior upper body strength gains and efficient muscle-building options, the weighted dips are one of the best exercises that advanced athletes should include in their routine.
Weighted dips are performed similarly to regular dips. The only difference is that you’re adding external weight to the movement. This makes the dip a lot more challenging and puts more tension on your muscles, resulting in strength and muscle gains
This exercise improves your relative and absolute strength while getting stronger in the dipping motion. There’s no need to put hate on weights. Weighted dips provide the best of both worlds.
While we love calisthenics and bodyweight training in general, we cannot deny the amazing benefits that combining these two approaches can provide.
If you want to learn more about using weighted calisthenics, check out this article below.
Read more: 📍How to Use Weighted Calisthenics For Ultimate Strength Gains
There’s no need to separate calisthenics and weight training. You can include both through weighted calisthenics.
For weighted dips, you can use these two pieces of equipment that you can opt for:
- Dip belts + dumbbells or weight plates
- Weighted vests
Alternatively, you can put books in your backpack and then weigh them so you can add more weight to the exercises. You can also ask your friend to get on your back as you perform dips if you’re crazy strong enough!
☝️ How to Perform:
- Load up safely on your weights.
- Get into the dip position without jumping.
- Perform the dips for reps.
🎯 Coaching Pointers:
- Gradually add weights. Don’t underestimate the additional loading you put in.
- Use an elevated surface so you can safely set up your support hold without jumping into position.
- Perform the weighted dip either with a full lockout or soft lockout (brief lock only) at the top.
- Use the regular bodyweight dip technique.
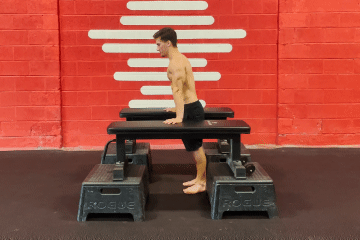
🔥 Weighted Bench Dips
A commonly recommended exercise in the weight room to induce tricep activation is weighted bench dips. This exercise primarily targets the triceps while having extended shoulders.
But due to the loading with the shoulder extension, this exercise can actually do more harm than good. This exercise increases the likelihood of injuries as even the mentioned 2022 study above DOES NOT recommend the bodyweight variation of the bench dip exercise at all.
For us, you can achieve success and progress with the bodyweight variation. But for weighted bench dips, we included them here as an existing dipping variation that you might probably want to avoid.
You’re far better of with other exercises that target your triceps such as the 📍tricep extension exercise.
🔥 Archer Dips
Credits: Activ Ciropractic
Let’s get back on the rings and talk about the archer dip variation. If you’re familiar with the archer pull-ups and archer push-ups, the same concept applies. You’re basically dipping with one arm with your other arm assisting for balance with some degree of hold.
This is a unilateral exercise so if you have a clear muscle imbalance between your dominant and non-dominant side, it will clearly show through this exercise.
Training archer push-ups (one of the progressions for the one-arm push-up) massively help in developing strength for this exercise.
You can also perform archer dips on a straight bar. The stable surface allows you to push with maximal force making it easier compared to doing it on the rings.
☝️ How to Perform:
- Hold a support hold position on the rings with rings turned out.
- Lower your body towards one side of the arm while keeping your non-working arm straight and locked out.
- Push back into the starting position with the bent arm.
- Repeat the process on the other side.
🎯 Coaching Pointers:
- Straight-arm lockout with the non-working arm
- Keep the bent arm close to the body
- Shift your weight towards the bent arm when lowering
- Don’t push using the straight arm to avoid strain on your shoulder joint, elbow joint, and chest
- Keep a false grip to provide better leverage for your body
🔥 RTO Dips
Credits: Scott Misfud
The ring turn-out dips or RTO dips are basically supinated dips but on the rings. So starting from the standard support hold on rings with your rings turned out to a 45-degree angle, instead of twisting your arms inward when lowering, you’re going to maintain that turnout.
This puts tremendous tension on your elbows and biceps making it an excellent exercise for building strength for high-stress exercises such as levers and planches.
While this exercise is amazing for joint and muscle development, it’s still a high-risk exercise IF your body is not prepared for the exercise. Make sure you have a solid ring support hold, ring dip mastery, and a good german hang before attempting this exercise.
☝️ How to Perform:
- Hold a support hold position on the rings with rings turned out.
- Lower down into your dip while maintaining the turned-out rings.
- Push back up to the starting position.
- Repeat for reps.
🎯 Coaching Pointers:
- Follow regular ring dip protocols
🔥 Impossible Dips
Credits: The Calisthenics School
Talk about the impossible. The impossible dip seems like an impossible exercise for many people. In this exercise, your triceps and the back of your shoulders hold most of the weight.
It seemingly looks like a Russian dip, but in the impossible dip, there’s no assistance from a forward lean from your body. No regular dip motion. The body maintains a backward lean to put the emphasis on your triceps throughout the full range of motion.
The impossible dip is a dip variation that more closely resembles a high-level tricep extension.
So if you want to learn this exercise, you should be able to do some heavy lifting with your weighted dips. This is to ensure that you have a solid baseline of tricep strength which will be doing much work for impossible dips.
In addition, the backward lean also adds stimulation from the back muscles to stabilize the body which makes this an excellent exercise for developing strength in your back muscles.
☝️ How to Perform:
- Begin in a support hold on the parallel bars.
- Lean your body backward while letting the rest of your body follow and keeping a straight line.
- Lower your body slowly by bending your elbows backward until your elbows touch the bar.
- Push back up to starting position.
🎯 Coaching Pointers:
- Backward lean
- Lockout at the top
- Push through your triceps
- Full body tension
🔥 Planche to Dips
To end our advanced dip variations list, we’re going to talk about a combination of two skills to make one high-level exercise and this is the planche to dips.
The planche to dips is an exercise that’s going to take some serious time and practice to master. Not only do you need to develop the strength to maintain a planche hold, but you also need the coordination and control to shift your body weight into a dip position while in a planche.
This exercise is not for the faint of heart and will take some time to master but once you can do this exercise, it’s going to be an excellent show of strength for your calisthenics skills.
To progress faster in this exercise, you first need to master, obviously, the dips and next, the planche.
Planche is a high-level straight-arm strength exercise that requires specific training to master. If you’re interested in mastering the planche, read here: 📍The Ultimate Guide to Planche
☝️ How to Perform:
- Start in a support hold position.
- Slowly lower your body into a dip position.
- Lean your upper body forward when you reach the bottom position.
- As you push back up, lean more forward and push into your full planche position.
- Hold the planche for a brief moment.
- Lower down back into the dip and repeat the motions.
🎯 Coaching Pointers:
- From the retracted scapula position, shift into a protracted position when pushing to the dip.
- Hollow body hold
- Straight arms during the planche
- Use slightly momentum from the lower body to reach the full planche position
- The aim is to go into the planche as slow as possible and be able to hold the planche at the top with good form
📌 Takeaway
And there you have it, folks! The advanced dip exercises you can work with or work towards in your calisthenics journey.
Dips are a great exercise for developing upper body strength and muscle. But, if you want to take your dipping game to the next level, you need to start doing advanced dip variations.
The 10 dip variations we listed above are great for building strong chest, shoulders, and triceps. So, if you’re looking for a challenge, try adding some of these variations to your next workout routine.
Just remember to practice good form and technique, warm-up properly, and listen to your body to avoid injury. And, if you’re ever unsure about an exercise, be sure to ask a certified personal trainer or coach for help.

