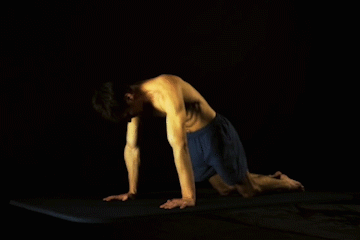
Are you looking for a calisthenics workout that you can do at home with no equipment? If so, you have come to the right place! In this blog post, we will discuss a calisthenics exercises routine that you can do without any special equipment. This workout is perfect for beginners who are just starting out.
In this article, we’ll be covering these topics:👇
- ⚡️ Is calisthenics for beginners
- ⚡️Advantages & disadvantages of calisthenics
- ⚡️Calisthenics workout for beginners
- ⚡️& Frequently Asked Questions
Let’s get started!
🤔Is calisthenics for beginners?
There are two common myths surrounding calisthenics:
💥Myth 1: Calisthenics is only for beginners
People in the weightlifting community who don’t have a proper understanding and underestimates calisthenics often spur out this misconception. It stems from the fact that regular push-ups are like doing bench presses with around 70% of your body weight. In weightlifting, you are not bound with any progression as you just have to add more weight to your bench press; the counterpart of push-ups.
However, a 2019 study by Tillaar suggests that push-ups and bench presses can be interchanged by strengthening coaches granted that the PROPER progression and training protocols are used to match the athletes’ strength & skill level.
Calisthenics is also for ADVANCED ATHLETES, thanks to the 📍progressive calisthenics approach. This simply means that you need to keep your workout and exercises more challenging after each session.
For example for push-ups, weightlifters tend to underestimate push-ups because they don’t know that they can easily make it harder by using progressions & variations such as :
- One-arm push-up
- Pseudo planche push-up
- Weighted push-up
- Gymnastic ring push-up
- Archer push-ups & more
💥Myth 2: Calisthenics is TOO HARD for beginners
Many cookie-butter or one-size-fits-all programs on the internet claiming to FOR BEGINNERS might not fit EVERY LEVEL of beginners. These are hurting your progress and your body in the long run!
Read more here: 📍The end of Beginner/Intermediate/Advanced Workouts
Although regular push-ups are considered a basic move, not all beginners can do the exercise properly. There are programs that force you to perform 10 push-ups, 10 dips, 10 burpees, and 10 pull-ups as a beginner program.
The problem: not all beginners can do these fundamentals leaving them discouraged and frustrated with calisthenics!
Again, progressive calisthenics saves the day. With the right progression to suit the exact level of a beginner you are in, you will gain better progress without the risk of injuries.
Calisthenics is FOR EVERYONE; from beginners to the most advanced. You just have to adjust the level of your workout according to your skill level, lifestyle, and goals.
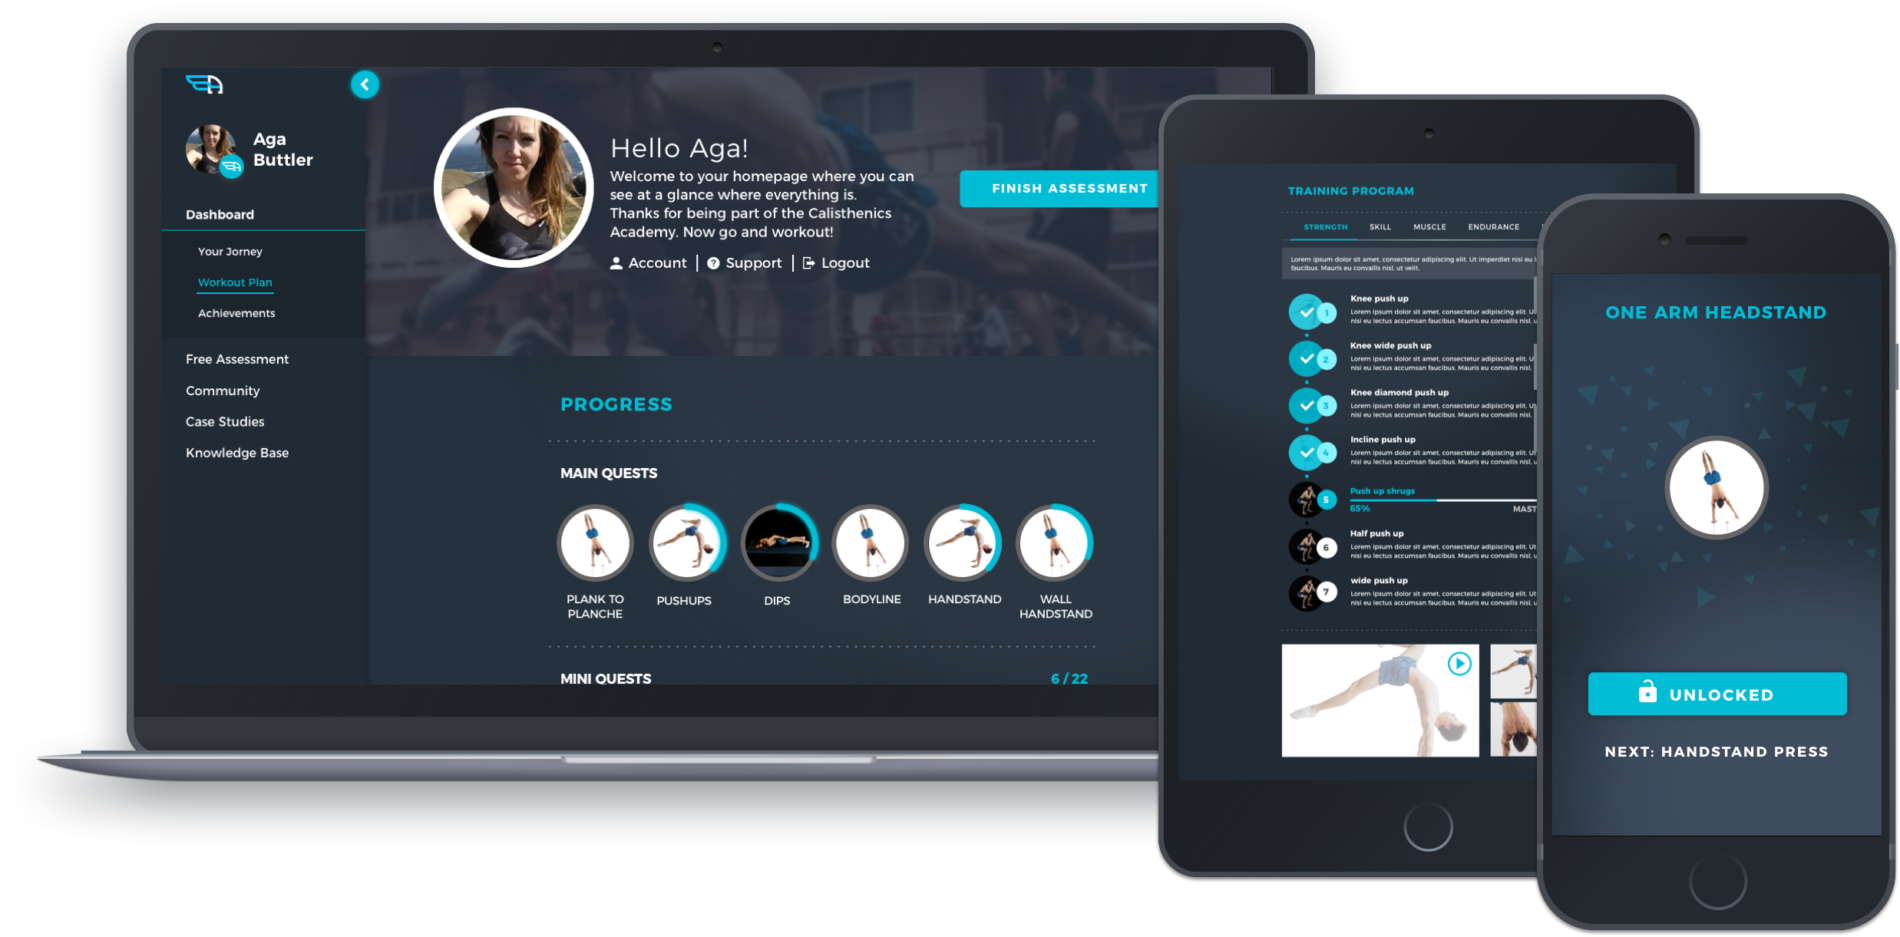
This is why The Movement Athlete app takes a PERSONALIZED approach to fitness.
⭐️Advantages of calisthenics training
Calisthenics training is a resistance training approach that offers a lot of advantages, especially for beginners. Here’s what you can enjoy with calisthenics training.
💪No special equipment needed
First, calisthenics exercises are relatively simple and can be done without special equipment. This makes them perfect for people who are just starting out with their fitness journey.
Calisthenics can be performed without any equipment. HOWEVER, it’s ideal for getting some key pieces such as:
- Dip station
- Pull-up bar
- Resistance band
- & gymnastics rings
Nothing too fancy, expensive, or inaccessible. If you don’t like purchasing some items, you can also continue with your workout and get creative by using the items around you.
Calisthenics equipment is excellent because they are accessible, affordable, and provides better results compared to not using anything. It’s worth investing in the 4 pieces above if you ask our opinion.
But for this beginner workout, everything will be easy to get and you don’t necessarily have to have the four mentioned above.
Get more help on what calisthenics equipment is and cheap ways to replace them here: 📍The Ultimate Guide to Calisthenics Equipment
💪Workout anywhere at anytime
Additionally, calisthenics exercises can be done anywhere, at any time. All you need is your own body weight and a little bit of space. This makes calisthenics workouts very convenient, especially for busy people.
If you’re also traveling a lot, there’s no need to look for a nearby gym or any equipment. You can train in your hotel room or at a nearby park then you’re good to go!
💪Holistic development
Finally, calisthenics training is a great way to build strength, endurance, and flexibility. Calisthenics is a great option if you are looking for a workout that will help you improve your overall fitness level.
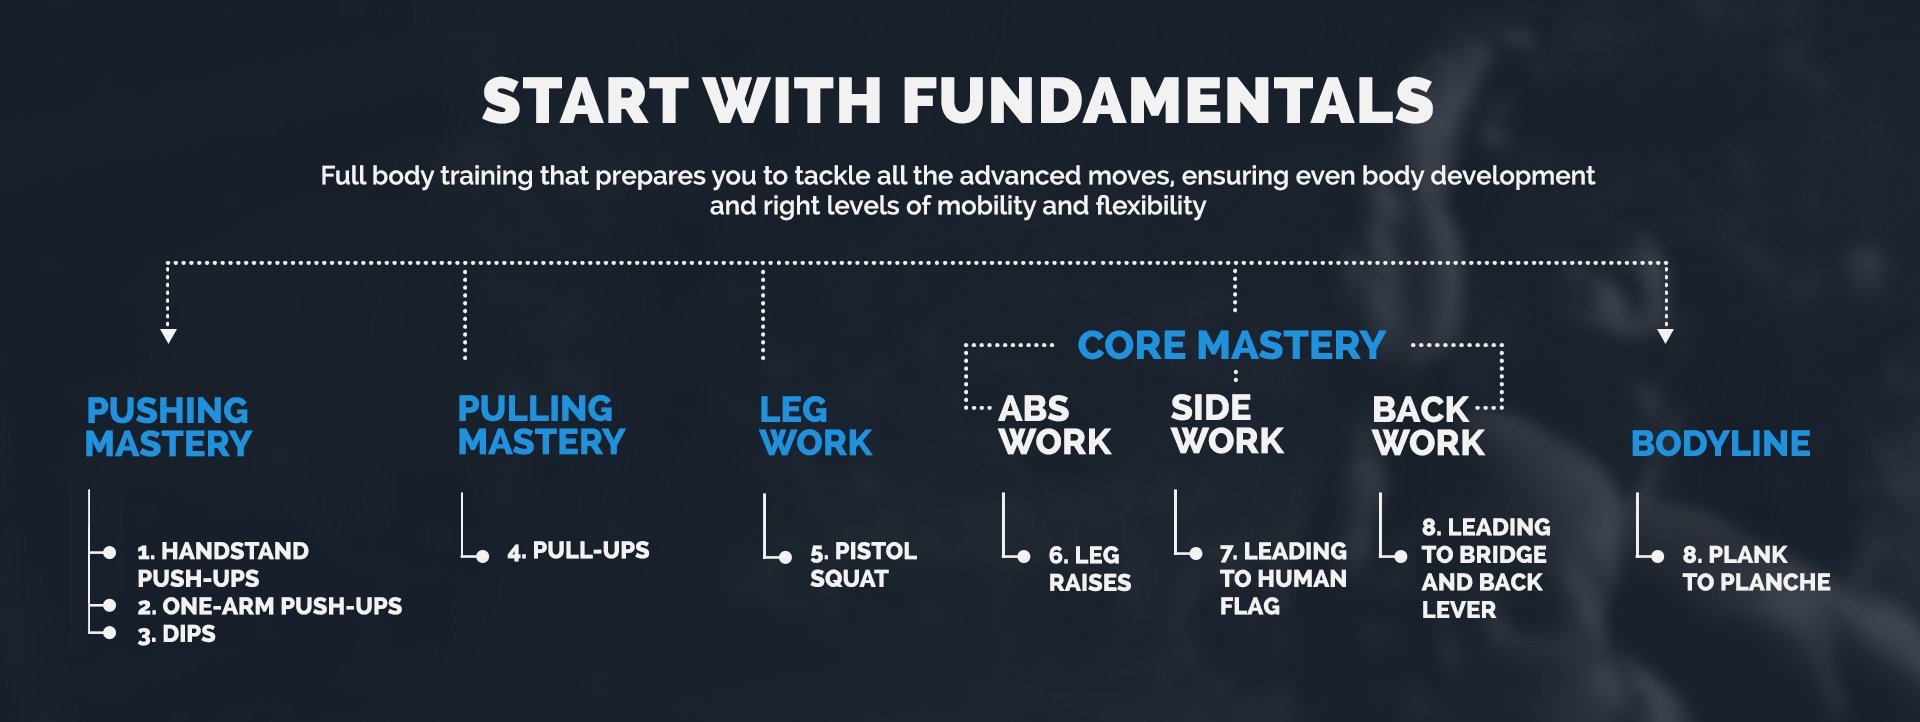
Let’s take The Movement Athlete app’s approach to master the pull-ups for example. When approaching learning the skill, the app breaks down the learning process into 4 elements:
- Strength – This is the main reason why we’re here and focuses on strengthening the body.
- Skill – Skill movements train and teach the correct movement pattern for a specific skill for faster progress. It can also act as a warm-up.
- Mobility & Flexibility – What good is your strength if you cannot move through a wide range of motion? Without these two, you’ll just have a strong body with tight and aching joints.
- Endurance – Your strength should be functional which means it needs to be able to use for extended periods of time like in the real world.
This process of learning is implemented for all calisthenics skills such as squats, dips, push-ups, and even for more advanced movements such as planche and levers.
Breaking down the process helps you progress faster and safer.
👎Disadvantages of calisthenics training
Now that we have discussed some of the advantages of calisthenics, let’s take a look at the possible disadvantages of training with bodyweight only. Calisthenics is an amazing approach to body mastery and fitness. However, there can be some drawbacks that you need to understand, especially for a beginner who’s just starting out.
🥺Progression is not straightforward
Unlike weightlifting where you just need to add more weights, in calisthenics, progression isn’t quite straightforward. There’s a set of exercises that helps you build towards a specific skill.
Aside from that, there are also other supplementary & accessory exercises that you need to perform to maximize progress towards your goals.
It’s not necessarily a disadvantage as this can lead to holistic development and it’s more convenient since you don’t need any fancy equipment.
🥺Many misconceptions & myths
Ok, this one’s not really a big disadvantage, but it can be if you don’t know how to filter the right information on the internet.
With tons of information and easy access to a pool of knowledge about fitness and calisthenics, the main bank on common misconceptions and myths to help promote their own self-interest.
However, suppose you can learn how to identify, analyze, and evaluate incoming information about the topics you’re looking for. In that case, you’ll find that calisthenics is very much optimal for physical (and mental) development.
Read more: 📍STOP THE LIES! 5 Most common Calisthenics myths!
🥺Still depends on your goals
Calisthenics offers many goals to work towards such as:
- Strength development
- Body control
- Learn skills
- Building muscle and losing fat
- Improving mobility
- Correcting dysfunction and injuries – Read – 📍How Calisthenics Treat Injuries
However, suppose you have specific goals such as lifting the most amount of weight, being the best basketball player, or mastering Brazillian Jiu-Jitsu. In that case, calisthenics might not be the best approach for that. Instead, training the skill itself that you want to learn is the better option. However, calisthenics can still be implemented to supplement your progress.
🥺If you don’t enjoy it…
Finally, the last disadvantage of calisthenics (or any other fitness approach) is IF you don’t enjoy it. If you’re not having fun with the approach, you won’t be able to sustain your training and you won’t make significant progress.
This holds true for any other training methods such as weightlifting, CrossFit, martial arts, sports, or whatever you can think of. Actually, the same principle applies to other aspects of your life.
CHOOSE THE APPROACH THAT YOU ENJOY DOING.
😍What should a good beginner program look like?
Programs can come in many forms and styles. However, a calisthenics beginner program should have these qualities below to be truly optimal for progress:
😲Working on the basics
If you opted for calisthenics to improve your fitness level, that means you’re set to build strength and muscle and improve mobility. These are the basic foundation of fitness everyone should strive for to improve general movement and body control.
To achieve this goal, beginners should work on the fundamental exercises of calisthenics. Beginners shouldn’t focus on more advanced goals YET, such as learning how to planche or a one-arm pull-up. These goals can be set for the long run and can be a motivation for you to work on. However, sticking with the basics sets a solid foundation of fitness for optimal and safe progress.
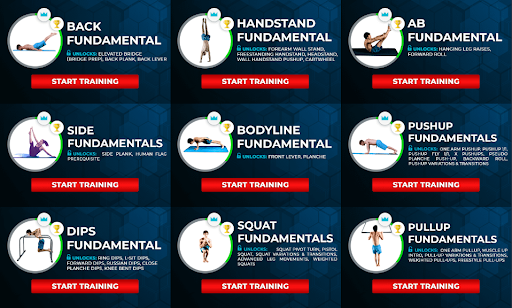
Aim to master the following exercises with a beginner program:
- Dips
- Push-ups
- Pull-ups
- Squats
- Core strength
- & a wall handstand
These calisthenics fundamentals should be CORE exercises of any calisthenics program. This is also why The Movement Athlete (a game-changing calisthenics app!) puts heavy emphasis on the basics.
Remember: Basics don’t mean easy.
The basics obviously benefit beginners, but even advanced athletes can still work on them to further improve their gains. They just have to adjust the training variables correctly. Everyone will all come back to the basics.
😲Exercises should be for beginners!
The exercises listed above are considered for beginners (although intermediate to advanced can also use these exercises). However, NOT ALL BEGINNERS ARE THE SAME.
You might be able to perform pull-ups but can do dips. Another beginner might be able to do push-ups but can’t do pull-ups. One beginner might not be able to do any of the basic exercises at all.
There is a wide spectrum of beginners, and a good calisthenics program should be able to cater to these differences.
Using progressions
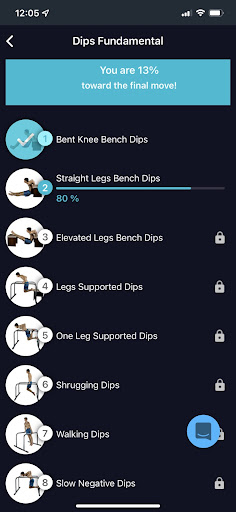
Here’s a brief example from The Movement Athlete app. Beginners who have no dip experience and just starting out should begin with the “Level 1” exercises for dip mastery. Doing so allows beginners to develop fundamental strength and mobility, and learn the correct movement pathway for dips.
The same principle follows for all the calisthenics fundamentals. Each exercise has a progression list that leads towards the main exercise goal. Progressions let beginners start their journey with calisthenics safely and efficiently so they can HAVE FUN & MAKE GAINS!
😲Progressive in nature
Performing 10 push-ups and 10 pull-ups for 2 weeks is not progressive. No elements show a gradual increase in intensity or any additional demand.
For strength & muscle development to take place, PROGRESSIVE OVERLOAD is needed. This simply means making each workout more challenging than the last one, no matter how small it is. Adding at least 1 – 2 reps in total volume or for each set per training session can be enough to stimulate growth.
The human body is powerful and resilient. It adapts, so we need to keep it challenged to keep growing.
😲Adaptive to your situation
Speaking of adaptive, a good calisthenics beginner program should also be adaptive to your lifestyle and energy changes.
Let’s face it. As non-full-time athletes, we can’t dedicate 100% to our workout every session. We also have other responsibilities that can take up our physical, emotional, and mental energy.
Having an 📍auto-regulating (to simply put: adapting to your last and current workout) program keeps the workout progressive but at the same time, sustainable in the long run.
For example, you don’t want to burn out after four weeks of training and then to rest for a month only to lose all of your progress.
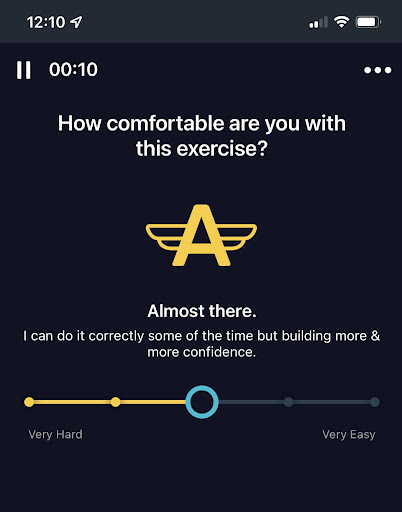
With the Movement Athlete app, the powerful AI that helps you build your program also adjusts your program as you go along your training. This maintains a challenge while not overdoing it. You’re not racing towards anything anyway.
Fitness is a lifelong journey. Keep your workout sustainable with an adaptive workout.
If you need a complete calisthenics program that can set you up from a beginner level to advanced, then check out the personalized, progressive & adaptive approach of The Movement Athlete.
GET YOUR 7-DAY FREE TRIAL NOW!
✨Full-body Workout for Beginners (No equipment needed!)
Total duration estimate: 1 hour and 10 minutes (warm-up and cooldown work included)
👊Warm-up
Duration: 5 minutes
The first step to any proper workout is to follow a general warm-up exercise to prepare your body and mind for your workout.
A warm-up shouldn’t be too extensive and tiring. Anything that gets you tired or lasts more than 15 minutes is too much.
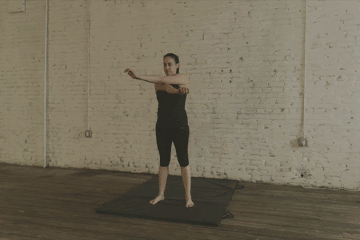
Here’s a quick but effective warm-up that’s specifically for the workout:
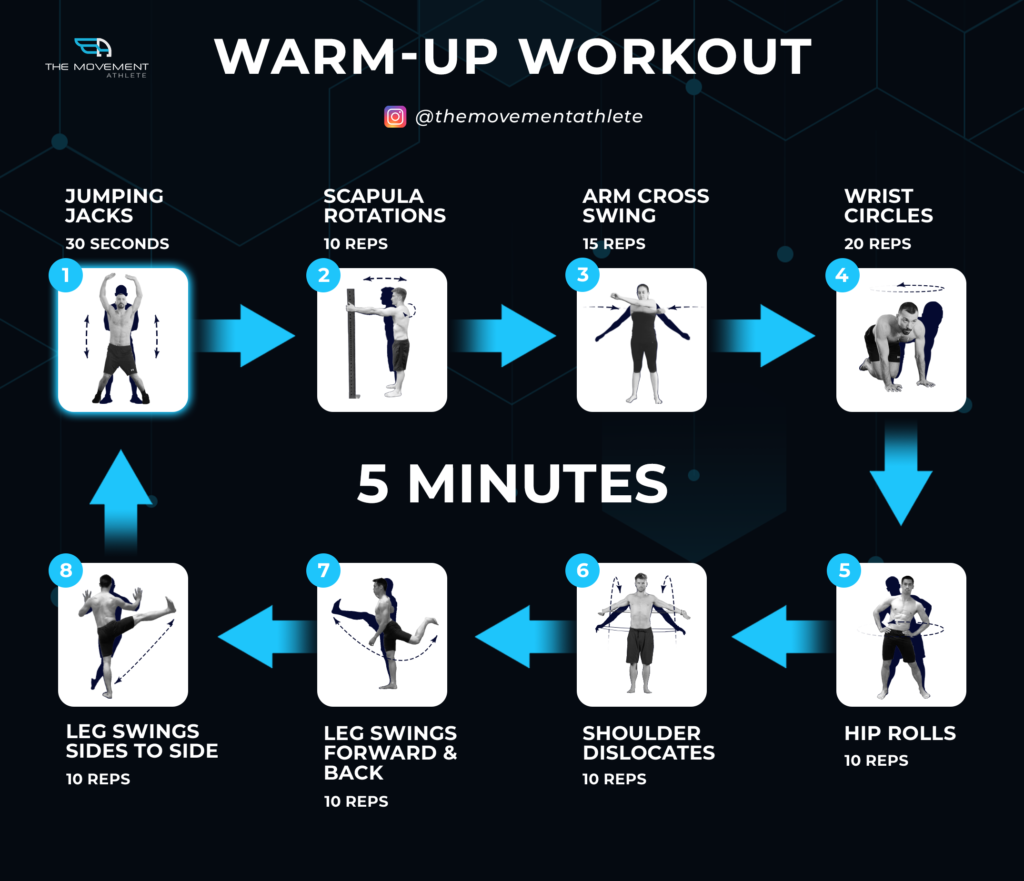
- Jumping jacks – 30 seconds
- Scapula rotations – 10 reps clockwise & counter-clockwise
- Arm cross swing – 15 reps
- Wrist circles – 20 reps clockwise & counter-clockwise

- Hip rolls – 10 reps clockwise & counter-clockwise

- Shoulder dislocates – 10 reps
- Leg swings forward & back – 10 reps for each leg
- Leg swings sides to side – 10 reps for each leg
Learn more here: 📍Ultimate Warm-up Guide to Calisthenics
👊Training protocols
Duration estimate: 55 minutes
Perform the workout 3 times per week – This allows enough recovery for the body to make gains while keeping the training frequency high to get enough stimulation.
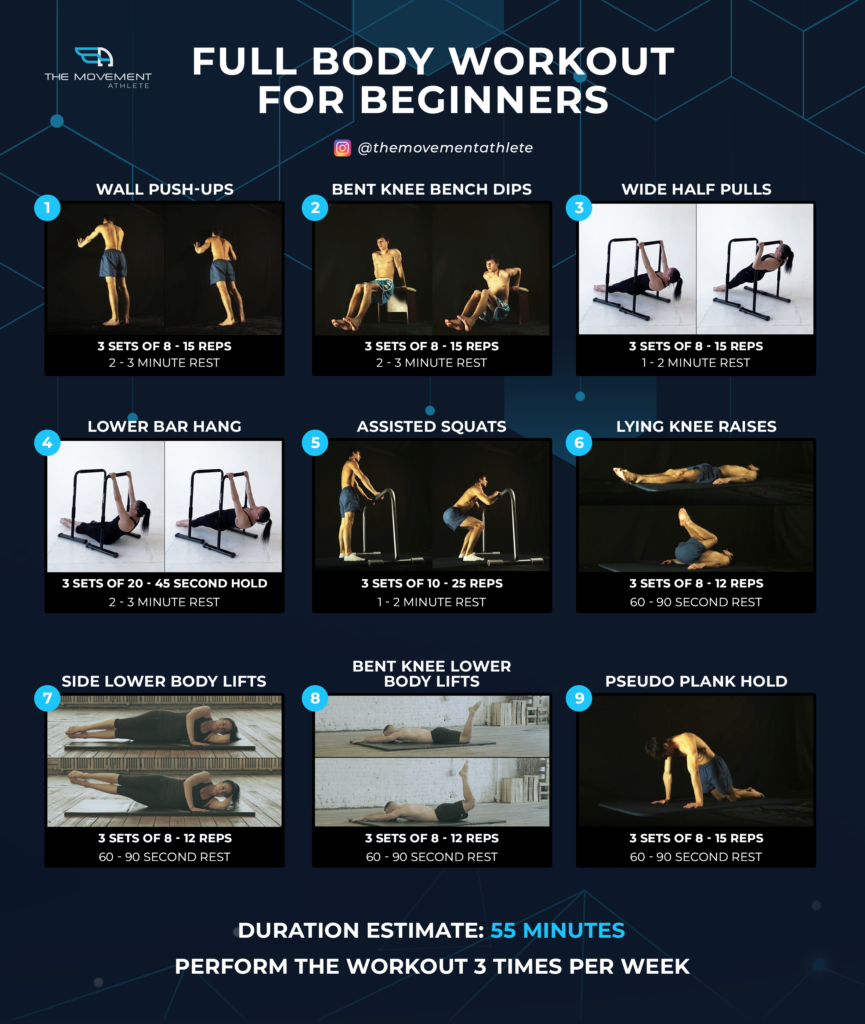
Wall push-ups – 3 sets of 8 – 15 reps (2 – 3 minute rest)
Bent knee bench dips – 3 sets of 8 – 15 reps (2 – 3 minute rest)
Wide half pulls – 3 sets of 8 – 15 reps (1 – 2 minute rest)
Lower bar hang – 3 sets of 20 – 45 second hold (2 – 3 minute rest)
Assisted squats – 3 sets of 10 – 25 reps (1 – 2 minute rest)
Lying knee raises – 3 sets of 8 – 12 reps (60 to 90-second rest)
Side lower body lifts – 3 sets of 8 – 12 reps (60 to 90-second rest)
Bent knee lower body lifts – 3 sets of 8 – 12 reps (60 to 90-second rest)

Pseudo plank hold – 3 sets of 20 – 45 second hold (60 to 90-second rest)
🔥Workout per body part
We’re going to divide the exercise per body part. However, each move is actually considered a skill that you can progress to harder variations in the future.
🤜Chest & tricep exercises
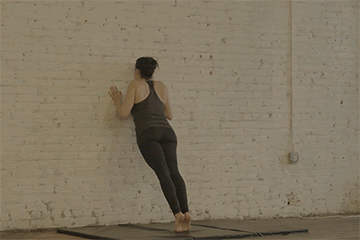
Wall push-ups
The wall push-ups are the entry-level for the regular push-ups on the floor. This exercise has minimal loading since the push-up is done in a more vertical fashion which is perfect for beginners. It’s like an incline push-up but done more vertically.
Mastering the wall push-ups allow you to get comfortable with the pushing motion and understand the push-up mechanics.
☝️How to perform:
- Begin by standing in front of a wall with arms extended out, and hands on the wall.
- Take a step back so that you can easily put your full weight on your hands.
- While maintaining a straight body, lower the chest towards the wall.
- Extend the arms back up to the starting position by pushing your body away from the wall.
- Repeat push-ups for reps
⭐️Coaching Pointers:
- Keep your bodyline straight
- Maintain your elbows close to your body
- Choose a comfortable position for your elbows
- Push your shoulders down away from your ear
- Pinch your shoulder blades together as you lower down
- Lean forward so that your weight is on your hands
Harder: Incline push-ups, kneeling push-ups, push-up hold, push-ups on the floor
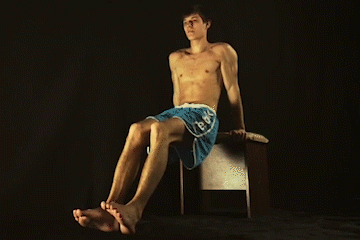
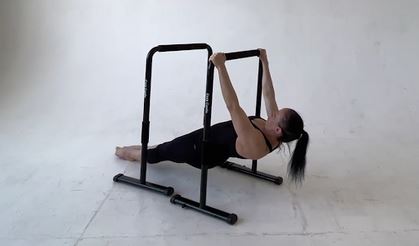
Bent knee bench dips
The dip is a fundamental exercise that builds fundamental upper body pushing strength. For beginners, however, this exercise can be too taxing, to begin with.
Bent knee bench dip is the best option for beginners to start developing the necessary movement pathway and strength towards the dips.
There’s contention on the viability of this exercise because if not done correctly, it can lead to shoulder impingement. However, you can say that if proper shoulder mobility is developed and the right technique is used, bench dips can deliver results.
☝️How to perform:
- Sit approximately one foot from the edge of a flat workout bench, with knees bent slightly and heels touching the floor. Your body weight should be on the arms.
- Dip your body by bending the elbows till the buttocks are close to the floor.
- Push through the hands to come up.
- Repeat the steps for reps.
⭐️Coaching pointers:
- Keep your shoulders away from your ear at all times
- Pinch your shoulder blades together
- Always have locked out arms at the top position at the beginning and end of each rep
- Don’t let the elbows flare
Harder: Straight leg bench dips, band-assisted dips
🤜Back & biceps exercises
Lower bar hang
The first step to developing your back and pull-ups is to develop enough grip endurance and strength to hold your body weight on a bar. The lower bar hang is a horizontal hang with the legs assisting the load.
👆How to perform:
- Hang in from the low pull-up bar with your feet forward of your body.
- Extend your legs and hips.
- Hold for a specified time.
⭐️Coaching Pointers:
- Retract and depress your shoulders
- Keep your core engaged.
- Arms straight
Harder: Move into a higher bar and do dead hang
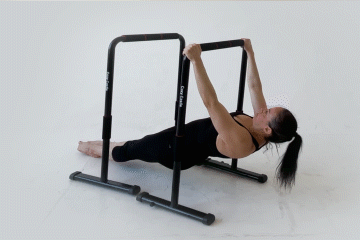
Wide arm half pulls
This exercise is also known as the inverted row or Australian row. The purpose of this exercise is to develop muscle & strength in the posterior chain: your lats, rhomboid, posterior traps, and biceps. Pulls prepare you for pull-ups and can also supplement your pull-up training in general.
👆How to perform:
- Hang in from the low pull-up bar with your feet forward of your body.
- Pull your upper body towards your hands.
- Lower down with control.
⭐️Coaching Pointers:
- Retract and depress your shoulders as you initiate the movement pattern.
- Keep your core engaged.
- Ideally, you would want to keep your legs straight and have a straight body line, but you can also have your legs bent to make the exercise easier.
Harder: Lower incline, feet elevated
🤜Shoulders exercise
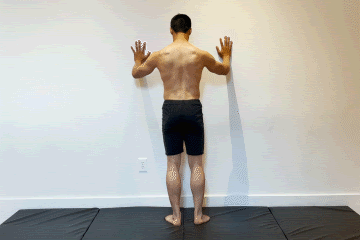
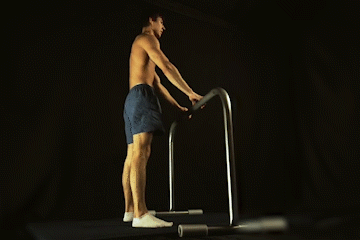
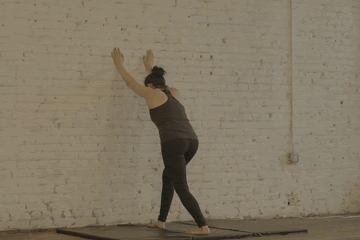
Wall stand
The wall stand exercise is the starting progression for the handstand. This exercise trains your mobility, shoulder strength, straight-arm strength, and proper body alignment.
More tips here: 📍The Ultimate Handstand Guide
👆How to perform:
- Position near a wall.
- Place your hands overhead on the wall shoulder-width apart.
- Walk backward to get into a diagonal position simulating a handstand.
- Shift your weight unto your hands and shoulders.
- Hold the position for a specified time.
⭐️Coaching Pointers:
- Practice straight body alignment.
- Core engaged at all times.
- Maintain a solid shoulder elevation or push your shoulders close to your ears.
- Arms straight at all times.
- Hands shoulder-width apart.
Harder: Move more diagonal to the ground
🤜Legs exercise
Assisted squats
The squat is the basic but best form for your lower body. Although not all beginners are already capable of controlling their body weight in a full range of motion.
The assisted squats lessen the loading on your lower body and shift some on your upper body to be able to complete the exercise. The assistance also helps guide you to reach the range of motion while you’re still building mobility in your lower body.
👆How to perform:
- Begin in a standing position with good posture close to a piece of furniture or anything sturdy to hold unto.
- Hold unto your assistance.
- Lower down with control into the squat position.
- Push down to the floor with your feet to get back into the standing position.
- Repeat for reps.
⭐️Coaching Pointers:
- Don’t lean toward your assistance
- Keep upper torso upright
- Engage your core
- Feet around shoulder-width apart
- Imagine sitting down on a chair
- Weight on your heels when pushing down
Harder: Full range of motion, Limit assistance
🤜Core exercises
The core is a common weak link in many people. Having weakness in this area can limit the power exertion and energy transfer to other muscle groups. Therefore, if you want to maximize your performance in every exercise, train your core.
We’ll be hitting all four facets of the core and not just the abs. Having a strong core at all planes keeps your trunk solid during motion and minimizes the risk of injuries and aches.
Abs exercise
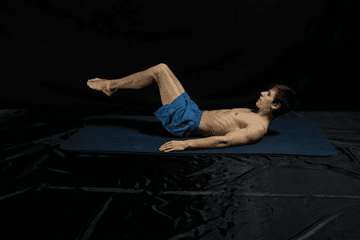
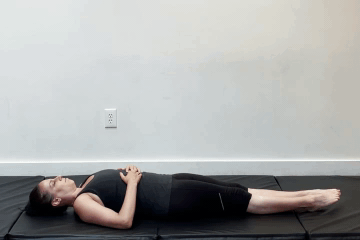
Lying knee raises
Spine flexion is one of the roles of the abs. This exercise trains that motion and develops the ab muscles.
👆How to perform:
- Lie down straight on your back with your arms by your side
- Legs straight and close together with the toes pointed
- In this position bend your knees and bring them to your chest, as close as possible.
- Make sure you move the knees together.
- The lower back is rounded and the hips are slightly above the floor
- Go back to the initial position.
- Repeat the above steps for specified repetitions.
⭐️Coaching Pointers:
- Keep your lower back flat on the floor
- Use your abs to facilitate the movement
- Don’t use momentum or any swinging motion
Harder: extend the legs
Lower back exercise
Bent knee lower body lifts
An underrated body part that’s crucial for everyday life (especially if you don’t want any lower back pains!) is the lower back. With this exercise, you get to target this muscle group and improve its mobility over time.
👆How to perform:
- Begin by laying on your stomach, legs straight and together.
- Arms extend straight up next to your ears.
- Squeeze your glutes and hamstrings, curling your legs up towards your butt.
- Then engage your erector spinae and low back to lift your hips and thighs off the floor.
- Hold for a second, then lower hips and legs to the floor.
- Straighten legs out, then do another repetition.
⭐️Coaching Pointers:
- Move through your capable range of motion
- Focus on your lower back when doing the movement
- Avoid using momentum
Harder: extend the legs, larger range of motion
Oblique exercise
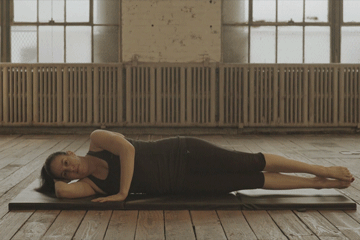
Side lower body lifts
The obliques play a crucial role in core control. Many exercises demand oblique stabilization such as pull-ups and push-ups. It’s not that just apparent compared to the abs, but they do work in conjunction with your abs! This exercise is excellent for beginners since the loading is minimal while still getting enough work done on your obliques.
👆How to perform:
- Begin by laying on your right side, the right arm supporting your head.
- Stack your legs on top of each other, keeping them straight and tight together.
- Left-arm comes across chest and palm placed on the floor in front of you.
- Contract obliques and abdominals, lift your legs up off the floor, lower back down, and repeat for specified repetitions.
- Repeat the motion on the other side.
⭐️Coaching Pointers:
- Engage your core
- Don’t use momentum
- Focus on your obliques to facilitate the movement
Harder: larger range of motion, slower movement, and adding a pause at the top
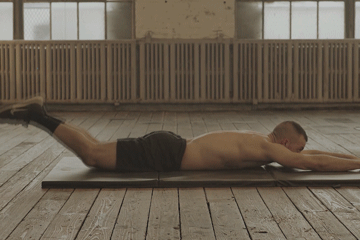
Bodyline exercise
Pseudo plank hold
Anti-extension is the role of the core to resist movement when moving such as in pull-ups, dips, and push-ups. It’s also crucial for exercises such as the handstand and levers if ever you want to work on them in the future.
The bodyline pertains to the straight body position with the correct hip position to maximize core engagement and minimize unnecessary loading on your lower back. To do this, tilt your hips backward. This is called the Posterior Pelvic Tilt or PPT.
Work on your bodyline core exercise to better prepare your core in this position that transfers to almost all calisthenics exercises.
The pseudo plank hold is ideal for those who are unable to perform planks WITH A GOOD FORM.
👆How to perform:
- To begin, get down on all fours position, that is on your hands and knees
- Hands should be placed, shoulder-width apart on the floor
- Arms straight and shoulders directly over the wrists
- Back is slightly rounded and keep abs tight
- Hips in front of (not in line) the knees with the Knees bent less than 90 degrees.
- Legs close together, knees, and toes resting on the floor.
- Hold this position for a specified time.
⭐️Coaching Pointers:
- Engage your core
- Posterior pelvic tilt
- Push your shoulders away from your ears
- Straight arms
- Neutral back position
Harder: Move into your elbows
🤜Cooldown Exercises
Duration: 6 minutes
While there are many proposed benefits that cooldown can provide, studies made on cooldown exercises are still inconclusive. However, we can still take advantage of your post-workout time by improving your flexibility & mobility. This is why we still implement cooldown movements since flexibility work after exercise does not negatively impact our workout progress.
Here’s a short cooldown work you can do after this workout. You can repeat it for 2 – 3 times.
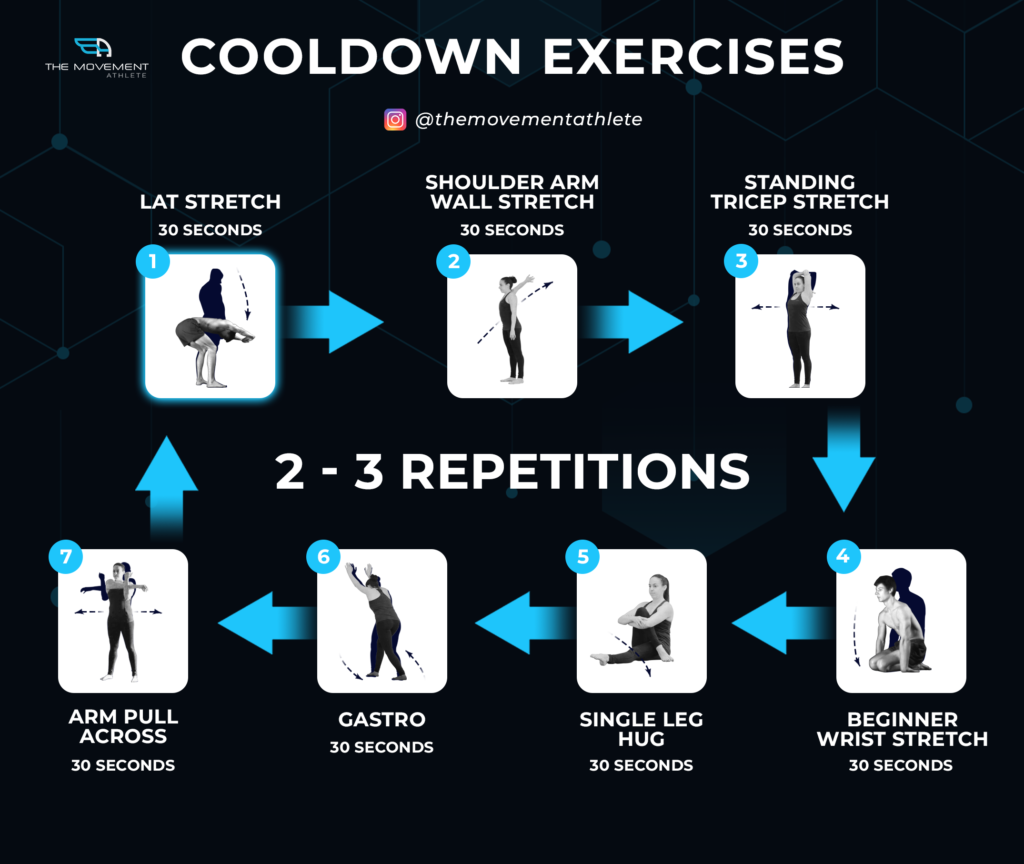
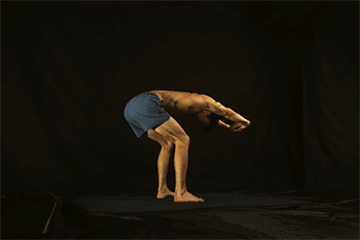
- Lat stretch – 30 seconds
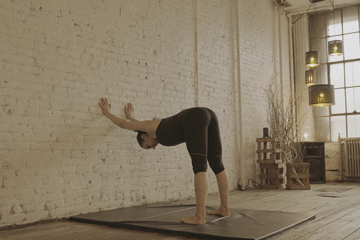
- Shoulder arm wall stretch – 30 seconds
- Standing tricep stretch – 30 seconds
- Beginner wrist stretch – 30 seconds
- Single-leg hug – 30 seconds
- Gastro – 30 seconds
- Arm pull-across – 30 seconds
🧐Frequently Asked Questions:
🔎Can I incorporate mobility training?
Ideally, you would want to do your mobility training on a separate day. This workout already includes mobility work from the warm-up, actual strengthening exercises, and cooldown work.
If you’re insistent on doing mobility work on the same day, perform this AFTER your workout with around a 6-8 hours gap between two sessions. For example, let’s say do this workout in the morning, then complete the mobility work in the afternoon or at night time.
But remember that doing more isn’t always better.
Read here to gain more understanding of the topic: 📍Flexibility vs Mobility
🔎How do I progress into harder exercises?
Once you have truly mastered the exercise by meeting the top range of the reps with good form, you can follow the next exercises on the progression list. Keep your training progressive as you grow stronger, but be sure to do it gradually.
🔎Why are there no exercises for isolating muscles?
If you’re looking into exercises like the bodyweight bicep curl, quad extensions, tricep extensions, and ring flyes, then we’re going to assume you’re no longer a beginner.
Beginners should stick to these compound movements and get strong from these exercises before doing any isolation work. However, the basics are more than enough to challenge your muscle groups to induce strength gains and muscle growth.
🔎Can I build muscle with this workout?
YES! This is exactly what the workout (& calisthenics) aims to do: to build muscle.
Strength development requires bigger muscles so you can maximize your potential. Stay patient as a beginner. You’ll be progressing faster than you expected because of the “NOOB GAINS” or the phenomenon where beginners tend to make faster progress compared to more experienced athletes.
Learn more about muscle development with body weight in this article: 📍How to Build Muscle Using Bodyweight Only
🔎Can beginners lose fat calisthenics?
Any workout can lose fat IF, and only IF, you eat at a caloric deficit. No workout in the world can burn fat if you’re not eating less than what your body needs to sustain your current weight.
If your goal is fat loss, then focus on your diet to ensure progress. However, performing this workout allows you to maximize fat loss while building muscle in the process.
Read here for more information regarding calisthenics and fat loss: 📍Why is Calisthenics So Effective for Fat Loss
🔎Can I combine weightlifting with this Beginner Calisthenics Workout & No equipment?
You can combine these two methods. However, you can’t do the full workout and add more weightlifting exercises. It’s best to use one exercise that can substitute for a specific exercise. However, these exercises don’t stimulate the muscles exactly the same as body weight exercises do.
Here’s again our list of calisthenics exercises and their weightlifting counterparts:
- Push-ups & dips – Barbel or dumbbell bench press
- Inverted rows – Lat pull-downs, barbell or dumbbell rows
- Squats – Leg press
- Handstand – Dumbbell shoulder press
Just substitute one, but we recommend following the bodyweight exercises first!
🔎Can I combine cardio with this Beginner Calisthenics Workout & No equipment?
You can add cardiovascular exercises on top of this workout especially if you want to maximize fat loss. However, proper training session spacing is needed. If you can’t do cardio then start with your calisthenics workout.
Ideally, you want to do cardio on a separate day. If not, leave at least 8 hours of space in between your strengthening session and cardio sessions, BUT your cardio session should only be low to moderate intensity.
For harder cardio sessions, be sure to do it on a separate day.
Learn more about cardio and calisthenics, here: 📍Is Calisthenics Better Than Cardio?
🔎Can I do this workout every day?
No. This workout should be spaced at least 24 hours in between sessions. This allows for recovery so you feel fresh, energized, and ready for each training session. Respect the recovery days.
🔎Can I do calisthenics every day?
Contrary to the workout above, you can do calisthenics every day IF you opt for a different TYPE of calisthenics workout the next day.
What do we mean by this?
Let’s say you’re a beginner and trained to your max capacity with this full-body workout on Monday, you will not do the same workout the next day because it will be too taxing. A better option is to do light mobility work on Tuesday, then perform your next calisthenics strengthening workout on Wednesday.
You can train every day with calisthenics but there are factors to consider such as the intensity of your workout, type of workout structure (push/pull/legs, full-body, etc.), and type of training.
Ready more on calisthenics training structure here: 📍Can I Workout Every Day? A Full Guide to Calisthenics Training Schedule
🔎Is calisthenics better than the gym?
While we are full advocates of the calisthenics approach, we don’t perceive fitness or any training approach as black and white.
Of course, there are advantages and disadvantages to each approach so you just need to find the right one that fits your goals, needs, lifestyle, and preference.
Calisthenics is a fantastic resistance training method if you want to lose fat, build muscle, and master your body. However, weightlifting is popular because it is also effective in its own way.
Understand what fitness approach will suit you by checking out this article: 📍Is Calisthenics Better than Weightlifting?
🔎Can 20 minutes of calisthenics be enough?
This workout lasts around just an hour of your day. If you can’t spare a complete hour, you can also break down this workout into two sets throughout your day.
However, you can also condense your strengthening workout and then spread it across the week. For example, you can do a 20-minute push workout on one day, then a 20-minute pull workout on the next, then a 20-minute lower body training on the other day.
Generally, Full body workout lasts longer (around an hour), but has a lower training frequency which is great if you can only afford to do 3 hours of total training per week.
You can read more on training schedule in this article: 📍Full vs Split Calisthenics Workout Guide
You can also incorporate a 20-minute high-intensity training or HITT from time to time to boost your fat burning capacity. Get your HIIT workout here: 📍20-minute Calisthenics HIIT Workout
For those who are “too busy” to work out, maybe this can help you out: 📍How to Find Time to Workout
🔎At what age is calisthenics for?
We have to repeat this again: CALISTHENICS IF FOR EVERYONE.
No matter how young or “experienced in life” you are, calisthenics can cater to your needs, situation, and skill level.
Here are some success stories from Movement Athletes all around the world with a very wide gap of age:
- “ I tried different calisthenics training programs, but I kept getting injured. Now I know it’s the lack of personalization, which [TMA] addresses. I absolutely LOVE this program!” – Donald, 65
- “I improved both physically and mentally and enjoy the freedom my body has to offer.” – Kon, 26
- “Life used to be governed by hard & fast gym times, but now, I’m free to build my days around workouts.” – Ryan, 32
- “It always seems impossible, until it’s done.” – Sean, 47
- “ I started at 28% body fat and now, I’m around 14%. Went down 35lbs and from size 10-12 to 4-6. “ – Carol, 68
More on Success stories here: 📍The Movement Athletes’ Testimonies
🔎Can women do calisthenics?
If men can do calisthenics, women can surely do them as well! A 2016 online published study comparing the effects of resistance training (such as calisthenics) between men and women showed that both sexes respond similarly to strength training.
While there are clear anatomical differences such as males build faster upper body muscles while females building quads faster, the differences are still minimal to have any difference in training protocols for men and women.
If you can check out our 📍Full-Body Workout for Women, you will notice a similar training regimen vs men’s workout. We also debunked some misconceptions about women and resistance training so be sure to read the article.
Upper-body training is not just for men, but also for women.
📌Takeaway
Calisthenics is a great way to get started with your fitness journey.
Not only does it require no equipment, but calisthenics exercises are also perfect for beginners. This calisthenics workout for beginners will help you build muscle and lose fat at the same time.
Remember to focus on your form and progress gradually to harder exercises.
And lastly, have fun with your workout! calisthenics is a great way to get started with your fitness journey.
If you’re interested in following a solid workout program from a complete beginner even until you reach an advanced level with a PERSONALIZED & ADAPTIVE APPROACH, then check out The Movement Athlete app.

