Ready to take your core strength to the next level? If you’re looking for a killer exercise that sculpts your abs and improves your overall body control and flexibility, the L-sit is where it’s at!🤯
In this guide, we’ll break down the L-sit progression into manageable steps so you can build strength, protect your joints, and feel like a total beast. Plus, we’ll cover the muscles worked, benefits, and tips on mastering the L-sit.
Let’s dive in!👊
😎 What Is an L-Sit?
The L-sit is a challenging calisthenics exercise that tests both strength and stability. While sitting with your legs extended in front, you lift your entire body off the ground using only your hands, forming a 90-degree angle with your legs straight and torso upright.
At first glance, the L-sit may look simple, but it’s a tough, full-body exercise that engages multiple muscle groups. The challenge is maintaining control without letting your legs drop or shoulders collapse, which requires a strong core, shoulder stability, and hip flexibility to hold the position. 🙌
Unlike exercises that focus on just one area of the body, the L-sit forces you to engage your entire kinetic chain—from your shoulders and arms to your abs and legs. This makes it such a versatile and efficient movement for building functional strength.
The L-sit isn’t just about brute strength; it also requires balance, control, and endurance, making it a favorite move among gymnasts, calisthenics enthusiasts, and anyone looking to master bodyweight exercises.
💪 Muscles Worked in the L-Sit
Before we jump into how to perform an L-sit, let’s talk about what muscles get fired up during this exercise. The L-sit works the:
- ✅ Core muscles: These include the rectus abdominis (the six-pack muscles), obliques, and deeper muscles like the transverse abdominis.
- ✅ Hip flexors: These help lift and hold your legs up.
- ✅ Shoulders and triceps: Supporting your body weight on your hands builds serious upper body strength.
- ✅ Quads: Keeping your legs straight and engaged works the muscles in the front of your thighs.
Now that we’ve covered the basics, let’s break it down into steps to help you build up that strong L-sit.
🌟 6 Essential Steps to Master L-Sit
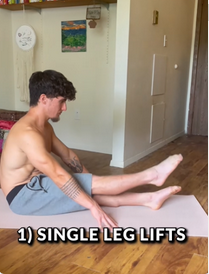
Step 1: ⚡️Single Leg Lifts
The first step to mastering the L-sit is building up the core and hip strength required to lift and hold your legs off the ground. Single leg lifts are a perfect entry-level exercise that allows you to develop the necessary control without overwhelming your body.
This movement isolates each leg, allowing you to strengthen one side at a time while ensuring proper form. It’s a simple yet effective way to teach your body the mechanics of lifting your legs and engaging your core.
Here’s how to perform single leg lifts:
- Start Position: Sit on the floor with your legs extended straight in front of you, palms pressing lightly into the floor beside your hips.
- Movement: Lift one leg as high as possible while keeping your back straight and your shoulders down. Focus on controlled movement, not speed.
- Hold: Aim to hold each lift for a few seconds, then lower your leg with control before switching to the other leg.
Tip: Feel your hip flexors engaging. That’s a good thing! This move teaches your body the mechanics of holding your legs up.
If you want to strengthen your legs and lower body, check out these articles for more helpful routines and tips:
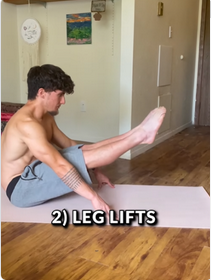
Step 2: ⚡️Double Leg Lifts
Once you’ve mastered the single leg lifts, it’s time to level up with double leg lifts. This step significantly increases the challenge because now you’re engaging both legs simultaneously, which puts more demand on your core and hip flexors. Don’t worry if this feels tough—it’s a significant progression that helps you build the endurance and strength necessary for the full L-sit.
Double leg lifts apply the foundational strength you built in Step 1 to both legs simultaneously. This movement increases core engagement and teaches your body to maintain balance and control when lifting both legs together. It’s a crucial step toward achieving the full L-sit hold.
Here’s how to perform double leg lifts:
- Start Position: Sit on the floor with your legs extended straight in front of you, palms pressing lightly into the floor beside your hips.
- Movement: Lift both legs off the ground simultaneously, keeping your back straight and your shoulders down. Focus on engaging your core to maintain control.
- Hold: Try to hold the position for as long as you can, even if it’s just a few seconds at first. Lower your legs with control and repeat.
Tip: Don’t be discouraged if you initially can’t hold the lift for long. Progress happens through consistency, and each time you practice, you’re getting stronger!
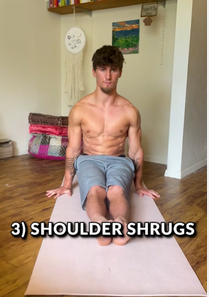
Step 3: ⚡️ Shoulder Shrugs
Now that your core and hip strength are developing, it’s time to focus on building shoulder strength and stability—a critical component of the L-sit. Supporting your body weight during the L-sit will be challenging without strong, stable shoulders, which is where shoulder shrugs come in.
Shoulder shrugs may seem simple, but they play a huge role in preparing your upper body to support your weight in the L-sit. The goal is to activate your shoulder muscles and teach them to stay engaged while keeping your neck and upper body aligned. Think of this step as creating a solid base to hold yourself up without collapsing at the shoulders.
Here’s how to perform shoulder shrugs:
- Start Position: Sit on the floor with your legs extended in front of you, palms pressed firmly into the ground beside your hips.
- Movement: Push down into your palms and lift your hips slightly off the floor. While doing this, shrug your shoulders away from your ears, creating space between your ears and shoulders. Keep your neck relaxed and avoid hunching.
- Hold: Maintain the lifted position for a moment, then lower your hips back down. Repeat this motion to strengthen your shoulder muscles.
Tip: It might initially feel awkward, but focusing on proper shoulder positioning is key. This movement helps develop the stability you’ll need to maintain form during the full L-sit.
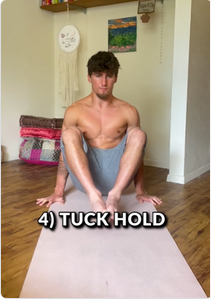
Step 4: ⚡️ Tuck Hold
You’re making fantastic progress! Now it’s time to work on the tuck hold, which is a crucial transition step toward achieving the full L-sit. The tuck hold builds the strength in your core, shoulders, and hip flexors necessary to extend your legs and eventually hold the full position.
This exercise shifts the focus to lifting your entire body off the ground but with your legs tucked in, making it more manageable while still providing a great challenge. The tuck hold helps you get accustomed to supporting your body weight while maintaining tight control, and it strengthens all the muscle groups needed for the L-sit.
Here’s how to perform the tuck hold:
- Start Position: Sit on the floor, legs bent and feet flat. Place your hands on either side of your hips, palms pressing into the ground.
- Movement: Push down into your palms and lift your body off the ground, tucking your knees into your chest. Engage your core to keep your body tight.
- Hold: Hold this tucked position for as long as possible, focusing on staying controlled and steady. Gradually aim to increase your hold time with each practice.
Tip: If you feel the burn in your core and shoulders, you’re on the right track! The tuck hold is where you start to see noticeable strength gains that will help you move closer to the full L-sit. Keep your body tight and stay consistent!
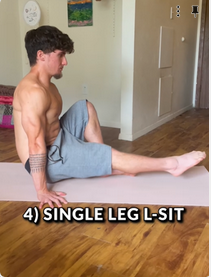
Step 5: ⚡️ Single Leg L-Sit
You’re almost there! The single-leg L-sit is an exciting progression that moves you one step closer to mastering the full L-sit. This move combines the strength and control you’ve built by challenging you to extend one leg at a time while keeping the other leg tucked. It’s a great way to introduce the full movement without overwhelming your body.
The single-leg L-sit strengthens your core, hip flexors, and shoulders and improves balance and body control. By focusing on one leg at a time, you’ll gradually develop the endurance needed for the full L-sit.
Here’s how to perform the single-leg L-sit:
- Start Position: Begin in the tuck hold position, with your body lifted off the ground and knees tucked toward your chest.
- Movement: From the tuck, extend one leg straight out in front of you while keeping the other leg tucked. Ensure your extended leg is as straight as possible and engage your core to maintain control.
- Hold: Hold this position for a few seconds, then switch legs and repeat.
Tip: Focus on keeping your extended leg fully straight and your core engaged throughout. Remember to breathe steadily and take your time building up strength and endurance. This progression is key to bridging the gap to the full L-sit!
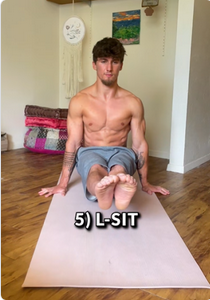
Step 6: ⚡️ The Full L-Sit – Final Boss Mode
This is it—the grand finale of your L-sit journey! Now, you’re ready to tackle the full L-sit, where all the strength and control you’ve been building come together. From either the tuck hold or the single-leg L-sit, you’ll extend both legs straight out in front of you, forming the iconic “L” shape. Your challenge is to keep your entire body elevated off the ground, supported only by your hands while holding that perfect position.
The full L-sit requires a solid core, strong shoulders, and hip flexor strength. It’s tough, but you’ve developed the tools needed to take it on by this point. Focus on staying tight and controlled, and remember that progress comes with consistent practice.
💯 Here’s how to perform the full L-sit:
- Start Position: Begin in either the tuck hold or single-leg L-sit position. Make sure your hands are firmly pressed into the ground beside your hips.
- Movement: Extend both legs straight out before you, keeping them parallel to the floor. Engage your core fully, and press down into your hands to lift your entire body off the ground.
- Hold: Hold the “L” position, ensuring your legs are straight, your core is engaged, and your back stays straight. Keep your shoulders down and away from your ears for stability.
💡 Tip: This move is tough, but you’ve got the strength and control now to hold it. Keep practicing, and remember to breathe! Focus on form over duration at first—holding the position even briefly is a big achievement.
With time and consistency, you can hold the full L-sit longer and more confidently. You’ve made it to the final boss, and now it’s all about perfecting your technique!
🔥 Mastering the Fundamentals: The Key to Nailing the L-Sit
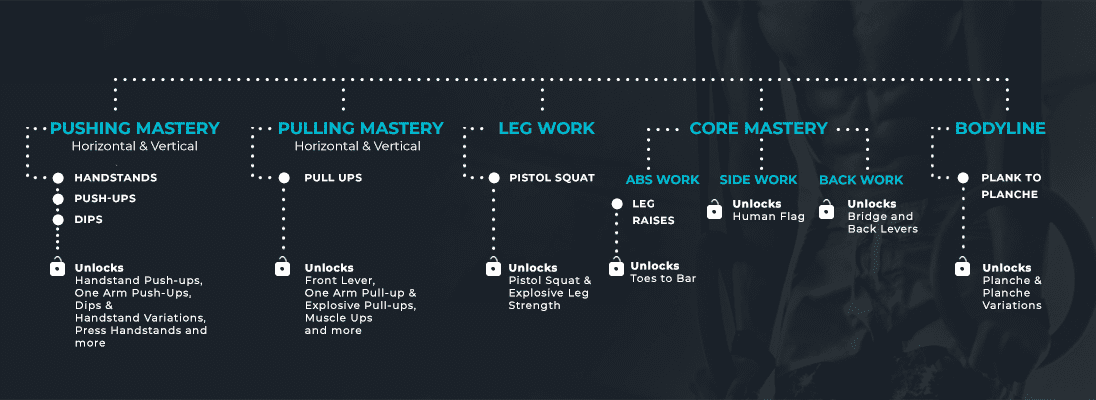
The journey to mastering the L-Sit requires more than strength; it requires flexibility, mobility, balance, and skill. Moves like the L-Sit and planches demand a combination of these attributes, which is why starting with the fundamentals is crucial.
The Movement Athlete (TMA) prioritizes structured skill development and consistent practice, focusing on incremental improvements in all key areas. Its free assessment tailors your training to your current capabilities, guiding you through progressive steps from beginner to mastery.
TMA ensures a strong foundation by emphasizing the basics first. This approach helps you perfect the L-Sit and prepares you for more advanced calisthenics skills with greater strength, control, and fluidity while reducing the risk of injury.
🏆 Why Master the L-Sit? The Incredible Benefits
So, why put all the effort into mastering the L-sit? Besides being an impressive skill to show off, the L-sit offers various physical benefits beyond aesthetics. It’s a powerhouse move that enhances strength, stability, and flexibility while improving your body’s overall function. Let’s dive into why the L-sit deserves a spot in your fitness routine:
- 🥇 Core Strength: The L-sit is one of the best exercises for building a rock-solid core. It engages surface muscles (like the six-pack abs) and the deeper stabilizers that protect your spine and improve posture. This move will make your core bulletproof.
- 🥇 Shoulder Stability: Supporting your entire body weight on your hands requires serious shoulder strength. Over time, practicing the L-sit helps you develop bulletproof shoulder stability, reducing the risk of injury in other exercises and daily movements.
- 🥇 Hip Flexor Strength and Flexibility: Holding your legs straight out challenges hip flexors like a few other exercises. This not only strengthens them but also improves flexibility in your hips and hamstrings, which are often tight in most people. Greater hip mobility contributes to better overall movement quality and injury prevention.
- 🥇 Improved Balance and Coordination: The L-sit isn’t just about raw strength—it requires precise control over your body in space. By consistently practicing, you’ll develop greater balance, coordination, and body awareness, which can translate to better performance in sports and everyday activities.
- 🥇 Joint Health: Over time, regular L-sit practice strengthens the muscles around key joints—especially the shoulders, wrists, and hips. Building this strength protects those joints from potential injury and improves overall joint health, making the L-sit an excellent long-term investment in your mobility and function.
In short, the L-sit is a highly efficient exercise that offers a total-body workout. It improves strength, flexibility, and stability while enhancing balance and protecting joints. Whether you’re an athlete or just looking to level up your fitness, the L-sit is worth mastering.
🧐 Frequently Asked Questions
🔎 Is it hard to do the L-sit?
L-sits are challenging because they require significant core, shoulder, and hip flexor strength. However, with practice and proper progressions, most people can build the necessary strength to perform them. Start with more accessible variations like the tuck-sit or single-leg lifts and work-up.
🔎 How effective is the L-sit?
The L-sit is a highly effective exercise for building core strength, improving shoulder stability, and increasing hip flexibility. It also enhances overall body control, balance, and joint health. It engages multiple muscle groups simultaneously, making it a full-body exercise(
🔎 What are the common mistakes to avoid when doing the L-sit?
Common mistakes include bending the arms instead of keeping them straight, rounding the back, and failing to engage the core and hip flexors fully. Additionally, pointing the toes and ensuring proper hand placement is vital to maximizing the exercise’s benefits and avoiding injury.
🔎 How can I progress to a full L-sit?
To progress to a full L-sit, start with foundational exercises like planks, tuck-sits, and boat holds. These will help build core, shoulder, and hip flexor strength. Gradually increase the difficulty by working with yoga blocks or parallettes for support, then transition to lifting one leg at a time until you can fully extend both legs
💥 Conclusion
Mastering the L-sit does not happen overnight, but the journey is equally rewarding as the final hold. By following these progressions, you’ll build strength, improve your balance, and work toward your goal safely. Consistency is key! Keep practicing, and soon enough, you’ll be crushing those L-sits like a pro.💯
Ready to take your fitness to the next level? Join the movement athlete community and gain access to expert tips, personalized progressions, and a supportive group here to help you conquer the L-sit and beyond. 🤜 Take the Assessment now and get a customized plan you can use immediately.

