Have you ever wondered what it takes to defy gravity, balance your hands, and achieve that awe-inspiring Press to handstand?🤸
The press to handstand is a remarkable feat of strength, flexibility, and control in various disciplines, from calisthenics and gymnastics to diving. Achieving this skill is a significant accomplishment that requires rigorous training and dedication.🎯
In this article, we will delve into the art of mastering the press to handstand. We’ll cover starting positions, prerequisites, technique and control, and more. Take this journey to discover this fantastic skill.
✨The Press to Handstand: A Controlled Feat of Strength and Control
The press to handstand is a controlled entry into the handstand, typically performed without momentum.
Athletes who have honed this skill are often seen in platform diving, where they start standing and gradually lift their legs to transition into a dive. Hand balancers demonstrate this skill on canes, while gymnasts utilize it on various apparatuses.
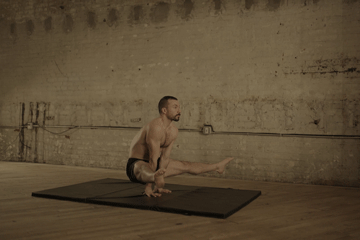
✊The most efficient press of the handstand involves passing through a position known as the “pancake,” where the legs are straddled and the chest is held close to the legs. This pancake position is the epitome of efficiency for achieving the Press the Handstand.
💪Muscles Used to Press to Handstand
Pressing to a handstand is a complex skill that requires the coordination of various muscle groups throughout your body. The key muscle groups involved in pressing to handstand includes:
1. 🔥 Anterior Deltoids (Front of Shoulders)
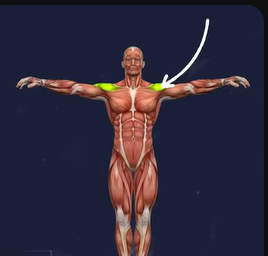
The anterior deltoids play a crucial role in lifting your body into a handstand. They are responsible for shoulder flexion, which means raising your arms overhead. As you press, these muscles work to raise your arms while maintaining stability and control.
2. 🔥 Trapezius
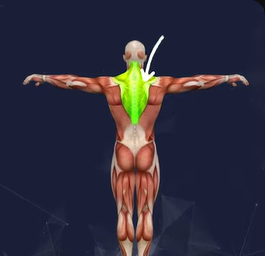
The trapezius, often called the “traps,” are a group of muscles in the upper back and neck region. They are involved in scapular movement and stability, especially in the lower and middle portions of the trapezius. These muscles help control the position of your shoulder blades and support your posture during the press.
3. 🔥 Lower Back
The lower back muscles, including the erector spinae, are essential for maintaining a straight body line during the press. They help prevent arching or rounding of the back as you lift your legs off the ground, contributing to a controlled movement.
4. 🔥 Hip Flexors
The hip flexor muscles, such as the iliopsoas, lift your legs and bring them closer to your chest during the press. These muscles create the necessary momentum to get your legs into a vertical position.
5. 🔥 Hamstrings
Good hamstring flexibility is crucial for achieving the straddle position in the press. Flexible hamstrings allow you to bring your legs closer to your chest in a straddle position, often used to transition into a handstand.
Improve your hamstring mobility and strength with these 17 Best Bodyweight Hamstring Exercises
Learn how to fix tight hamstring with this related article on Why most calisthenics skills are IMPOSSIBLE with tight hamstrings
6.🔥 Abdominal Muscles (Abs)
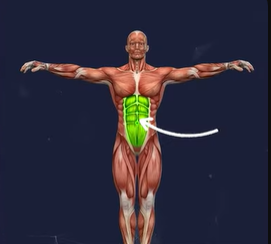
The abdominal muscles, including the rectus abdominis, obliques, and transverse abdominis, are central to maintaining a straight body position and preventing your lower back from collapsing as you lift your legs. They play a critical role in core stability and controlling movement during the press.
These muscle groups work harmoniously to execute a controlled and balanced press to a handstand. The coordination and strength of these muscles allow you to overcome gravity and achieve the impressive feat of pressing to a handstand. As with any physical skill, consistent training and proper form are essential to developing and strengthening these muscles for successful handstand presses.
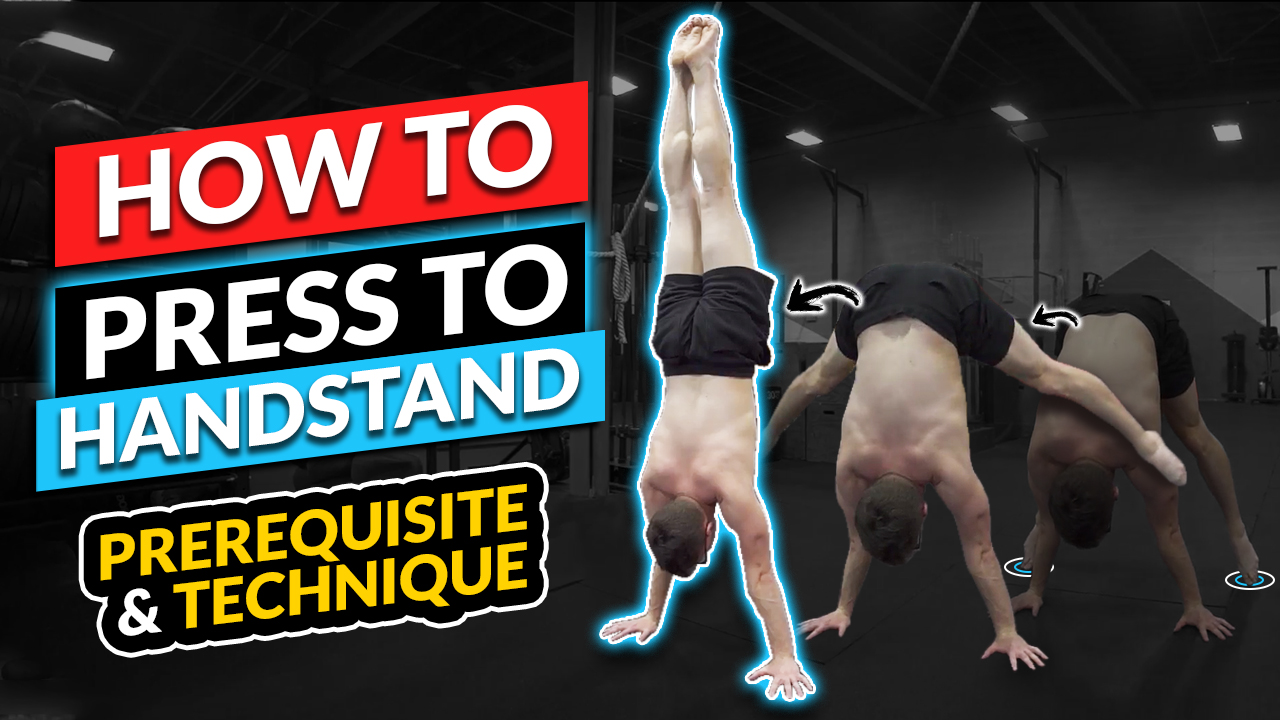
👊Starting Positions to Press to Handstand
The press to handstand can be initiated from various positions, including standing, the L-sit, or the straddle L position. Each variation requires a unique blend of strength, flexibility, and control. This article will focus on the standing and L-position initiations into press to handstand.
🤔How Long Does It Take to Do a Press to Handstand?
Doing the press to handstand takes most athletes more than a year. But the time required varies depending on factors such as:
- ✅ Hamstring flexibility
- ✅ Stronger hip flexor
- ✅ Shoulder strength
- ✅ Overall body conditioning.
Athletes with more flexible hamstrings and stronger hip flexors and shoulders may progress more rapidly.
In contrast, those with tighter flexibility will need more time to reach the necessary body positions for this skill. Nevertheless, consistent training and dedication make it an attainable goal for any high-level athlete.
💥Prerequisites for the Press to Handstand
To start mastering the press to handstand, you must meet specific prerequisites. The press to handstand is a unique skill that demands flexibility and strength, particularly in the hips. In fact, specialists found that strength training can contribute to an improved range of motion, according to 2021 research.
The prerequisites to press to handstand are:
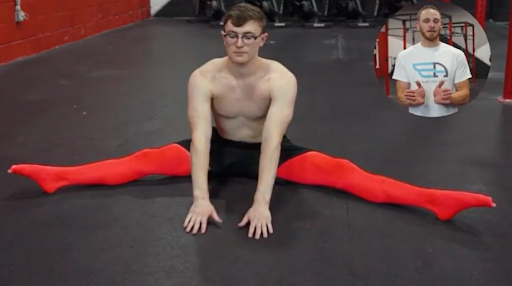
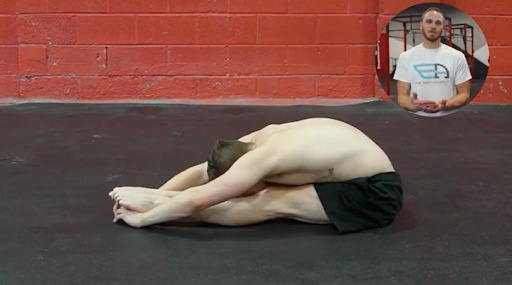
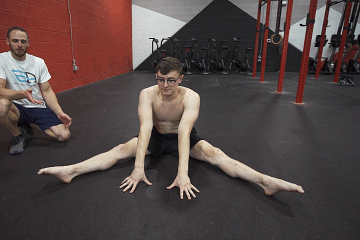
1. 🎯 Pancake and Pike Positions
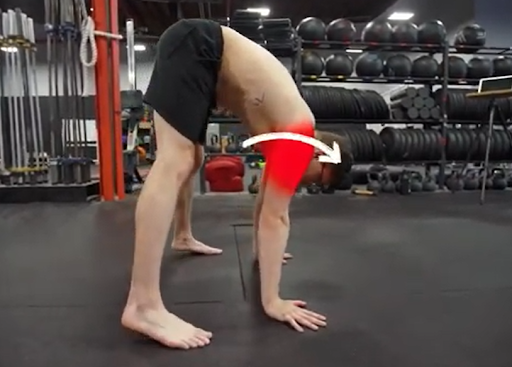
Achieving a pancake (straddled legs with the chest close to the ground) and a pike position (legs close together with the chest as near to the legs as possible) is crucial.
- Pancake Position: Performing a pancake position entails having the ability to sit with your legs spread wide in a straddle and then hinge at the hips to bring your chest close to the ground. This demonstrates excellent hamstring and hip flexibility. The pancake position is crucial because it mimics the leg positioning required for the straddle press to handstand.
- Pike Position: In contrast to the pancake position, the pike position involves having your legs close together with your chest as near to the legs as possible. This position showcases flexibility in the hamstrings and lower back. It is vital for the pike press to handstand variation.
2. 🎯 Seated Leg Lifts
To build the necessary hip flexor and core strength, you should be capable of performing 20 seated leg lifts. Seated leg lifts involve sitting on the ground with your legs extended, lifting them off the ground while keeping them in a straddle or legs-together position. This exercise targets the muscles required for lifting the legs in the press to handstand.
3. 🎯 Straddle L Hold Position
Mastering the L position (sitting on the ground with legs extended and raised to form an “L” shape) or the straddle L position (similar but with legs spread apart) is essential.
These positions serve as starting points for the press to handstand. They demonstrate control over your leg positioning and the engagement of core muscles.
4. 🎯 Handstand Control
It is crucial to have a strong and controlled handstand as a prerequisite. Holding a stable handstand position is a prerequisite and the ultimate goal. Achieving a press to handstand without first having a stable handstand is incomplete. Handstand control involves balance, shoulder strength, and the ability to make fine adjustments to maintain a straight line from your fingertips to your toes.
🙌Technique and Control
Technique and control are the keys to executing a successful press to handstand.
Let’s delve into the details of technique and control in executing a successful press to handstand.
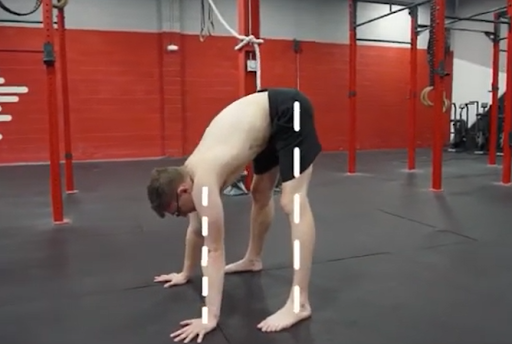
1. ⚡️ Starting with Straight Arms and Legs
The foundation of a successful handstand press begins with a strong and stable base. This demonstrates the importance of initiating the movement with straight arms and legs. It sets the stage for the controlled ascent to a handstand.
2. ⚡️ Lean Forward
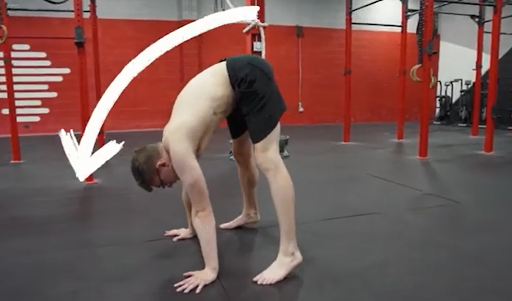
The first key element of the press is a slight forward lean. This shift in your center of gravity initiates the movement. You should engage your core muscles, particularly the lower abdominals, to bring your legs closer to your chest. This action tilts your torso forward.
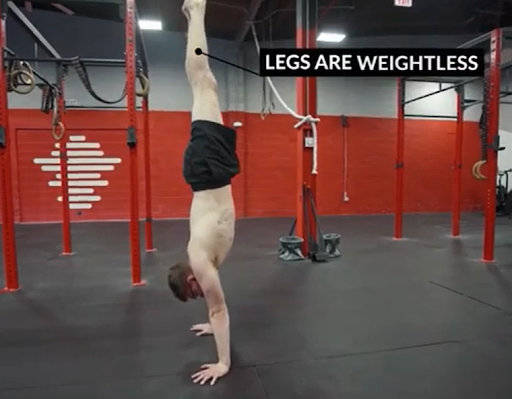
3. ⚡️ Leg Lift

Your legs should rise off the ground as you lean forward. The motion should be slow and controlled, maintaining an even tempo. The legs feel weightless as they are lifted, making engaging your core and hip flexor muscles essential. This action is crucial for maintaining balance and control during the press.
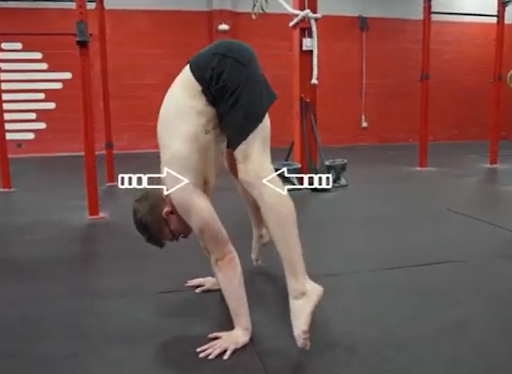
4. ⚡️ Stacking the Body
Throughout the press, the goal is to stack the body vertically over the hands. As you continue to lift your legs, your shoulders should lean slightly forward, just in front of your hands. This forward shoulder position helps maintain balance and prevent falling backward.
5. ⚡️ Precision and Control
Control is paramount in the press to handstand. It’s not about speed but about the precision of movement. The entire sequence should be a gradual and measured process. A common mistake is rushing the press, leading to a lack of control and balance.

6. ⚡️ Reversing the Movement
After successfully reaching the handstand position, reverse control is applied to descend or lower your legs to the ground. Keep your core engaged and your movements controlled to prevent toppling over.
Remember that mastering the press to handstand is gradual, and perfecting your technique and control takes time and patience. It’s essential to prioritize safety and always focus on the quality of your movement rather than rushing to achieve the final position.
Know the common mistakes when doing press to handstand and learn how to fix them. Check out our article on Press to Handstand Mistakes Common Errors and how to Correct Them
Check out this helpful YouTube video🎥 on How to Press to Handstand
🏆Benefits of Training a Press to Handstand
Training to achieve a press to handstand offers many physical and mental benefits. Here are some key advantages to working on this impressive skill:
🥇Strength Development
Training for the press to handstand targets various muscle groups, including the shoulders, core, hip flexors, and more. As you work on this skill, you’ll gradually build strength in these areas, enhancing your overall physical prowess.
🥇Improved Flexibility
Achieving a press to handstand often requires high flexibility, particularly in the hamstrings and hip flexors. Consistent training can improve flexibility, making it easier to perform various movements and reducing the risk of injury.
🥇Core Stability
Maintaining balance during a press to handstand relies heavily on core strength and stability. Regular practice enhances your ability to engage and control your core muscles, benefiting other aspects of your fitness and daily life.
🥇Enhanced Body Awareness
The press to handstand demands a heightened sense of body awareness and proprioception. As you work on this skill, you become more attuned to your body’s positioning and movements, improving overall coordination.
🥇Balance and Coordination
Perfecting the press to handstand hones your balance and coordination. These skills can extend beyond your handstand practice and enhance your performance in other physical activities.
Interested in building your upper body and core strength? Check out our push-up 📜articles:
- 📍 How to Do Perfect Push-up: The Ultimate Guide for Maximum Gains and Explosive Strength
- 📍 The Power of Push-Ups: Unveiling 4 Benefits You Need to Know
🧐Frequently Asked Questions:
🔎How can I start learning to press to a handstand if I’m a beginner with no prior gymnastics or yoga experience?
Starting as a beginner, it’s essential to develop both your upper body and core strength. Begin with exercises like pike push-ups, hollow body holds, and leg lifts to build the necessary strength. Additionally, practice your handstand against a wall to get comfortable with being upside down.
🔎What are the key strength and flexibility prerequisites for mastering the press to handstand?
Core strength, shoulder strength, and hamstring flexibility are crucial. You should strengthen your abs, shoulders, and lower back while improving hamstring flexibility through stretches and exercises like pike stretches and forward bends.
🔎Can you recommend specific exercises and drills to develop the required strength and flexibility for a press to handstand?
Exercises like planks, pike compression drills, and L-sits can help build strength. For flexibility, include exercises like pike stretches, pancake stretches, and yoga poses like downward dog and forward folds.
🔎How can I overcome the fear or anxiety of being upside down during a handstand press?
Fear of being upside down is common. To overcome it, practice against a wall or with a spotter. Gradually increase your comfort level by spending more time in a partial handstand position. Breathing deeply and focusing on your form can also help reduce anxiety.
🔎Are there specific exercises or stretches to prevent and manage wrist and shoulder injuries in handstand training?
Yes, wrist mobility and strengthening exercises can help prevent wrist injuries. Additionally, shoulder stability exercises, like scapular push-ups and shoulder rotations, can protect your shoulders. Incorporating regular wrist and shoulder stretches into your warm-up and cool-down routines can also be beneficial.
🔥Conclusion
💯Mastering the press to handstand is a testament to your strength, flexibility, and control. It requires time, effort, and determination, but the journey is immensely rewarding. So, start your training, follow the progressions, and work towards achieving the press to handstand, a symbol of true athleticism and control.
Begin your life-changing journey with calisthenics. Take our free assessment now to receive a personalized training plan from The Movement Athlete, experts in at-home bodyweight strength training.