Build Strong and Healthy Shoulders 💪
The rear delts are often neglected in our training, but they are essential for building strong and healthy shoulders.
There are a lot of calisthenics exercises that work the rear deltoids such as inverted rows, pike push-ups, and handstands, but some are better at targeting this neglected body part than others. In this blog post, we’ll take a look at the:
- ✅ Anatomy of the shoulders
- ✅ The function of the rear delts
- ✅ 5 best calisthenics exercises for rear delts
- ✅ Potential weighted counterparts
- ✅ & Frequently Asked Questions
⚡️What are the rear delts?
The deltoids or the shoulder muscle are made up of three heads- the anterior (front) delts, posterior (rear) delts, and the lateral or middle delts. The rear delts attach at the back of the shoulder blade and help to move the arm backward.
While all three heads of the deltoid muscle are important for creating round, strong shoulders, many people neglect their rear delts and tend to focus on the front and lateral heads more. This can lead to an imbalance in your muscles and can make you more susceptible to injuries.
The primary function of the rear delt is shoulder horizontal abduction, meaning moving your arm away from your body in a horizontal plane.
✨Functions of the rear deltoids
Each of the three heads of the deltoids works in unison to move the shoulders and the arm in different directions. In addition, each head has its own primary function of movement. For the rear delts, it’s for Horizontal abduction – moving your arm away from your body in a horizontal plane.
Furthermore, the rear deltoids work together with the other two heads to perform the following:
- 🤜Abduction – Lifting your arm to the side
- 🤜Shoulder extension – Moving your arms backward
- 🤜Shoulder external rotation – Like when you’re gesturing ” I don’t know”
- 🤜Protect & stabilize your shoulder joints – For real-world strength and pain-free shoulders
While training your rear deltoids offers an excellent boost in performance, reduced risks of injuries, and better physique, this also translates to better general shoulder health and better daily shoulder performance.
If your rear delts are trained well along with the rest of your should muscles, then your rotator cuff can stay healthy and injury-free, too.
Lagging rear delts also result in a compensation wherein if done repetitively, your shoulder caves into the “caveman posture”. Add that if you’re working 8+ hours a day sitting in front of your computer, then you’re sure to ruin your posture in no time.
However, training your rear delts can help prevent, and if ever you already have it, revert this posture.
Read here: 📍How to Fix & Prevent Muscle Imbalance
Although not as visible in front of the mirror compared to the front and side deltoids, the rear delts are equally important
🔥Best 5 calisthenics exercises for rear delts
The best shoulder exercises including their different variations do work the rear delts. These exercises include handstand push-ups, pike push-ups, inverted rows, and handstand shrugs.
However, these exercises work more of the anterior deltoid which can cause the rear delt to lag. So in conjunction with the top shoulder exercises, you also need to implement these calisthenics exercises for rear delts so you can boost your shoulders’ performance and health.
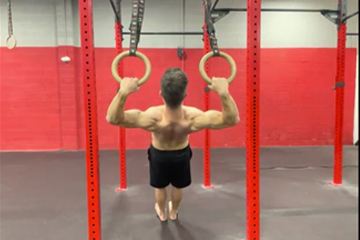
✅Ring face pulls
Stronger and bigger rear delts are possible with ring pace pulls. The movement pattern of this exercise puts emphasis on the rear deltoids and rotator cuff, making it an amazing shoulder exercise. It builds strength & mobility for both performance and general shoulder health.
Why on rings? Although the exercise can be done on a rigid surface, we prefer the ring variation as this offers freedom of movement for your joints so follow your individual anthropometry. Doing so lets you train your rear delts with minimal risk of injuries.
While it can put emphasis on your rear delts, it also targets your posterior chain complex such as your rhomboids, infraspinatus, lats, and lower traps.
⭐️How to perform:
- Set the rings at a height suitable for your skill level.
- Hold the rings around shoulder-width apart.
- Position your body either with a straight body or with bent legs.
- Elbows to the side while forming a 90-degree angle with your arms and shoulders. With this motion, you get your body closer to the anchor point.
- Move your elbows until aligned with your shoulders or past them.
- Pause at the end range for a brief moment.
- Lower down with control.
- Repeat for reps.
☝️Coaching pointers:
- Start conservatively with the height adjustment. No need to rush and go heavy. Light to moderate intensity with moderate to high training volume is optimal. Going heavy is at a higher risk of injury
- Controlled movement
- Use a false grip
- Core engaged
- Always maintain scapula depression
- Fully pinch the shoulder blades together (scapula retraction) as you begin the pulling motion
- Harder = Lower rings, straight body
- Easier = Higher rings, bent legs
✅Ring rear delt flyes
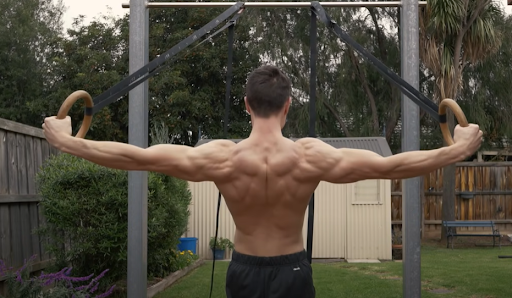
Source: FitnessFAQs, Daniel Vadnal at the Top position of the flyes
Similar to the face pulls, the ring rear delt flyes train the abduction in the horizontal plane. It also takes advantage of the free-moving rings to accommodate our body proportion differences. It also adds convenience to the exercise since you can easily adjust the exercise difficulty and help isolate the rear delts for better growth.
The straight arm technique allows you to minimize the help from your biceps when pulling while the shoulder-level rings at the top position, help you minimize the help from your lats. This exercise also hits your middle trapezius and rhomboid, which are also commonly neglected muscle groups of the posterior chain.
If you don’t have a set of rings, you can still perform a similar movement pattern on a stable surface such as a low bar. However, execution will slightly be more difficult because the bar height will be already set. The fixed bar will also restrict the movement of your elbows and hands which can affect your performance if you have any mobility issues.
Still, we highly recommend opting for a pair of gymnastics rings as it’s one of the best investments you can get for your calisthenics journey.
⭐️How to perform:
- Adjust the rings depending on your skill level.
- Hold the rings shoulder-width apart.
- Position your upper torso straight while your lower body is either also straight or bent.
- Lean back to rely on your grip on the rings to hold your weight.
- This is the starting position.
- Fully retract your scapula.
- Pull your arms apart while maintaining your arms straight and locked out.
- Pause at the maximum top position.
- Lower down with control.
- Repeat for reps.
☝️Coaching pointers:
- Lean backward to place your weight on your arms
- Core engaged
- Arms lockout straight
- Proud chest position
- Controlled movements
- Rings at shoulder height
- Maintain full shoulder retraction and depression
- Harder = Lower rings, straight body
- Easier = Higher rings, bent legs
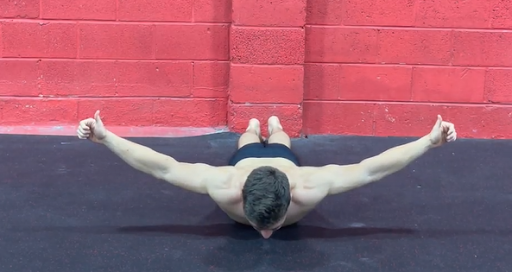
✅T’s
The T-prone raise has actually the same movement pattern as the ring rear delt fly. As a result, this exercise isolates the rear delts while also hitting a bit of your middle traps and rhomboid in the process.
You can easily implement this in your workout since you don’t need any equipment at all. The main issue with this exercise is if you already build a good amount of rear delt strength, the exercise will require a ton of reps before getting much from it afterward. Unlike the 2 exercises above they will provide a lifetime of rear delt challenge due to their scalability.
To address this, you can hold light weights (start with a water bottle) when progressing with the exercise. HOWEVER, stay conservative with your implementation of weights because this isolation work can easily injure you if rushed.
Follow the steps and techniques to ensure you’re hitting the right muscles from the exercise.
⭐️How to perform:
- Begin by lying on the floor with your stomach facing down.
- Tilt your hips backward to create space between your stomach and the floor.
- Place your arm sidewards.
- Lift your arms upward as high as you can.
- Pause at the top position.
- Lower down with control.
- Repeat for reps.
☝️Coaching pointers:
- Core engaged
- Posterior pelvic tilt
- Arms straight
- Thumbs facing the sky
- Head down on the floor
- Fully retract your scapula every rep
- Shoulders depressed
- Easier = Limit range of motion
- Harder = Adding pauses a the top, adding light weights
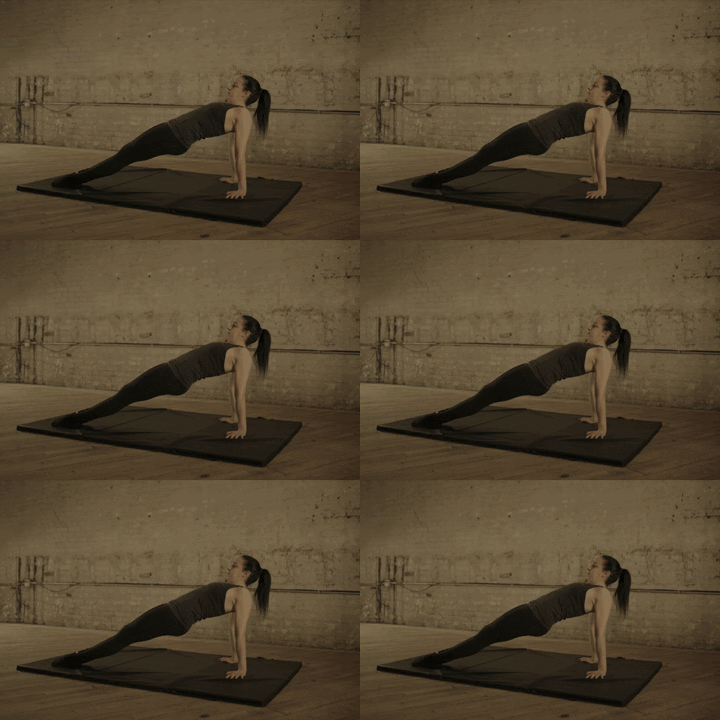
✅Advanced table / Back plank
If you’re familiar with the planche lean which puts emphasis on the anterior delts, the advanced table is the opposite of that. It’s basically flipping over the planche lean to form the advance table position. Because of the reversed position, it then hits the posterior delts which we want to focus on for this article.
This exercise trains the shoulder extension movement and loads it up with the body weight. It does require a good amount of strength, but usually, mobility is the limiting factor for most who are unable to sustain the position.
As you get stronger with this exercise, you will build your rear delt as well as your shoulder mobility, and develop good core strength. The more you lean forward, the more weight you put into your rear delts that can stimulate growth.
⭐️How to perform:
- To begin, sit up straight with your legs out straight in front of you and arms extended behind you.
- Palms on the floors with fingers facing your butt.
- Contract glutes, hamstrings, and abdominals while lifting hips off the floor towards the ceiling.
- Push strong through your arms.
- Your body should be a straight line from your heels to your ears.
- Lean forward to place the most weight you can on your arms that you can handle.
- Hold the position for a specified time, then lower back to a seated position.
- Repeat.
☝️Coaching pointers:
- Lockout arms
- Retracted and depressed scapula
- Engaged core
- Posterior pelvic tilt
- Make the exercise easier by bending your knees instead of extending your legs
- Start by “pulsing” into the movement rather than holding the advanced table position at the beginning
- Push your hips upward into an extension
- Easier = bent knees, slight lean
- Harder = elevated legs, deep lean, single-leg variation
✅Rear delt press
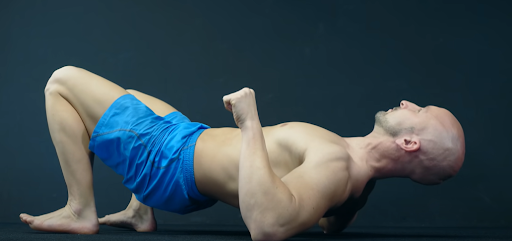
Source: Calimove
If you have noticed a pattern, most of the exercises on the list follow a similar arm position apart from the advanced table hold. The rear delt press is quite similar to the rest of the exercises but flips the body position to perform a push to activate the rear delts. While you also work for your other posterior muscle groups, the rear delt press is one of the best bodyweight exercises to target your rear delts.
While it seems like a doable exercise, once you get into position, you’ll immediately feel the challenge. To regress, you can start by lying flat on the floor and then retract your shoulders per repetition even if you can’t raise your whole body off the floor.
⭐️How to perform:
- Begin by lying on the floor with your back flat on the ground.
- Bend your knees so that your feet are close to your glutes.
- Put your elbows by your side but just below shoulder level.
- Drive your heels and elbows to the ground to raise your body off the floor.
- A brief pause at the top position.
- Lower down with control.
- Repeat for reps.
☝️Coaching pointers:
- Fully retract and depress your scapula to engage your rear delts
- Core engaged
- Posterior pelvic tilt
- If you can’t lift your body, begin the same attempt and motion with your body on the floor
🧐Frequently Asked Questions
🔎How do I implement this into my training?
These exercises are isolation work, so it’s best to add them in the later part of your training once you’re done with your compound exercises such as the pull-ups, rows, push-ups, & dips. You don’t want your rear delts to be exhausted too soon when they’re still going to perform heavier exercises on the compound movements.
You can choose one exercise among the 5 and use a progression that suits your skill level. We highly recommend opting for light to moderate intensity only with 3 – 4 sets of 8 – 15 reps. You don’t want to go heavy with these exercises.
🔎How can I build my rear deltoids with calisthenics?
You build bigger rear delts just like how you build your other muscle groups: by satisfying the three elements of muscle hypertrophy.
- 📍Progressive training – Using these exercises above
- Proper nutrition – Eating at a slight caloric surplus with high protein intake
- & Good recovery – By sleeping well & managing your stress levels
You don’t need to put extra emphasis on your rear deltoids. Just do your regular progressive calisthenics focusing on the fundamentals while implementing at least one rear deltoid exercise from time to time to prevent lagging.
Read more on muscle building with calisthenics here: 📍How to Build Muscle Mass with Bodyweight Only
🔎Is a rear deltoid exercise a shoulder exercise?
Yes. The rear delts make 1/3 of your shoulder. Keep in mind that even if you’re working n your rear delts, you might also hit the other deltoids as well, but not to the same degree.
In a 2020 study on the deltoid activation from different shoulder exercises, you will notice that the whole shoulder complex usually works together but with varying contributions to the movement. In fact, other exercises such as pull-ups and dips also work the shoulder complex to a high degree.
🔎Is using weights better than bodyweight than building the rear deltoids?
Each has its own pros and cons. To keep it short, weight lifting offers a straightforward approach to building up the rear delts. You just have to perform movement patterns that hit the muscles, then gradually load up through weights. The risk, however, is overdoing it. It’s easy to overestimate your skill which can lead to a shoulder injury.
Bodyweight training requires progressions or variations to progress. If you can’t do the exercise, then you just have to move to an easier progression, but it’s not as straightforward s adding weights.
For us, choose what you enjoy and what works for you. But both approaches should equally provide you value depending on how you implement them into your routine.
More on the pros & cons of each approach here: 📍Calisthenics vs Weightlifting
🔎What are the weighted counterparts?
Since we already provided the best 5 CALISTHENICS exercises for rear delts, we’ll also briefly share with you the weighted counterparts that we like.
- Barbel high rows
- Dumbbell incline rows
- Face pulls on machines
- Rear delt cable pull
- Seated rear lateral raises
These exercises provided greater rear delt activation while minimizing assistance from other muscle groups. The caveat is that you need to have access to equipment to take advantage of these exercises.
🔎Do shrugs hit the rear delts?
We did not include the shrugs on the list because it’s more of a trapezius heavy exercise. While it does work the whole deltoid, your traps will definitely get exhausted first before you get enough rear deltoid stimulation.
If you like to develop stronger handstands and target your traps, then shrugs are a good option. But if you want to use this exercise to develop your rear delts, it’s better to choose from the best calisthenics exercises for rear delts above or their weightlifting counterparts.
📌Takeaway
Never forget to train your rear delts!
Rear delts are best trained with calisthenics by using a full range of motion and enough time under tension with the correct technique. You can also use weights to train them, but it’s best to do so with caution as the risk for injury is higher.
While you don’t need to put extra emphasis on your rear delts, never forget about them. As we always say, balance is key. The best way to progress in calisthenics and avoid injury is by training all your muscle groups equally – including the rear delts.
If you to build stronger and healthier shoulders, then mobility should also be a crucial part of your training regimen.
GET YOUR FREE SHOULDER-MOBILITY COURSE HERE! 💪

