How well-prepared is your core for a handstand? The answer to this question holds the key to mastering the art of 📍handstands.
👊Despite being deceptively simple in appearance, handstands demand a strong and well-conditioned core to execute them with grace, balance, and control. Your 📍core is the central support pillar, enabling you to defy gravity and maintain that seemingly impossible balance upside down.
In this article, you will learn the essential elements of core preparation for handstands, helping you embark on a journey to perfect this challenging skill.
Core Strength💪 and Handstands🤸
Picture yourself inverted, suspended mid-air, with no sense of up or down. In this disorienting state, your core muscles become your compass, guiding you through the challenging world of handstands.
The importance of core training for handstands cannot be overstated. According to a study, strength plays a significant role in maintaining a handstand and other static positions. Without a strong core, maintaining balance and control is a nearly impossible task.
🔎Why is core training essential for handstands?
Well, when you’re upside down, it’s easy to lose your sense of direction. Left becomes right, up becomes down, and without proper core engagement, chaos ensues.
In handstand training, you need to be well-prepared. Your 📍core muscles will keep you balanced, stable, and safe during your handstand practice.
If you attempt a handstand with a weak or unengaged core, your handstand will crumble, and you might find yourself crashing to the ground. You don’t want to get hurt, which is why this comprehensive core training program was created.
Check out our previous articles on our handstand mobility mini-series:
- 📍Perfecting the Pose: Handstand Shaping Drills for Mastery
- 📍Wrist Pain During Handstand Poses: Evaluating and Enhancing Wrist Mobility
- 📍Shoulder Mobility: Overhead Shoulder Mobility Drills for Perfecting Your Handstand
✨The Core of Handstand Mastery
Before you dive into the exciting world of handstands, there’s a whole process to go through. Skipping core training and simply attempting handstands without a strong foundation is a recipe for frustration and potential injury. Here’s where the Movement Athlete’s core training program comes into play.
Its core training regimen is meticulously designed to help you build a solid foundation for handstands. Within The Movement Athlete app, you’ll find all the exercises laid out for you, ensuring you’re well-prepared to progress in your handstand journey.
⚡️Body Line and Core Work
Effective core training for handstands begins with understanding body positioning. This groundwork includes exercises like the dead bug, hollow holds, and superman holds. These exercises prepare your body to assume the right shape, engage your core muscles, and control your breathing. Let’s explore them briefly.
✅Exercise 1: Dead Bug
The dead bug exercise is fundamental to your training regimen to achieve a strong and stable core for handstand practice. This exercise focuses on engaging your core muscles while maintaining proper alignment, making it an excellent choice for developing the core strength and control necessary for handstands. Let’s break down the Dead Bug exercise into its key components:
1. Static Dead Bug Position
Begin by lying on your back with your arms extended toward the ceiling, your legs lifted off the ground, and your knees bent at a 90-degree angle.
Press your lower back into the floor, ensuring no gap between your back and the ground. This engages your core muscles and helps protect your spine.
Practice controlled breathing. Inhale deeply through your nose, allowing your abdomen to rise. Exhale through your mouth, maintaining core engagement. This controlled breathing will help you synchronize your breath with your core engagement, which is crucial for handstand stability.
Learn more about proper breathing while performing various exercises with our articles on:
- 📍The Proper Way to Breath during Exercise to Maximize Performance
- 📍Proper way of breathing while doing Ab exercises
- 📍Proper Breathing Techniques for Pull-Ups: Elevate Your Performance!
2. Marching Dead Bug
Once you feel comfortable with the static dead bug position, it’s time to advance to the marching dead bug.
In the same starting position, extend your arms upward toward the ceiling. Lift your legs off the ground, keeping your knees bent at a 90-degree angle.
Ensure your lower back is firmly pressed into the floor to engage your core muscles.
Choose a starting side, for example, your left leg and right arm. Work on extending one leg at a time in this variation and perform a controlled foot tap. You can alternate between legs while synchronizing your breath at regular intervals.
You can also do the opposite arm and opposite leg. Extend your left leg and simultaneously lower your right arm toward the floor. This will create a longer lever, increasing your core muscles’ demand.
The dead bug exercise, particularly the marching dead bug variation, effectively enhances your core strength, stability, and coordination. As this exercise progresses, you’ll build the foundational strength necessary to execute a controlled and balanced handstand.

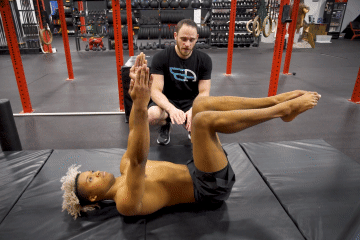
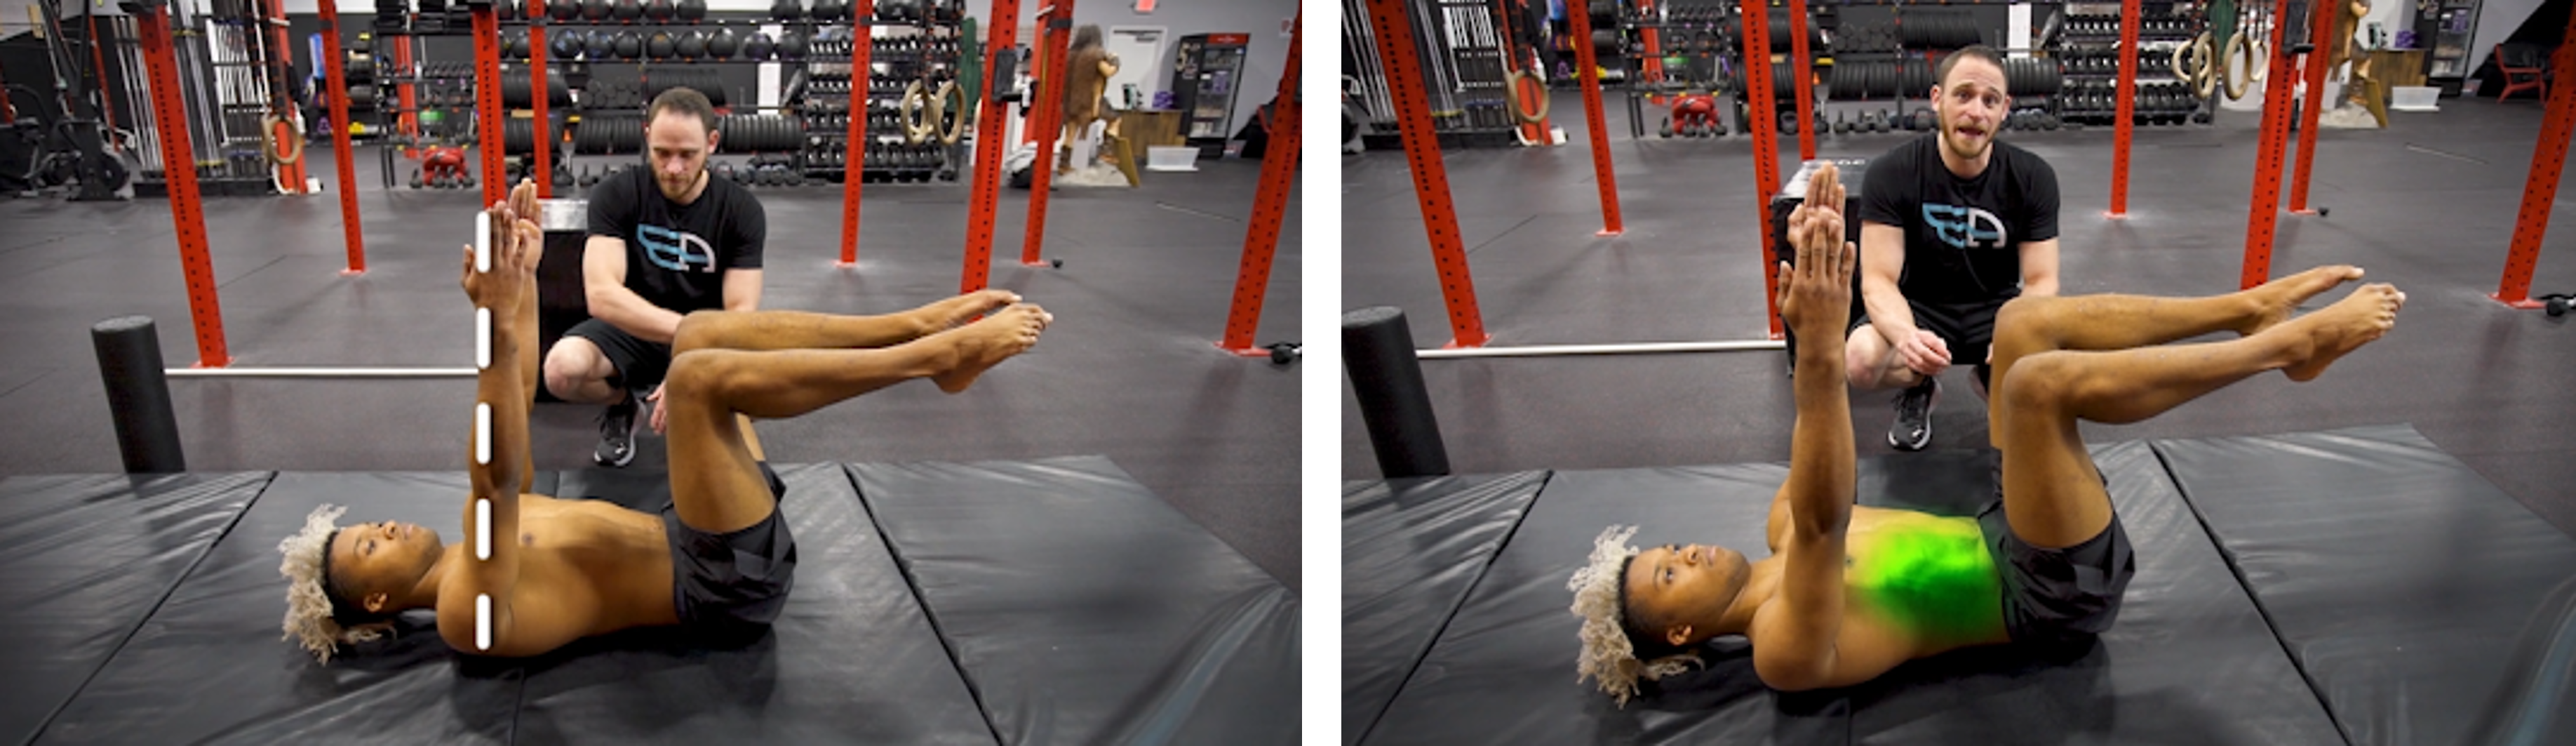
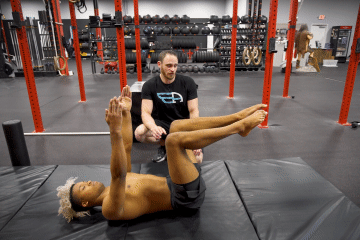
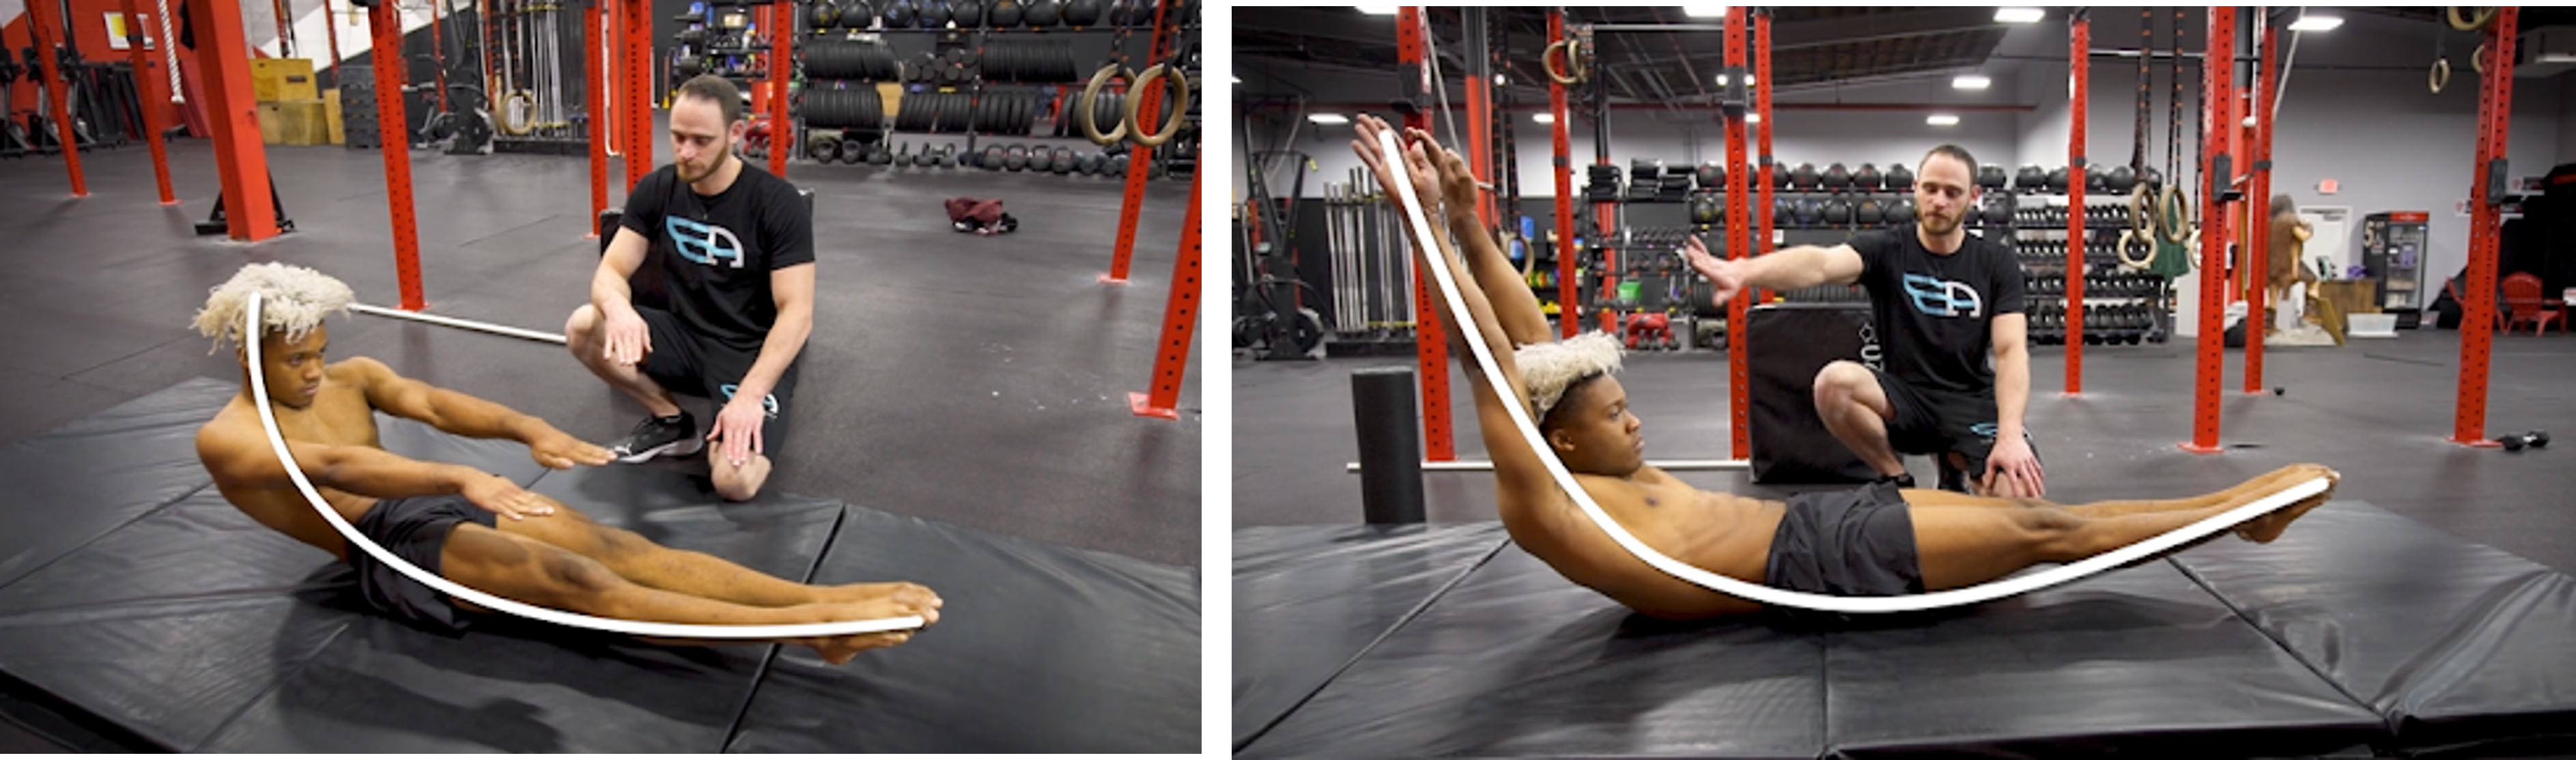
✅Exercise 2: Hollow Holds
The 📍hollow hold exercise is an integral part of core training for handstands, and it plays a significant role in shaping your body while enhancing core strength. They teach you how to maintain proper body alignment and positioning, which is crucial for handstands.
Begin by lying on your back with your arms extended overhead, aligning with your ears. Lift your head, shoulders, and legs slightly off the ground. Your lower back should be in contact with the floor. Create a curve, or “crescent shape,” from your head to your toes. Your body forms a slight hollow, emphasizing core engagement.
Maintain the curve in your body. Your chest should be slightly lifted, and your legs should be raised. Keep your arms and legs straight and in line with your ears.Focus on minimizing any gap between your lower back and the floor.
As you hold this position, pay attention to your breathing. Inhale deeply through your nose, allowing your abdomen to rise. Exhale through your mouth, ensuring your core remains engaged throughout the exercise.
Aim to hold the hollow position for a specific duration, gradually increasing the time as your strength improves.
Incorporating hollow holds into your core training routine helps you develop the body positioning and core strength necessary for handstands. Maintaining this crescent-shaped posture with a strong core is a fundamental skill directly translating to your handstand practice. It teaches proper body shape and balance, making it an essential handstand step.
✅Exercise 3: Superman Hold
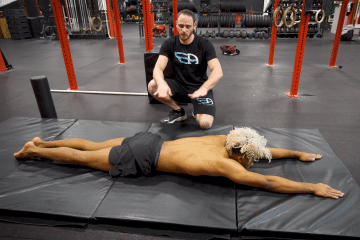
In handstand training, the superman hold is an exercise that helps build core strength and improves the overhead range of motion. This exercise emphasizes maintaining a uniform curve in the body, ultimately contributing to enhanced control and stability during handstands.
Begin by lying face down on the floor with your arms extended straight overhead and your legs fully extended. You’ll begin lifting your arms, chest, and legs off the ground to achieve the uniform curve arch.
Focus on extending your hips, which will cause your legs to rise while keeping your lower back engaged. This arching motion creates a uniform curve, ensuring that the effort isn’t concentrated solely on your lower back but is distributed throughout your entire back and core.
Open your shoulders to raise your arms, accentuating the arch. As you hold the superman position, it’s crucial to maintain a uniform curve from head to toe.
You should be able to find balance and comfort in this position. It’s important to note that, as part of your core training, you should be capable of holding both the hollow and arched positions with stability.
Deviating outside of the neutral position (as you do in the Superman Hold) is important to building overall core strength and control.
You must also bring your body back to a neutral position if you find yourself too far-arched or too far-hollowed. This ability to transition between different positions helps you develop a dynamic core, allowing you to adjust and maintain balance during handstands and other activities.

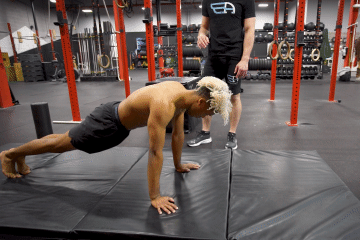
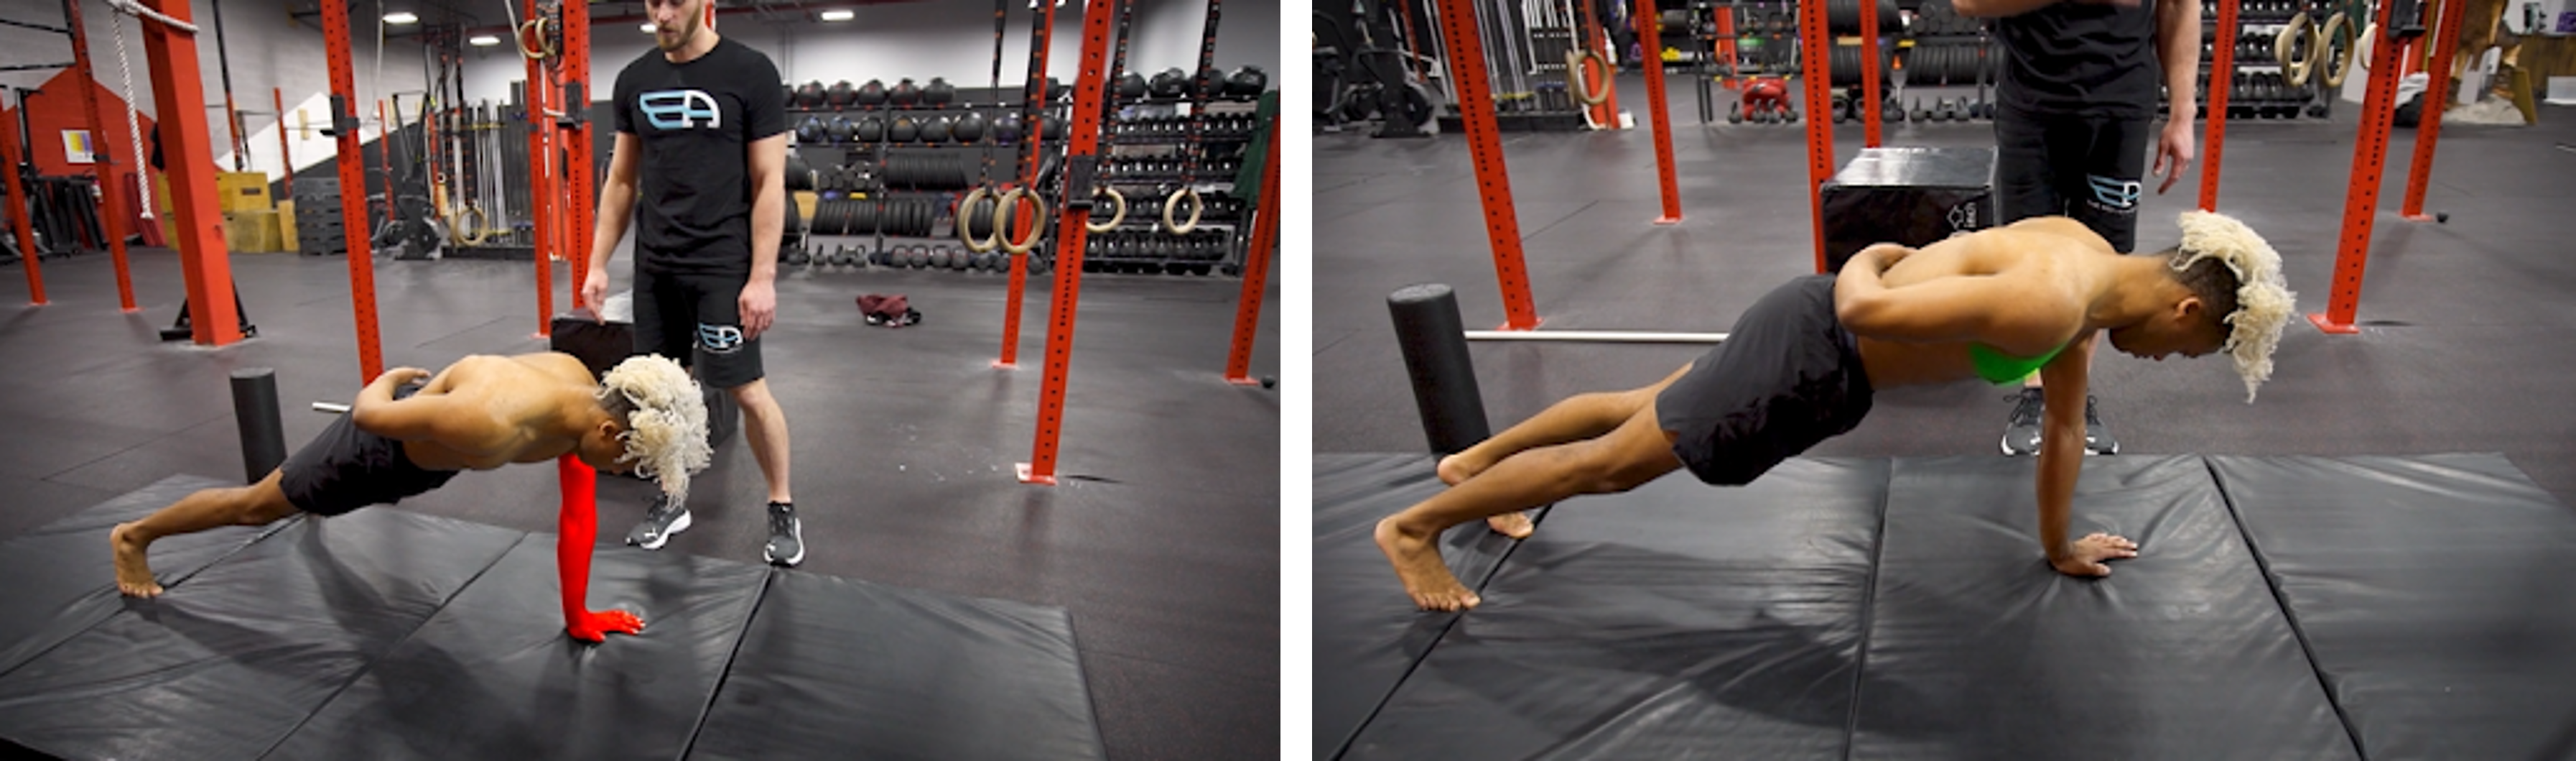
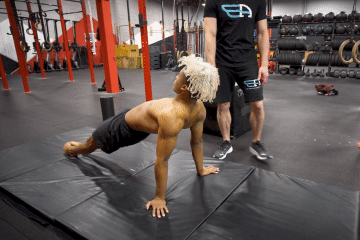
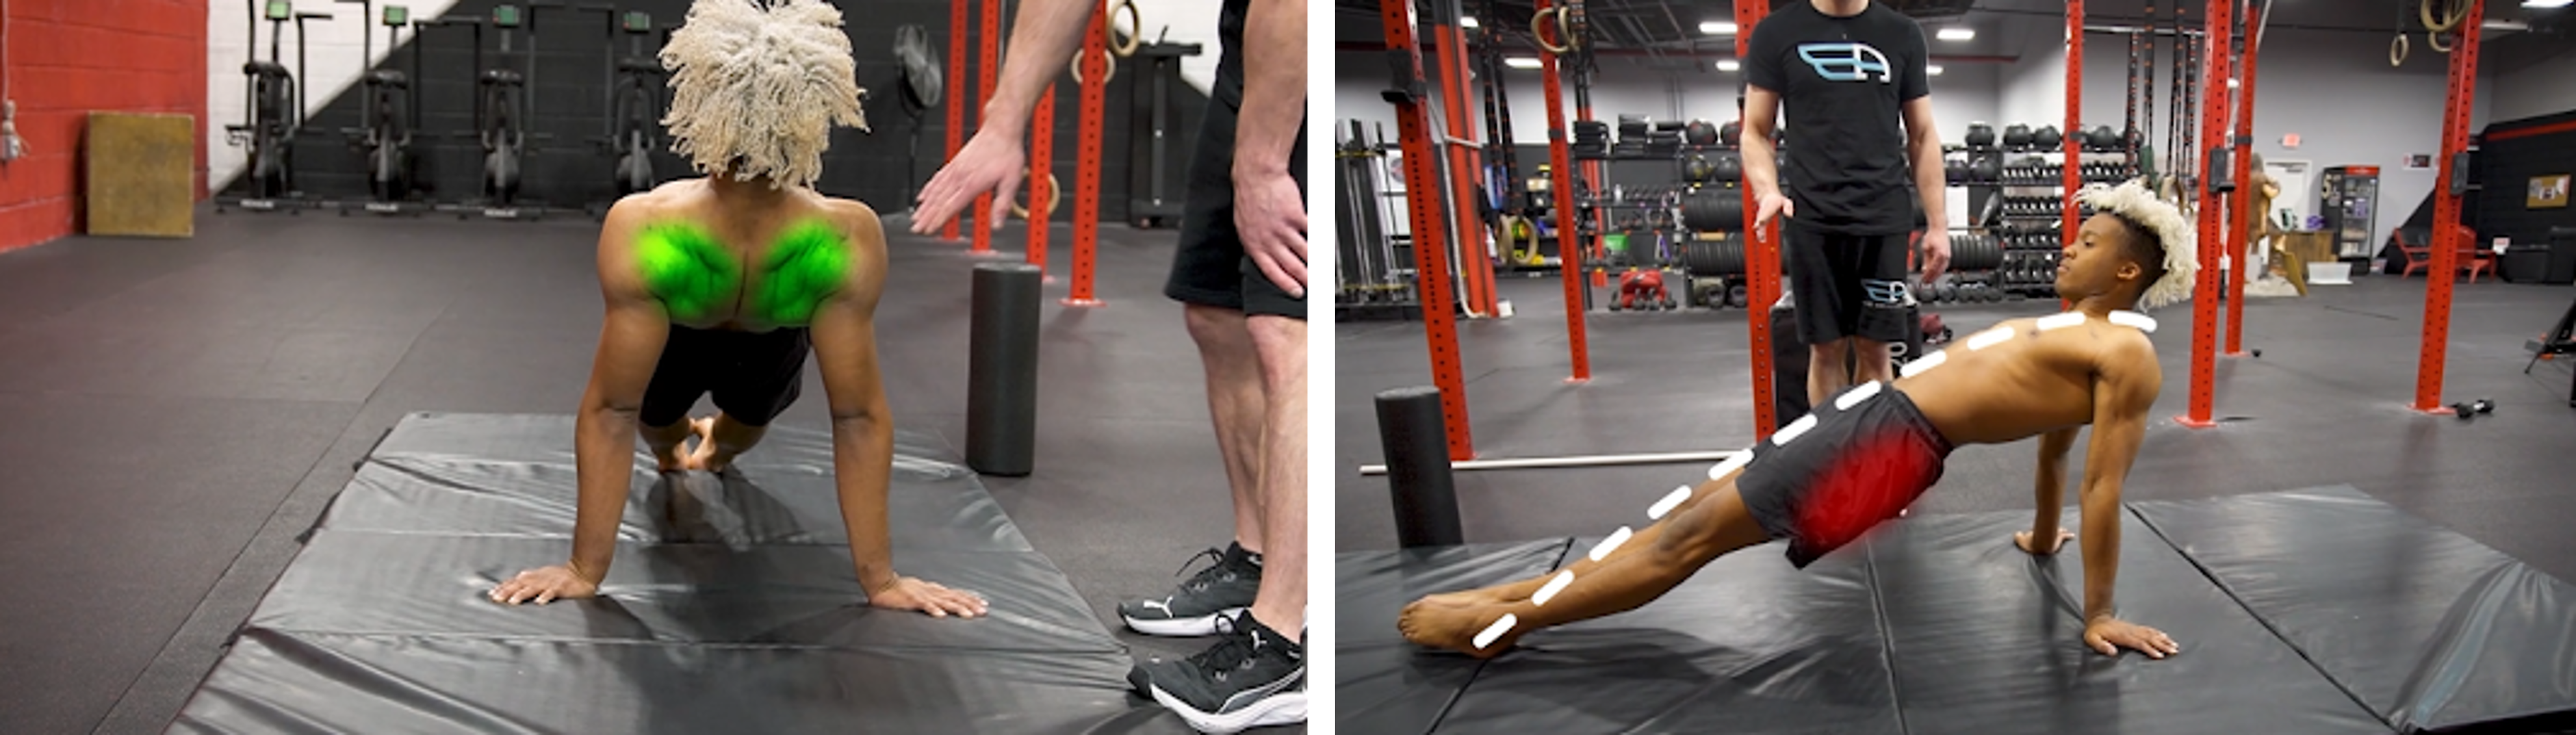
✅Exercise 4: Two Arm Plank
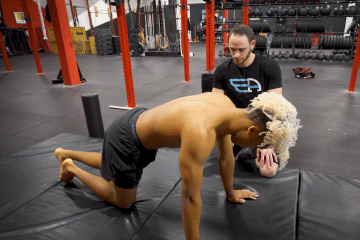
📍Planks are a vital part of core training for handstands. Begin with the two-arm front support plank, gradually increasing the challenge by favoring one side or narrowing your leg stance.
The front support plank, or two-arm plank, is essential for handstand training because it builds core strength and stability.
Begin by assuming a 📍push-up position with your hands shoulder-width apart and directly beneath your shoulders. Your body should form a straight line from your head to your heels, with your legs fully extended.
Maintain a straight and rigid body, with no sagging in the hips or arching in the lower back. Keep your head neutral, aligning it with your spine to avoid straining your neck.
Your arms should be fully extended, and your weight distributed evenly across both hands. Precisely stack your forearms and shoulders on top of your wrists. This alignment helps prepare your wrists, shoulders, and core for the demands of handstands.
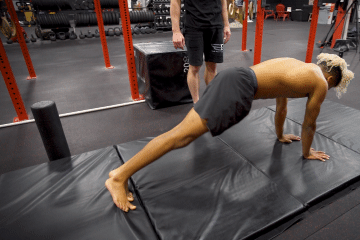
✅Exercise 5: Single Arm Plank
You can also do a one-arm plank into your core training regimen. It is a significant step towards developing outstanding core strength and the balance required for advanced skills like handstands.
The one-arm plank adds a layer of complexity to the standard plank by concentrating all your body weight on a single hand. This challenge enhances your core engagement and balance.
Begin in the traditional plank position, with your hands directly beneath your shoulders. Your body should form a straight line from head to heels, and your legs should be fully extended.
Gradually shift your weight to one hand, favoring one side while raising the other hand slightly off the ground. Distributing your weight evenly across your remaining hand and maintaining straight body alignment is essential.
To intensify the challenge, gradually bring your legs closer together. Aim to align your legs so that they are parallel to the floor, which demands increased balance and core strength. Keep your chest directly above the floor for optimal engagement.
If you find the one-arm plank relatively easy, maintain the narrower leg stance and parallel alignment. This added challenge will help you further improve your balance and core strength, bringing you closer to your handstand goals.
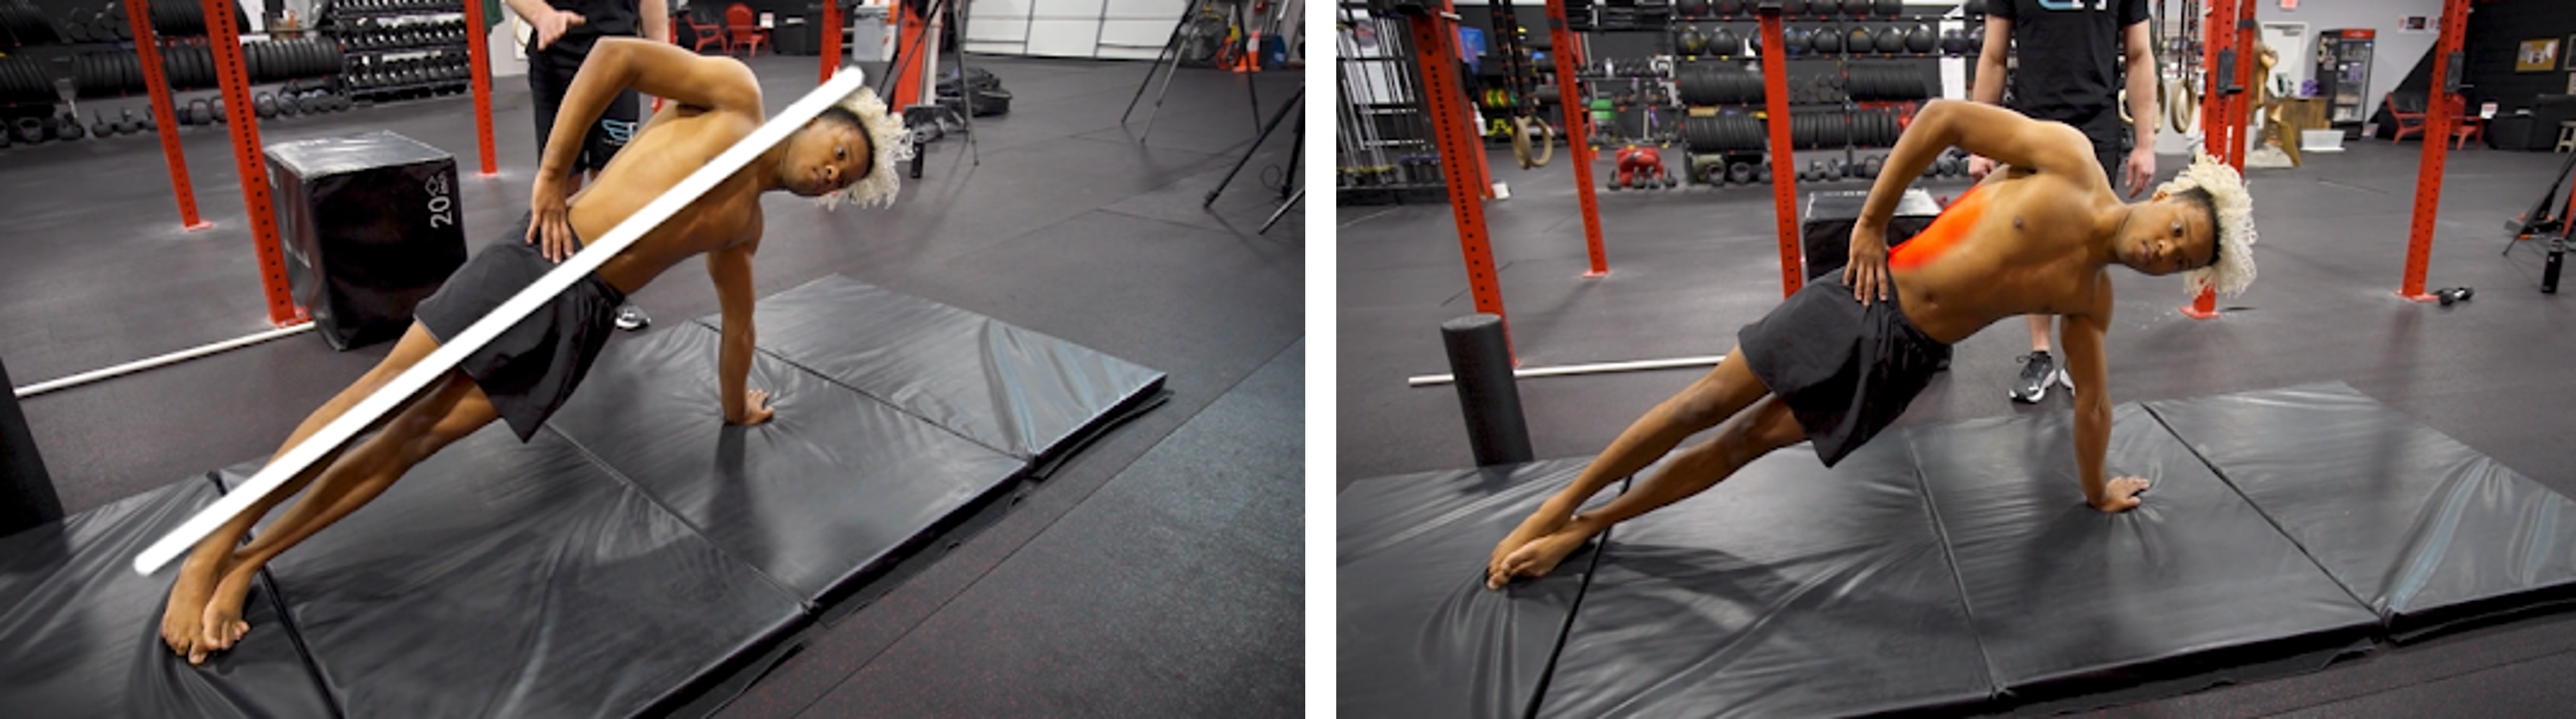
✅Exercise 6: Side Plank
The side plank is a powerful exercise that targets not only your core but also your oblique muscles. Oblique muscles are vital for maintaining balance and stability during various activities, including handstands. It involves balancing your body on one arm while keeping your body straight and stacked.
Begin by lying on your side with your legs extended. Place your lower elbow directly beneath your shoulder. Your body should form a straight line from head to heels.
Push through your lower forearm and lift your hips off the ground. Your body should now be balanced on the lower arm and the side of your bottom foot. Ensure your body remains straight and stacked, with your shoulders, hips, and legs aligned.
To further challenge your core and obliques, you can take the side plank to the next level. While in the side plank position, rotate your upper body by another quarter, effectively transitioning from one side plank to another.
As you become more proficient, you can prolong the duration of your side plank holds and experiment with the quarter-turn transitions. These variations increase the challenge, helping you develop the strength and stability necessary for advanced skills like handstands.
✅Exercise 7: Rear Plank
You can also do the rear plank position, which focuses on strengthening your upper body, particularly the muscles in your scapula and shoulders while engaging your glutes. It’s a valuable addition to your core and strength training routine, as it contributes to overall stability, which is essential for handstand training.
The rear plank is an exercise that involves lifting your body off the ground while sitting and leaning on your arms, creating a slightly tight arch position in your back.
Sit on the floor with your legs extended. Place your hands on the ground behind you, with your fingers pointing toward your feet. Position your hands beneath your shoulders.
Press through your hands and lift your hips off the ground. Your body should form a straight line from your head to your heels. Focus on squeezing your scapula and shoulders together, engaging your upper back muscles.
As you hold the rear plank position, squeeze your glutes. This engagement enhances your hip stability and adds to the overall strength and control of your rear plank.
The rear plank can be adjusted to your level of comfort and challenge. If you prefer, you can transition to a bent-arm position, lowering yourself down to your elbows. This modification may be helpful if you experience wrist pain or discomfort.
To maintain balance and symmetry in your training, you can rotate from the rear plank position into the opposite side plank. This movement engages your obliques and provides a balanced workout for both sides of your body.
Improve your planking skills with the help of our article on 📍The Ultimate Test of Strength: The Copenhagen Plank
And don’t miss the chance to check out the awesome video discussing and demonstrating core exercises tailored for handstand perfection:
🔥Core Muscle Involved in Handstands
When performing a handstand, several core muscles are crucial in maintaining balance, stability, and control. These core muscles include:
1. 🎯 Rectus Abdominis: The rectus abdominis is the front abdominal muscle that flexes the spine. It helps maintain a straight body line during a handstand.
2. 🎯 Obliques: The internal and external obliques are located on the sides of the abdomen. They help with rotation and stability in the handstand and assist in controlling lateral movements.
3. 🎯 Transverse Abdominis: The transverse abdominis is a deep abdominal muscle that acts like a corset, providing stability to the spine and core. It helps maintain a tight, engaged core throughout the handstand.
4. 🎯 Lower Back Muscles: The erector spinae muscles, which run along the spine, support the lower back and help prevent over-arching while in a handstand.
5. 🎯 Hip Flexors: The hip flexor muscles, such as the iliopsoas, are responsible for lifting the legs and maintaining a straight body line in the handstand. They play a crucial role in achieving the upright position.
To perform a successful handstand, it’s essential to engage and strengthen these core muscles to ensure stability, control, and balance while inverted.
🧐Frequently Asked Questions
🔎Why is core strength so crucial for handstands?
Core strength is essential for handstands, as it helps maintain balance and stability while inverted. A strong core allows you to control your body position and prevent over-arching or collapsing during a handstand.
🔎What core exercises are best for handstand preparation?
Effective core exercises for handstand preparation include planks, leg raises, hollow body holds, Russian twists, and V-ups. These exercises help strengthen the necessary core muscles.
🔎How often should I work on core exercises for handstands?
Consistency is key. Aim to incorporate core exercises into your routine 2-4 times a week, depending on your fitness level and goals, while also practicing handstand progressions.
🔎What are common mistakes to avoid when working on core preparation for handstands?
Common mistakes include over-arching or under-arching the back, neglecting proper hand placement, and failing to address shoulder and wrist mobility. Proper form and technique are crucial for injury prevention.
🔎Is it necessary to warm up and cool down when practicing core exercises for handstands?
Yes, warm-up and cool-down routines are essential. A warm-up helps prevent injury by preparing your muscles and joints, while a cool-down aids recovery and reduces post-workout soreness.
💥Conclusion
It’s essential to address any weaknesses or tightness in your body before diving into handstand training.
🙌The journey to handstand mastery is ongoing. You’ll find the mentioned exercises invaluable as you strive to make your handstands straighter, longer-lasting, and pain-free. Your handstand mastery journey never truly ends as you continuously seek to improve your form and technique.
If you’re eager to delve into the world of handstands, don’t forget to explore progression videos for wall handstands and freestanding handstands. The Movement Athlete will guide you on mastering handstands, one step at a time.💯
And if you are just getting started with calisthenics, you can Take a Free Assessment with the Movement Athlete. Get a detailed, free, personalized training plan, including recommendations and workouts you can use immediately.
🏆The Movement Athlete can help you build real-life strength, bullet-proof joints, and gymnast-like body adaptive calisthenics.

