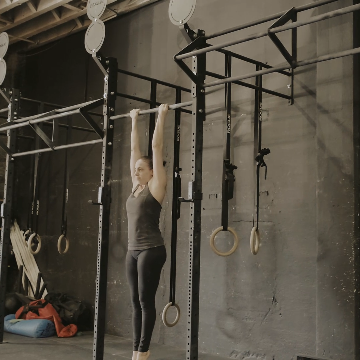
🎉Congratulations! You’ve decided to take the plunge and learn how to get your first pull-up. Good for you!
This article will discuss how to do your first pull-up and some tips for getting started. Pull-ups are an amazing exercise that works out the entire upper body and core. They can be done almost anywhere with minimal equipment – all you need is a bar or tree branch!🙌
How many of us have tried to do our first pull-up only to find it so hard? Don’t worry. Pulling your full body weight isn’t as easy as it seems, even if it’s branded as a beginner exercise!
This post will offer some advice on making them easier and give you the steps for doing your first one.
🔥Your ultimate guide to your first pull-up🔥
Before you dive in we strongly recommend watching these two videos.
- The Perfect Pull-Up Technique Demystified: Get ready to master the art of pull-ups, complete with insider secrets that will make you feel like a pull-up ninja. Trust me; you’ll be swingin’ like Spider-Man in no time.
-
- Pull-Up Blunders: 6 Common Mistakes: We’re going to dissect those funny (and not-so-funny) moments that might be holding you back from pull-up glory. Spoiler alert: you’re not alone in these blunders!
Now that you know the basics, lets dive in.
🎯Correct pull-up progression
Learning and going through the progressions is the key to mastering the pull-ups. Understanding the correct form and getting comfortable with each progression before moving on to the next one is important. The best way to progress in pull-ups is by doing bodyweight exercises that mimic the movement of a pull-up. If you want to learn how to do your first pull-up, you must do its easier variations first.
We’ll cover more on the progressions in the article below,👇 but we’ll also discuss the main ones here so you’ll know what to do with them and how to structure your workout.
Read here: 📍Pull-up Progression: Step-by-Step Guide.
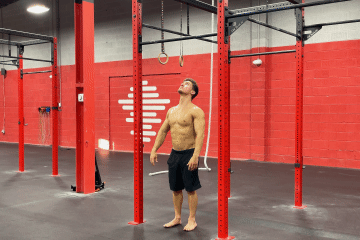
🎯Choosing a beginner-friendly pull-up bar
The starting point is finding good equipment to do a dead hang position most comfortably. Yes, beginners can hang from any sturdy point, such as a tree branch or a house beam. However, you might have some trouble if beginners will try hanging on a thick surface or bar. This requires a stronger grip compared to holding on to narrow bars. A rough bar might also be unsuitable since it can easily cause discomfort, holding you from fully maximizing your training with bars.
List of Pull-up Bars: 📍Best Pull-up Bars in the Market
However, if there’s no access to any form of pull-up bars, you might just have to suck it up and try to use what you have. You can start hanging virtually from anywhere. Just be sure that the surface you’re holding onto is sturdy and won’t break easily.
Read here: 📍How to Do Pull-ups Without a Pull-up Bar
🎯Grip strength
Beginners start with the most basic preparation for the pull-up: improving their grip strength. This is the first step since there’s no point in training for your pull-ups if you can’t even hold your full body weight for at least 30 seconds. Performing one rep of pull-ups will last around 3 seconds, so if you need to perform more reps, you will need to be able to hold onto the bar for longer periods.
✅Dead Hang Exercise
To improve your grip strength, you need to improve your forearm strength. The simplest way is to perform dead hangs or simply hang on to the bar.
Not all beginners can hold this immediately, and that’s understandable. You can begin by starting out on low bars or prepare an elevated surface you can step on to support your body with your legs while holding onto the bar. As you get stronger, you can slowly aim to use less assistance from your legs until you can hold your full body weight. From there, you can gradually build more time.
☝️How to Perform:
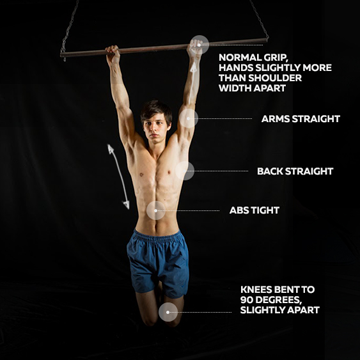
- Hold unto a bar with hands around shoulder-width apart.
- Maintain straight arms.
- Hold unto the bar for the maximum time.
💯Coaching Pointers:
- Keep breathing
- Maintain body tension
- Engage your core
- Overhand grip or your hands wrapping around the bar
- Keep your thumbs gripping around the bar
- Breath
✊Ways to Make Scale:
- Use your legs for assistance by placing it on an elevated surface or putting it on the floor
- Use resistance bands to lessen the load
- Hold on to a low bar and keep your body horizontal
🎯Horizontal Pulling Strength
Horizontal pulling also assists massively in pull-up mastery. Even if you’re already training pull-ups, it’s still ideal to keep doing horizontal pull exercises into your regimen to supplement your pulling strength gains.
Horizontal pulling movements also target more or less the same muscle groups, similar to a pull-up. One of the most basic and best exercises for the job is the bodyweight rows, also known as Austrailian pull-ups or inverted rows. This way, you get to improve the muscles and motion for pull-ups with a much easier intensity.
Rows are perfect for beginners because you can easily scale them for beginners, and the equipment isn’t that demanding. Ideally, you would want to perform them on low bars or low-hanging gymnastic rings. If you don’t have access to them, you can simply perform them on a door frame or a sturdy pole.
✅Bodyweight rows
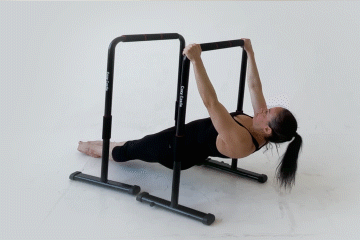
☝️How to Perform:
- Set up a bar between two sturdy structures.
- Lie underneath the bar with your back flat on the ground and arms extended towards the bar.
- Pull yourself up until your chest touches the bar while maintaining straight arms.
- Lower yourself down slowly in a controlled manner until your arms are fully extended again.
💯Coaching Pointers:
- Engage your core
- Posterior pelvic tilt
- Depressed shoulders by pushing them down away from your ears
- Retracted scapula by pinching the shoulder blades together
- Move with a full range of motion in each rep
- Straight body line or bent legs, depending on skill level
✊Ways to Make Scale:
- Begin with a more vertical body position
- Bent legs to lessen the load
- Go lower into a more horizontal body line as you get stronger
- You can also use dumbbells for dumbbell rows as an alternative
- Dumbbell rows could also be an alternative
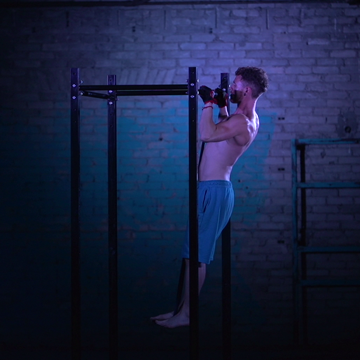
🎯Assisted pull-ups
Assisted pull-ups are the getaway to get you started with the pull-up movement pathway while targeting the muscles needed for the exercise. This is a pull-up variation where you get assistance to lessen the weight required to perform a pull-up.
There are two ways to perform assisted pull-ups. You can either use assistance from bands or assistance from your legs.
✅Band-assisted pull-ups
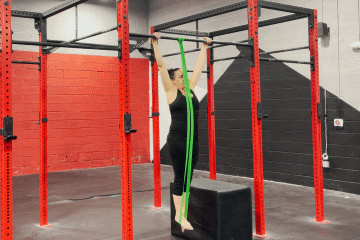
There’s a bit of controversy behind the band-assisted pull-ups. This is because the assistance you get from the band is greatest during the bottom of the hardest part of the pull-up motion and reduces as you go up.
The good thing about this variation is that the amount of assistance is consistent in each ever rep. In contrast to leg-assisted pull-ups, you can easily use more assistance from your legs once you tire.
You can adjust the amount of assistance by changing the band that you’re using. Thicker bands are more for beginners since the thickness and length offer more assistance.
✅Leg-Assisted Pull-ups
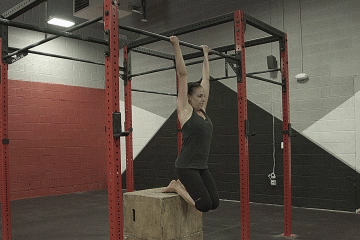
This option is excellent if you don’t want or can’t purchase any form of resistance band. You just have to perform the exercise on low bars so that your feet are touching the floor, or you can use an elevated surface placed underneath your body. The downside of this variation is that you can get inconsistent assistance from each rep, especially when fatigue sets in.
However, it’s also good since you can rep out more per set. You can simply use more assistance when you get tired to push a bit closer to failure.
The variation you’ll choose depends on your available equipment and your preference. Both are excellent for beginners to start learning the pull-up movement pathway and technique.
Take note that both exercises follow the same pull-up form. So keep these in mind.
💯Coaching Pointers
- Core engaged’
- Shoulders depressed and scapula retracted
- Chin over the bar
- Comfortable grip width
- Overhand grip
- Full range of motion from full straight arms to chin over the bar
- Control the entire movement
✅Negative pull-ups
The final step to finally achieving the full pull-up motion is working on the eccentric movement, most commonly known as the negative phase of the pull-up. This refers to when the muscle fibers lengthen as you lower yourself down from the pull-up position. This is a great way to train your muscles to get used to the motion and build strength for you to do full pull-ups with ease.
During the negatives, our muscles can handle more load than we can actually lift. So this is the perfect time to train your muscles so that you can eventually do full pull-ups.
To enter the top position of the pull-up, you can either jump or prepare an elevated surface so you can “walk” your way to the top. We highly recommend opting for the second option as this reduces the risks of injuries by eliminating the sudden force you need to stop.
☝️How to Perform:
- Prop yourself up to the top position of the pull-up by using an elevated surface.
- Slowly lower your body for at least 4 seconds.
- Reset and repeat for reps.
💯Coaching Pointers:
- Slow down the descent for at least 4 seconds
- The slower you go, the harder the exercise
- Keep your shoulders depressed, and scapula retracted
- Core engaged
- Be careful jumping to the top position; the sudden loading might be too much, especially when you’re tired
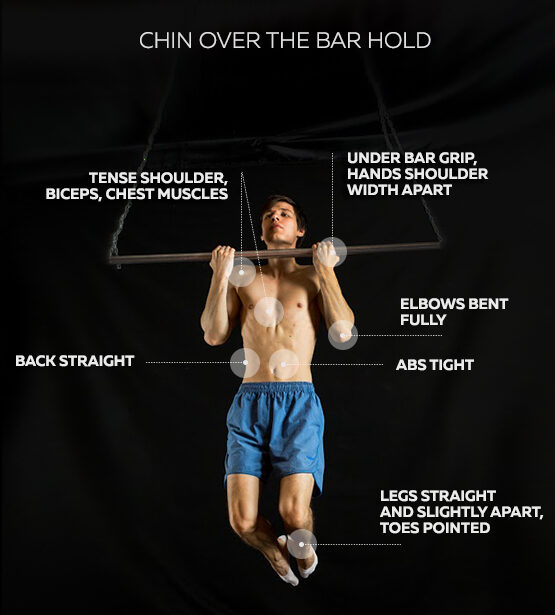
✅Pull-up holds
Once you’ve gotten the negatives down, you’re one step closer to the actual pull-up. However, if you’re still having trouble with the pull-up, you might want to include pull-up holds in the hardest position to master the pull-up.
A pull-up hold is an isometric pull-up variation. This means you just have to hold specific positions in the pull-up. Doing so increases your strength in this specific position, so when you try you’re actual pull-up, you eliminate the weakness that you might have in that position.
You can either hold the top or middle position of the pull-up. The middle position is much harder, but it can assist you in getting to the top position easier when you try the pull-up. The top position hold helps you maintain your chin over the bar in each rep.
The entrance to the pull-up hold is similar to the negative. You can either walk your way to it or jump to the hold.
☝️How to Perform:
- Prop yourself up to the top or middle position of the pull-up by using an elevated surface.
- Hold for a period of time
💯Coaching Pointers:
- Keep your shoulders depressed, and scapula retracted
- Core engaged
- Be careful jumping to the top position, the sudden loading might be too much, especially when you’re tired.
- Breath when holding the position
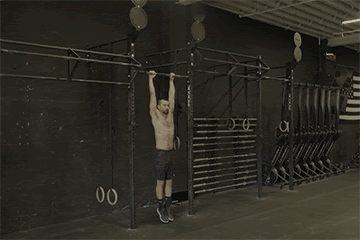
✅Pull-up itself
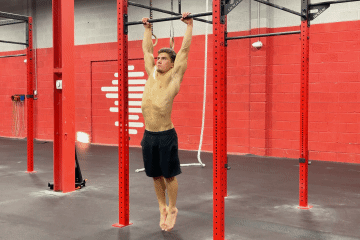
Finally, when you’re working with the pull-ups, it will be more on building the numbers in reps and sets. If you’ve gone through the progressions and done the work, your pull-up technique should already be sound and solid.
Work with at least five reps of pull-ups, then increase until you get to 10 pull-ups per set in 3 sets. Once you get there, you can work with weighted pull-ups or more advanced variations, such as archer and mantle pull-ups.
If you need a refresher course on your pull-up technique, then review it here: 📍How to Do the Perfect Pull-up
🎯Pull-up secrets
☑️Chin-up vs pull-up
Some people interchange the two exercises, but the small difference has quite an impact in terms of targeted muscles, mobility requirements, and difficulty.
The first and main difference is the grip. Chin-up has an underhand grip where your palms face you. On the other hand, pull-up has an overhand grip where your palms are facing away from you.
From the grip comes all the other major differences in the exercise.
☑️Targeted Muscles
Because of the underhand grip, the biceps are more recruited to perform the pull. The lats, the major pulling muscle, are still the primary targeted muscle. However, bicep engagement helps a lot which usually makes the exercise easier. This usually allows beginners to learn chin-ups before being able to perform a pull-up.
However, 2013 provides support that both types of grip can sufficiently stimulate the back muscles even when the biceps are more activated during a chin-up. So it’s still best to switch around the grip every two sessions, which can also be beneficial.
Mobility Requirement
While it seems chin-ups are a better option since you also get to build bigger biceps, chin-ups require a larger range of motion; the chin-up is also riskier in terms of getting elbow pain. This is because that the exercise requires a larger range of supination and overhead shoulder mobility. If insufficient, this cause the dreaded golfer’s elbow that can be a nuisance or worse.
There are other factors as well that causes the golfer’s elbow when performing chin-ups. Don’t be scared of the exercise. Check out the article below to prevent this when training with chin-ups.
Read more here: 📍Why Your Elbows Hurt During Chin-Ups.
😱Which one is for beginners?
Chin-ups are usually the first exercise beginners will unlock. However, performing both grips and alternating them for maximum development while minimizing the risk of injuries is still recommended.
👊Scapula training
One undervalued aspect of pull-ups people miss out on is scapula strength. The scapula is the main connection point between your arms and lats. The weakness here can be one of the biggest limiting factors in pull-ups. Not only that but developing a strong scapula also help develop healthier shoulders in the long run. It’s for better performance and better quality of life.
✅Scapula pulls
You can build scapula strength through pull-ups and rows itself. However, other muscle groups can get fatigued fast, even before you can get your scapula stimulated enough. Adding scapula pulls at the end of your pull-up training will do wonders for this purpose.
Read more on the scapula and why it is important for pull-ups and calisthenics here: 📍What is the Scapula?
☝️How to Perform:
- Begin in a dead hang position on a bar.
- Push your shoulders down away from your ears as much as possible.
- Pull your shoulder blades together so that they are squeezed together.
- Hold for a brief moment.
- Lower down with control.
- Repeat for reps.
💯Coaching Pointers:
- Maintain straight arms
- Controlled movements
- Core engaged
👊Core training
Another limiting factor in pull-ups is the core. A 2017 study showed great core activation, particularly in the rectus abdominis, AKA the abs. Strengthening your core will help you maintain a better position in the pull-up and maximize each rep—a weak core results in power leaks, leading to a weaker pull.
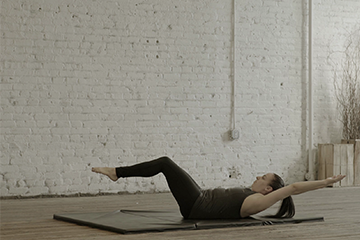
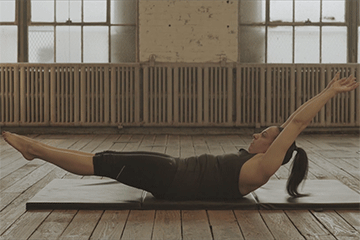
✅Hollow Hold
In this case, you can use many ab exercises to address this concern. However, we would want something that directly translates to pull-ups and works a core function similar to the pull-ups.
Hollow hold or planks are excellent options for this purpose since it also trains anti-extension. This is when your core resists movement and arching, similar when to performing a basic pull-up. Core strength from this exercise also transfers to other exercises, such as dips and push-ups, so having this in your arsenal is great.
☝️How to Perform:
- Begin by lying on the floor.
- Place your arms overhead and legs together.
- Lift your arms off the floor.
- Lift your legs off the floor.
- Hold for time.
💯Coaching Pointers:
- Back flat on the floor
- Chin tucked to the chest
- Upper back and legs off the floor
- Full body tension
- Squeeze your quads together
✊Ways to Make Scale:
- Raise your arms in front of you or by your side and/or bend your knees to make the exercise easier
- Rocking your body back and forth while holding the hollow is more challenge
🤔How long can a Beginner Learn Pull-ups?
Unfortunately, there’s no direct answer to the question. It can take days, weeks, or months. Even experienced lifters who might not have the necessary specific strength (especially in the scapula) might take some time to master the skill.
But yes, you can master the pull-up in a matter of 30 days if you do the work and have a relatively good starting point. If you’re feeling stuck, then check out our list. You might be missing something: 📍Why Can I Do Pull-ups?
💪Pull-up workout
💥Training frequency
We’re going to share with you a training workout for beginners so you can unlock the pull-up. You can perform this workout two to three times per week and allow at least one rest day or train a different muscle group in between pull-up sessions.
💥Pulling exercises
Exercises here will be scaled depending on your skill level.
| Exercise | Reps & Sets | Rest Period |
| Pull-up progression | 3 sets of 6 – 10 reps | 3 min rest |
| Bodyweight Row | 3 sets of 12 – 20 reps | 2 min rest |
| Hollow Hold progression | 3 sets of 30 – 60 secs | 1 min rest |
| Dead hang progression | 2 sets of Failure | 1 min rest |
💥Progressive Overload Protocol
Start with the most challenging exercises, which allow you to perform the lowest number of recommended reps. From there, aim to add at least one more rep in each session in one set.
Once you can comfortably perform the exercise with the upper rep range, you can try to move on to the next progression.
💥General fitness
Body weight and body composition are huge factors in mastering a pull-up. If you have a lot of fat, this unnecessary weight could hinder you from mastering the move. You should focus on optimal body composition to maximize your gains and progress. This includes a mix of strength training with cardio for weight loss and muscle building. So it’s really worth tuning in your nutrition to get the most out of your training.
Read more regarding nutrition here: 📍Bodybuilding Nutritional Guide.
On top of proper nutrition, you should also place special attention to your sleep. Our bodies don’t get stronger during our workouts. In fact, we get weaker during our workouts but soon get stronger if we supplement our nutrition with sleep and recover.
More on recovery here: 📍Best Recovery Tips for Maximum Progress
📌Conclusion
Doing a pull-up is no small feat and takes time to master. With the right technique, practice, and dedication, you can do your first pull-up in just a few weeks. There’s no better feeling than achieving something that seemed impossible at one point! So keep up with your routine and never give up on yourself – you’ll get there in no time.
While this program structure can already help you build up toward your first-ever pull-up, it’s still best to get a personalized and adaptive program that’s tailored skill level. The Movement Athlete app provides exactly that, and you no longer need to think about the programming as it also adjusts for you.
If you want to try this powerful approach to learning your first-ever pull-up and more, head on to our free assessment to begin your journey.

