From helping your handstand to getting started with your l-sit, parallets should be a staple in any beginner’s hand-balancing workout. Let me tell you why:
Typically, Calisthenics tells you to stick with the bare essentials of equipment. Some rings, a pull-up bar and that’s it. But sometimes, having one or two more things at home can make your training easier.
Take hand-balancing, for example. It’s crucial to calisthenics, but it’s one hell of a challenge when you’re just starting out:
You need to get your legs up straight, keep your balance and hold your posture. Even if you’re using a wall or support blocks, your wrists and hands will usually get tired long before the rest of your body is ready to give up.
And that’s where a little piece of equipment like parallets comes in handy. They’re an awesome and affordable hand-balancing tool that allows you to do train longer safely. You can even go to our Calisthenics Academy shop and get them today.
But how can I use parallets?
Parallets can help you in so many different ways, but there isn’t much info about how to actually add them to your training, or how to work out with them. This is why we’ve created a guide. Let’s dive into it!
WHY SHOULD I ADD PARALLETS TO MY TRAINING?
Here are some of the awesome benefits parallets have:
- Prolong your training. You can practice hand-balancing on the ground until you start experiencing wrist fatigue, then switch to using the parallets for the rest of your training session.
- Prevent overuse injury. Hands and wrists aren’t naturally equipped to carry our entire body weight. If you don’t train them properly, they’ll quickly develop overuse injuries that take a lot of time to heal. As a beginner, parallets will help you train properly without putting too much stress onto your hands and wrists.
- Add an extra step to your progressions. Is working on the floor too hard right off the bat? Try training with parallets as an extra step towards working on the ground.
- Practice moves you can’t do on the ground. Can’t do an L-sit on the ground because, well, you just can’t yet? Start on parallets! They take you off the ground enough for you to get started.
6 ways to include parallets in your training
Here are 6 basic moves you can train on your parallets for a wider range of movement, easier progressions while safeguarding your wrists and hands.
Be careful with your wrists’ position! When starting, always keep them in a neutral position to prevent overexertion.
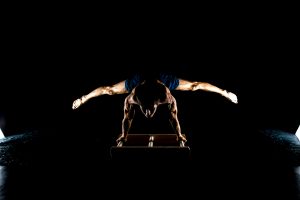
L-Sit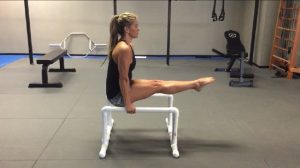
How-to: Keep your hips extended at the same level as your hands. Raise your legs as high as you can, preferably to a 90-degree angle, parallel to the floor. If you can’t, focus on keeping your feet off the ground while holding your back and arms straight.
Photo credit: Crossfit Magnus
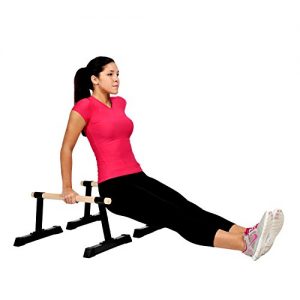
 Tuck-Sit
How-to: Keep your hips extended, slightly in front of your hands, and your back as straight as you can maintain it. Your knees should be tightly held to get her and your head is held in a neutral position.
Photo credit: GMB Fitness
Push-up
How-to: Keep the parallets wide enough that your hands and shoulders are at the same 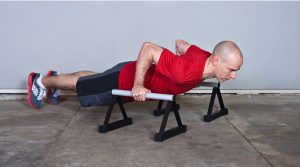 width. Bend your knees if you need to, and lower down with your elbows tucked in. As per calisthenics, lower slowly while exhaling (4s) and push up quickly with a 1s pause each way. Watch out for your hip position and keep them aligned with your body!
Photo credit: Men’s Fitness
 Tuck-Planche
How-to: Push down on your shoulders, round your back and pull your knees together, tight against your chest. Remember, keep your wrists in a neutral position.
Photo credit: Men’s Fitness
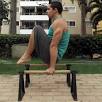
Dips
How-to: You have the option to do L-Sit dips, or follow the image with your feet on the ground. Keep your elbows tucked in and exhale while going down slowly (4s) and inhale coming up.
Photo credit: Desert Cart
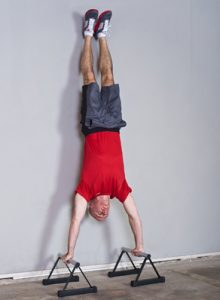 Handstand (against the wall)
How-to: Place your hands on the parallets as close to the wall as you can while staying balanced. Align your head, shoulders and back, bring your stomach in to avoid the “banana” shape. Push your shoulders down and keep your head neutral (don’t overextend your neck). Try letting only your feet touch the wall.
Photo credit: Men’s Fitness
Wanna workout? Include your parallets!
-
Use the best warm-up for you.
If you don’t have one, here’s a good warm-up routine from GMB Fitness:
- Shoulder circles – 5 times each direction
- Up/Down/Right/left neck tilts – 5 times each side
- Arm crossovers – 5 times each side
- Wrist stretches, fingers facing into and away from the knees – 5 times each
- Elbow circles with hands on the ground – 5 times each way
- Scapular shrugs, hands, and knees on the ground – 5-10 times
- Cat/Cow alternation – 5 each pose, hold for 3-5s
- Shake out those shoulders for a few seconds!
-
Dips – 5-12 reps
-
L-sit 5-10s
-
Tuck-sit 5-10s
-
Tuck planche 5-10s
-
Push-up – 5-12 reps
-
Rest 90s-2 minutes
-
Repeat steps 2-7 for no more than 3-4 rounds.
You can end your workout with a handstand (against the wall), holding for 10-45s.
Interested in getting your own set of parallets? Check out our shop at Calisthenics Academy!
Have your own experience with parallets? Share it in the comments or in our Facebook group.

